


WinX DVD Ripper Platinum
Rip a full DVD to MP4 (H.264/HEVC) in 5 mins. Backup DVD collection to hard drive, USB, etc with original quality. GPU Accelerated.
- DVD to MP4
- Support old/new/99-title DVD
- 1:1 copy DVD
- Full GPU acceleration
Learn More


Rip a full DVD to MP4 (H.264/HEVC) in 5 mins. Backup DVD collection to hard drive, USB, etc with original quality. GPU Accelerated.

AI-powered video/image enhancer. Complete toolkit to upscale, stabilize, convert, compress, record, & edit 4K/8K/HDR videos. Cinema-grade quality. Full GPU accelerated.

Manage, backup & transfer videos, music, photos between iPhone iPad and computer in an easier way. Free up space and fast two-way sync.

Find the answers to purchase benefits, license code, refund, etc.

Get help yourself if you have any questions with Digiarty Software.

Tutorials and step-by-step guides to learn how to use our products.

We've been focused on multimedia software solutions, since 2006.

Contact Support TeamHave any questions on purchase or need technical support, please contact us >>


 1. Get Started
Click the button below to download a setup file of WinX DVD Ripper for Mac.
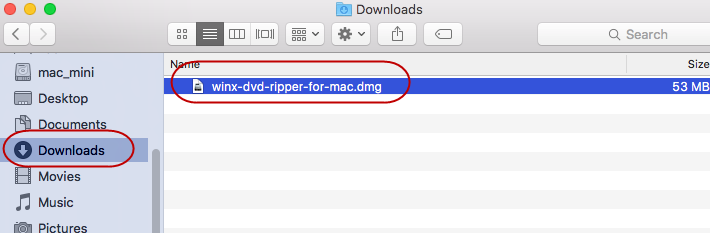
1 Open the "Downloads" folder, double click "winx-dvd-ripper-for-mac.dmg" and install it.
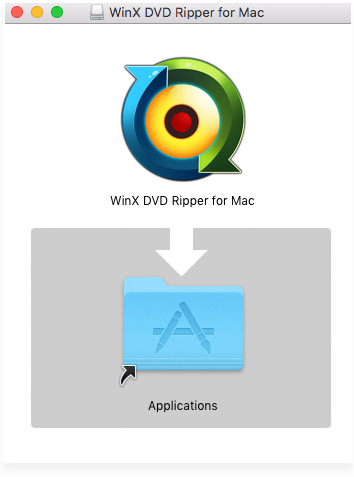
2 Drag and drop WinX DVD Ripper for Mac into the Applications folder.
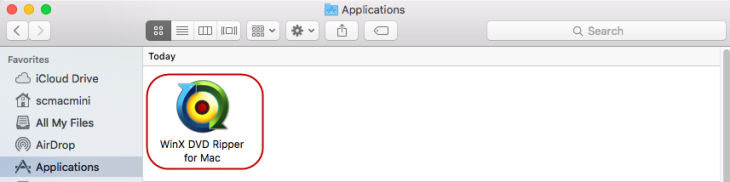
3 After installing, run WinX DVD Ripper for Mac.
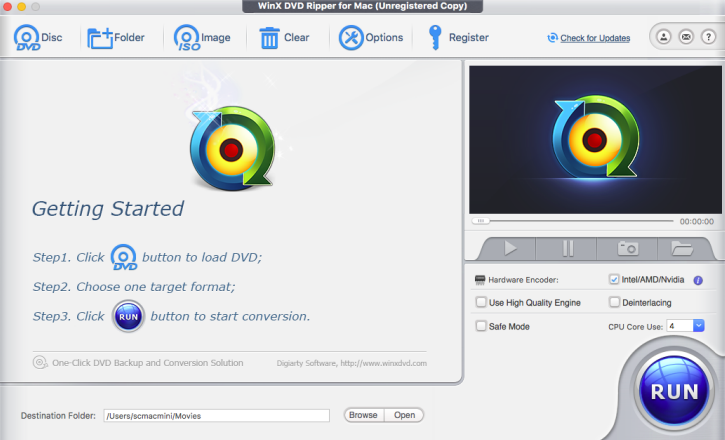
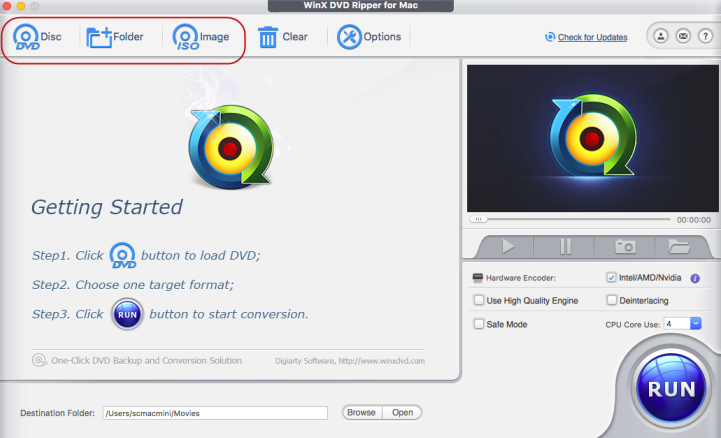
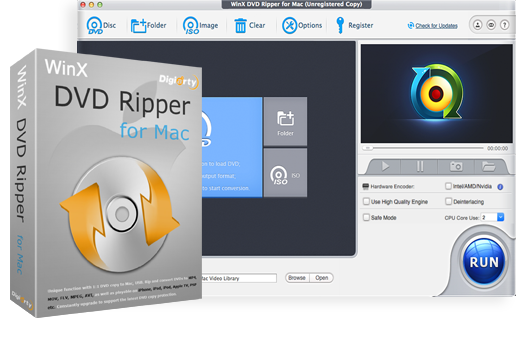
4 Then you will see WinX DVD Ripper for Mac main interface like below:
The trial version has the following limits:
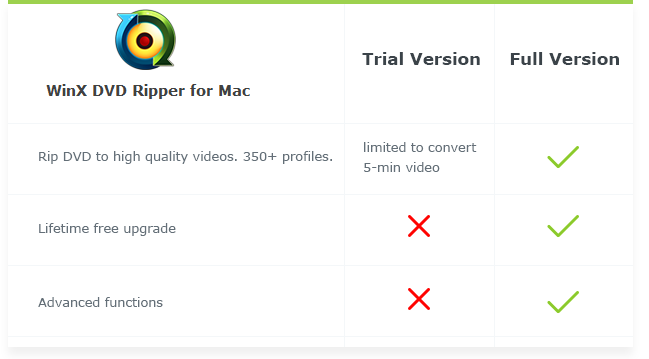
1 Only convert 5-min video for evaluating purpose.
2 No free update to the latest full version.
3 Advanced features are not available.
※ Tips: the full version will remove the 5-min limit, and it guarantees constant free upgrade to support any newly released DVDs, remove the latest DVD copy protections.
Here are two ways to purchase WinX DVD Ripper for Mac full version:
1: Click "Buy Now" button below to purchase from the official buy page.
2: Or from the program's interface: under the"Register", click the "Buy Now" button.
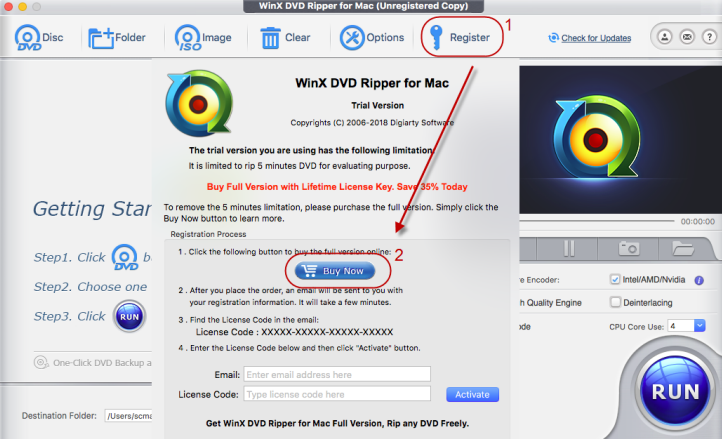
※ After your oder is placed, you will receive product information with license code via email.
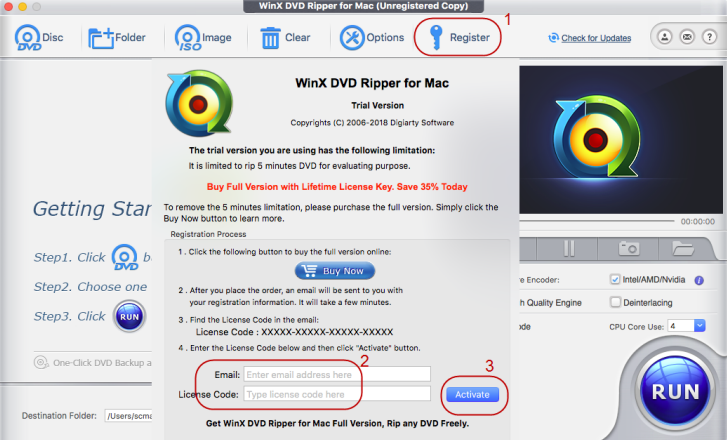
1 Launch WinX DVD Ripper for Mac, click "Register".
2 Enter your registration info with "Email" and "License Code".
※ Email refers to the email address that you used to buy/obtain the software.
3 Click "Activate".
Do please copy and paste the license code into the register box! There is no space before or after the code number.
※ Once you input the license code, all features will be fully available to you.
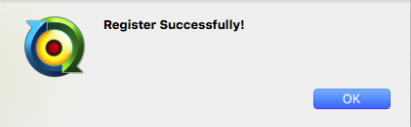
4 Then, you will get a prompt message to show you if the register is successful or not.
 2. Basic Operation
Rip DVD on Mac with 3 steps easily: Load DVD > Select Output Profile > Rip DVD.
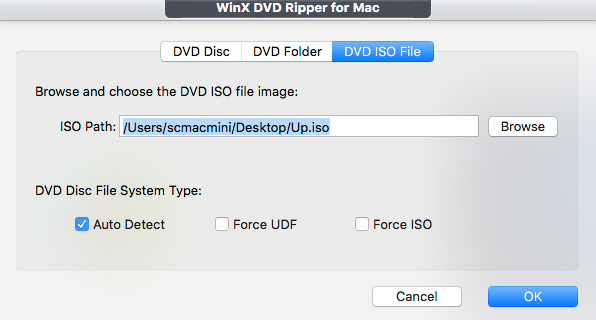
Three ways to load DVD content: "DVD Disc", DVD "Folder" or DVD "ISO Image".
※ You can select different settings to rip more DVDs: "Auto Detect", "Force UDF" or "Force ISO" in the DVD Disc File System Type.
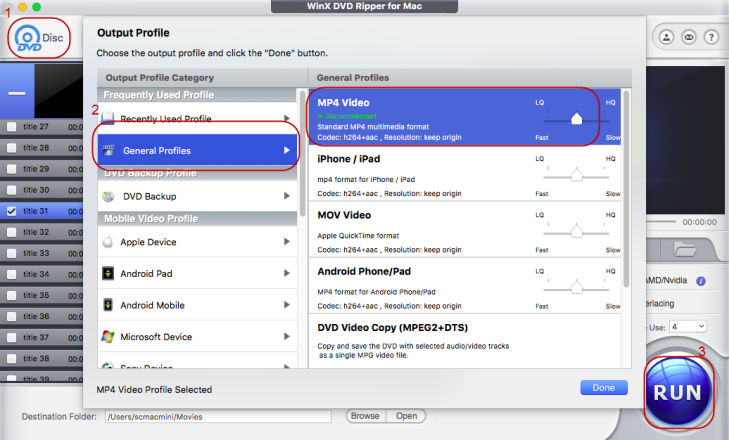
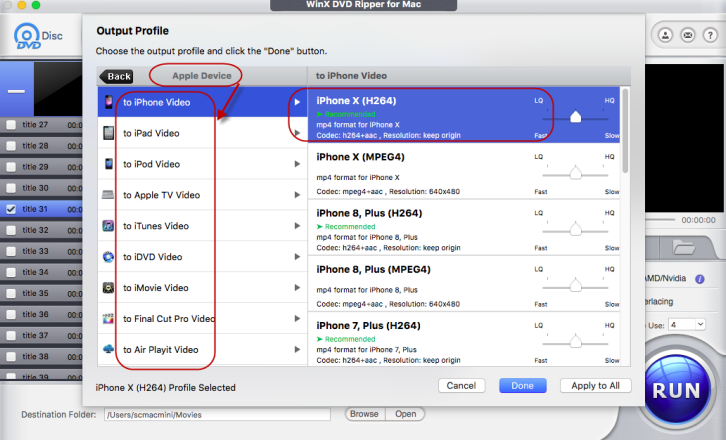
After loading the DVD, the program will show you an "Output Profile" window. Settings for each device are prepared in advance, and you can select desired video and audio format from the list.
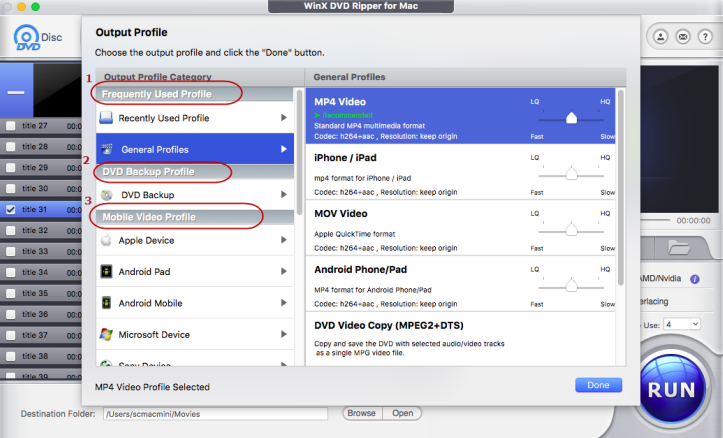
1 "General Profiles"
You'll find output formats that are commonly used right here.
2 "DVD Backup Profile"
It offers you 3 unique DVD backup modes:
Main Title Content Copy; Full Title Copy and Backup full title to MKV.
3 "Mobile Video Profile "
In this part, you can easily find your mobile devices. Rip DVD for playback on iPhone, iPad, Android Pad/Mobile, Microsoft, Sony and other phones.
Scroll down the Output Profile window, you can find more profiles.
4 "Web Video Profile" & "Common Video Profile"
For example, if you want to upload the DVD movie to YouTube, then you can use WinX DVD Ripper for Mac to rip DVD to YouTube MP4, DVD to YouTube MPEG4, DVD to YouTube FLV.
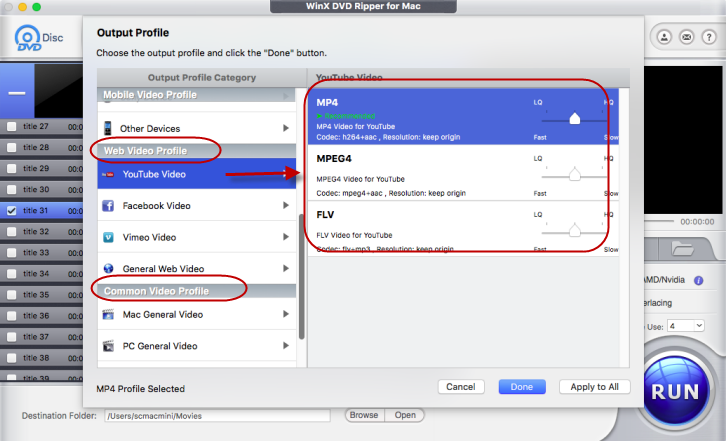
Also, you can rip DVD to Facebook , DVD to Vimeo, etc.
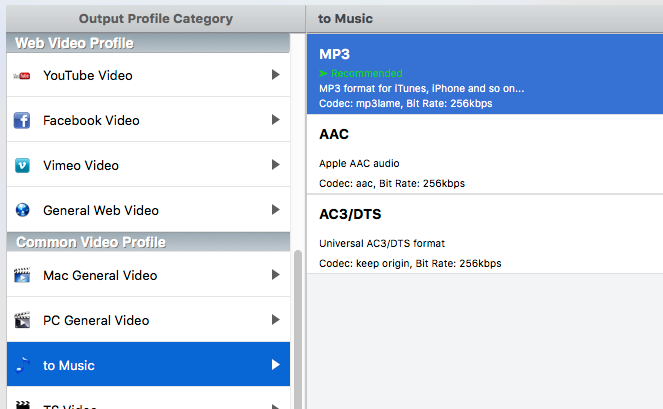
A profile such as "music" is also available. It can output an audio format such as MP3, AAC, AC3.
Simply choose the format you want in the above categories, and click "OK" to enter the interface shown as below.
WinX DVD Ripper for Mac will automatically check the right title that contains the full DVD movie content. You can also digitize/backup the 99-title DVDs, TV series DVDs and workout DVDs.
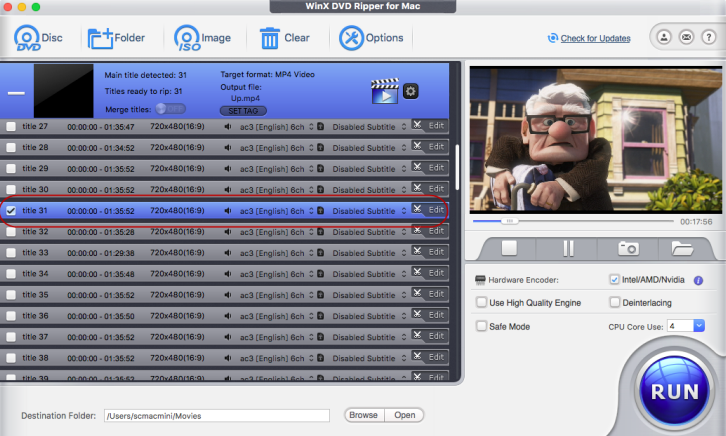
(Optional) In the Destination Folder, you can re-set path to store the converted video.

After that, click "RUN" in the lower-right corner to start the DVD ripping.
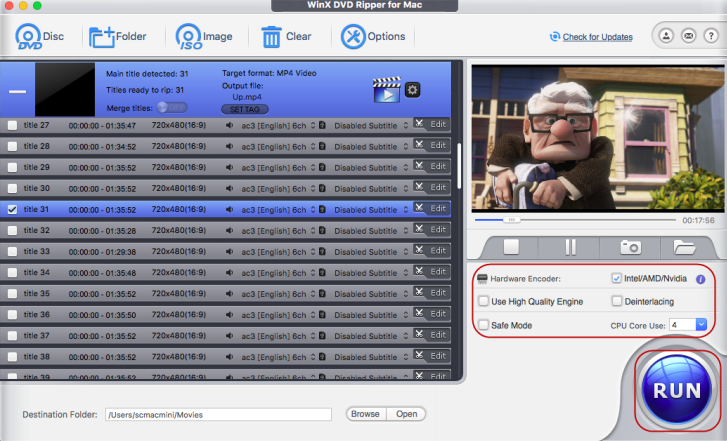
※ Other useful tips:
1 "Hardware Encoder"and the "CPU Core Use" is used to speed up the DVD ripping progress.
2 "Use High Quality Engine" and "Deinterlacing" for better image quality.
3 If the DVD ripping stops unexpectedly, then you can choose "Safe Mode" to try again.
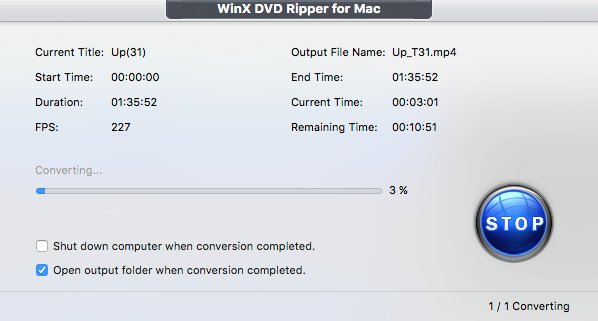
Wait till the DVD ripping finished. Or you can shut down computer when conversion completed.
 3. Settings
Here is the guide on how to manually change the settings.
Like the icon shows, it will remove all the titles in file list window to the initial interface.

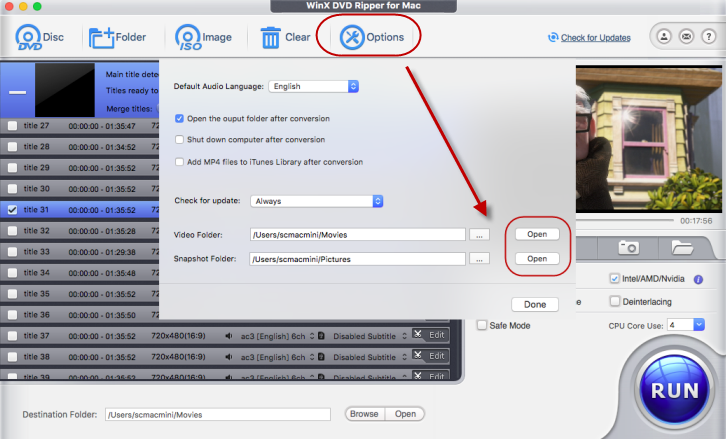
Customize the Default Audio Language, Check for update, Video Folder and the Snapshot Folder.
You can find detailed information about the product in the upper-right corner.

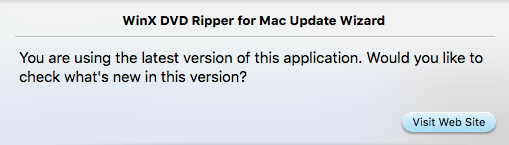
1  See if you are using the latest version or not.
2  Product info like Version No., Release Date, Registration email, License code, etc.
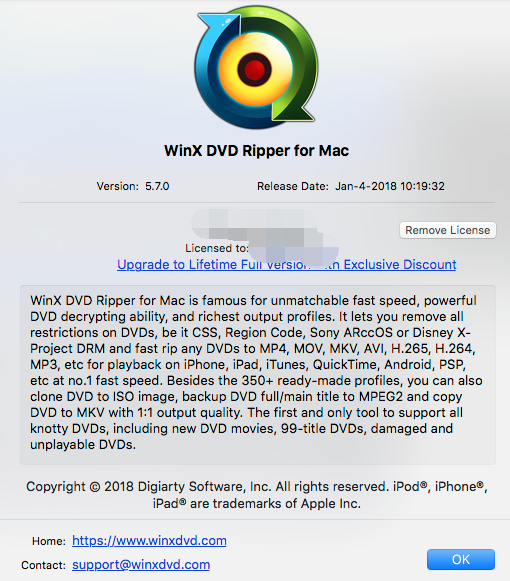
3  : For any product question, you can email the Log File to us that will help us do better analyses on the problem. Or you can directly contact via support@winxdvd.com
4  :Click to visit WinX DVD Ripper for Mac official user guide page.
Learn how to customize output settings here.
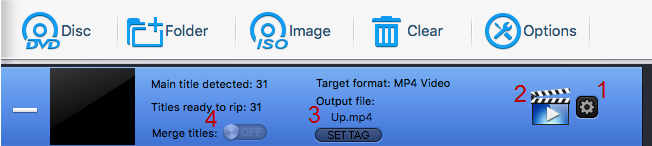
1  :Click the gear icon to change the output quality and file size.
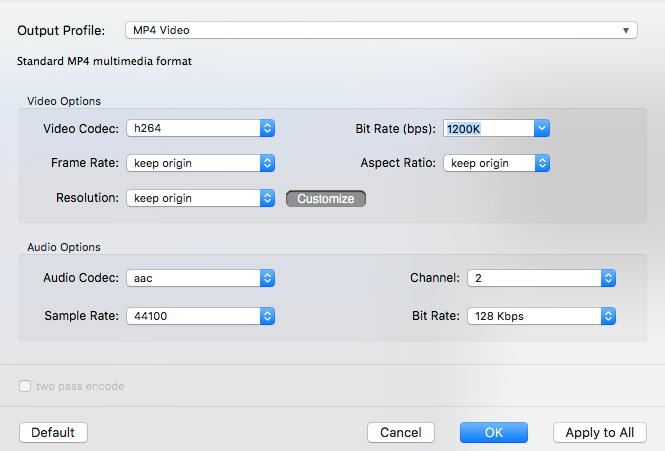
You can customize video audio codec, bitrate, frame rate, aspect ratio, resolution, audio codec, audio channel number, sample rate, etc.
* The "Default" button is used to restore all the settings back to the initial state.
2  :Change the output profile directly.
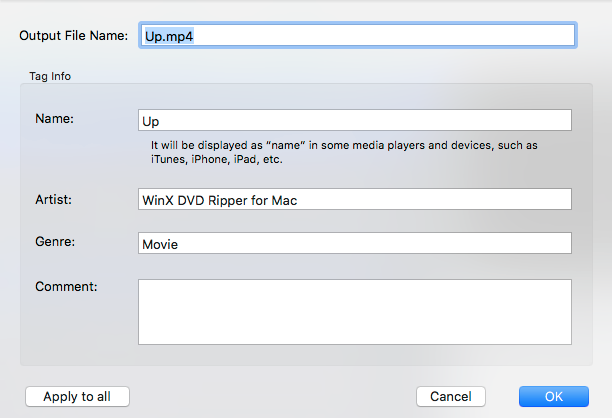
3  :Rename output file for proper display on iPhone, iPad, Apple TV and other devices.
4  : Combine selected titles into one.
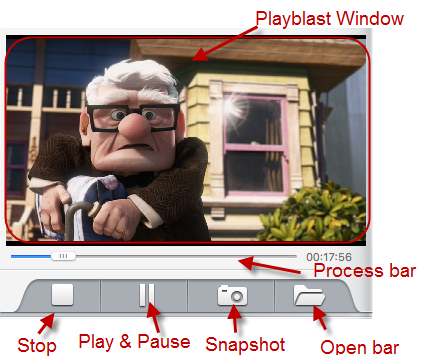
Watch the DVD movie; take snapshots in the video and store in PNG format.
 4. Edit
If you want to edit the video, like adjust volumn, add subtitle, crop and trim DVD, then click the "Edit" part in the title you selected.

Click "General" -> Check "Audio Volume" -> Drag the bar to adjust volume -> "Apply to all".

You can select subtitle in DVD, add extra subtitle or adjust subtitle position using this feature.
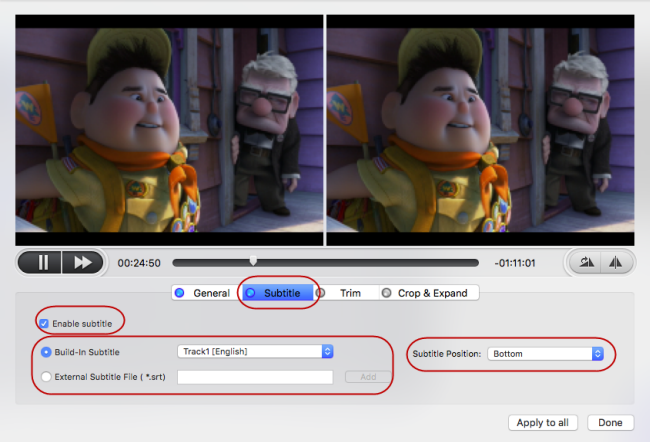
Build-in Subtitle: Choose one of subtitles from original DVD.
External Subtitle File: Add extra .srt subtitle. You can also change the language you want.
Subtitle Position: Adjust subtitle position, three options are available: Bottom, Center, Top.
Click "Trim" button to rip only part of DVD.
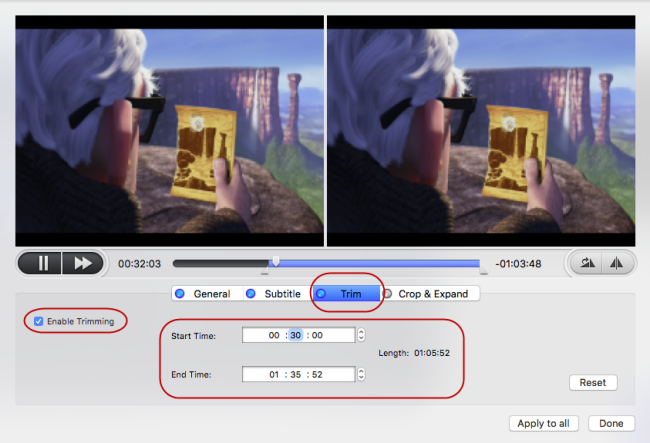
"Enable Trim" to set "Start Time" and "End Time".
* You can also just drag the slider bar to select a segment to be ripped.
Crop and expand converted video to fulfill the screen or devices.
① Crop
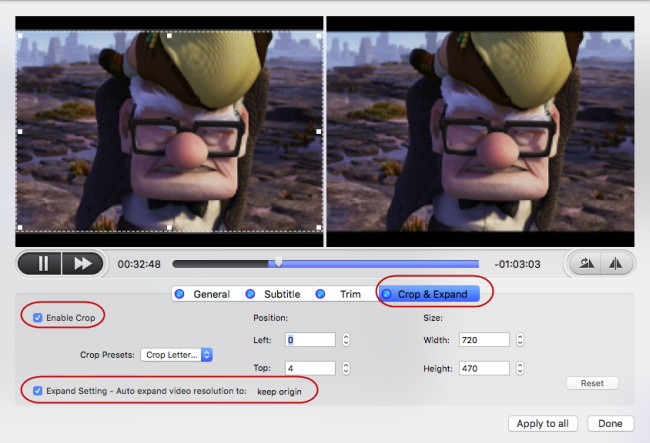
Crop Presets: Free, Crop LetterBox, Keep Current, Keep Origin, 16:9, 4:3 and 1:1.
Position: Set boundary from left and top with pixel.
Size: The resolution of crop video/image.
② Expand: Auto expand to profile video resolution to fulfill the playback screen.
Aiming to be the leading digital media company, Digiarty Software, Inc. is dedicated to providing professional and innovative multimedia software for all Windows and Mac users.

For enquiries about order, registration, upgrade, technical problems etc, please email us >>

To develop business relationship with us, please contact our PR representative, email us >>


Home | About | Privacy Policy | Agreement | News | Contact Us | Resource
 Copyright © 2026 Digiarty Software, Inc. All rights reserved


 1. Get Started
 2. Basic Operation
 3. Settings
 4. Edit