VLC Rip DVD No Audio? How to Fix this VLC DVD Rip Error?
VLC enables users to rip DVDs to MP4, MKV, AVI, and other digital formats, but sometimes the VLC DVD rip file doesn't have audio. This issue had mentioned several times in forum.videolan. Yet, there is not a cover-all troubleshooting post to include all these effective solutions. That's why this post comes into being, with all the possible workarounds gathered here to help you out of this trouble.
Top Solutions to Fix VLC Ripping DVD No Audio Problem
If you're encountering issues with no sound when ripping DVDs using VLC, don't worry — you're not alone. Fortunately, there are several effective fixes you can try to resolve this problem and get your audio back. Let’s go through them one by one.
Solution 1. Check VLC Audio Settings
Open VLC and go to "Tools" > "Preferences." Under the "Audio" tab, ensure that the correct audio output device is selected. You can also try changing the audio output module to see if that resolves the issue.
Solution 2. Change Audio Encoding Parameters
Improper audio encoding parameters can also result in DVD rips no sound with VLC. Therefore, this issue can get resolved by changing its audio encoding parameters.
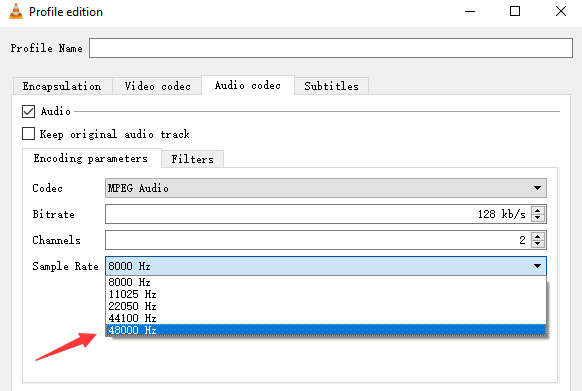
After you select an output profile for output file, "Video - H.264 + MP3 (MP4)", for instance, choose "Profile edition" window and find "Codec" section, where you're suggested to change "Sample Rate" to "48000 Hz" or enable "Keep the original audio track" option to troubleshoot this VLC DVD ripping no audio error.

Solution 3. Manually Choose One Audio Track from Multitrack DVD
The no sound issue in VLC when ripping a DVD can sometimes occur due to the presence of multiple audio tracks on the original DVD. Many users may overlook the audio track selection and leave the settings at their default values, resulting in the absence of sound.
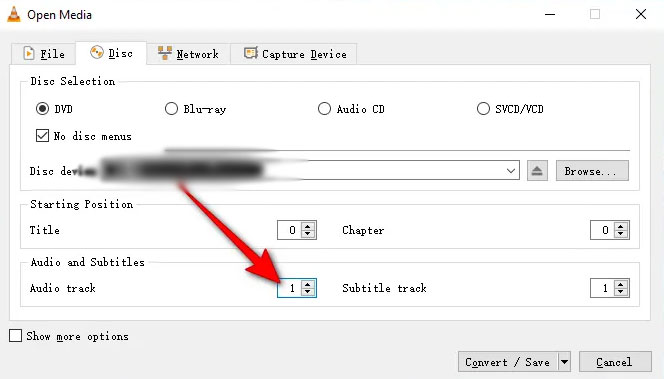
To resolve this issue, you need to select the appropriate audio track when loading the DVD in VLC. Under the "Audio and Subtitles" section, enter the number corresponding to the desired audio track and proceed with the remaining steps of the ripping process. If you're unsure about which audio track to choose, you can play the DVD in VLC and navigate to the "Audio" menu, then select "Audio Track" to identify the correct one. However, please note that sometimes the numbering of the audio tracks may be inconsistent, requiring you to perform some trial and error to determine the correct track.

Solution 4. Update VLC to the Latest Version
Make sure you're using the latest version of VLC. Older versions may have bugs or compatibility issues that could cause problems with audio ripping. Visit the official VLC website to download and install the latest version.
Solution 5. Install libdvdcss Codec Library
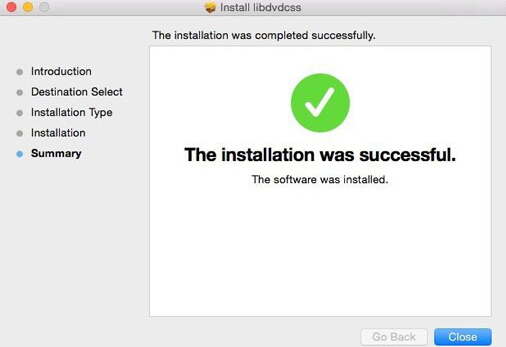
VLC relies on libdvdcss, a library that decrypts DVDs. If you haven't installed it, download and install the appropriate version for your operating system. Libdvdcss enables VLC to read encrypted CSS and region code DVDs, which could potentially resolve the audio issue.

Solution 6. Remove Cinavia Watermark Protection
The issue of no audio in VLC when ripping DVDs can also be encountered when dealing with Cinavia-protected commercial DVDs. These DVDs incorporate Cinavia, an advanced anti-piracy technology aimed at preventing unauthorized copying. As a result, the sound may either disappear immediately or after a specific duration. Even though VLC is armed with libdvdcss library, it is still unable to handle the advanced Cinavia protection effectively.
To overcome the Cinavia protection and resolve the VLC DVD rip no audio problem, it is advisable to utilize a specialized application designed for this purpose. These applications are capable of removing the Cinavia protection from DVDs effectively. They provide powerful and user-friendly DVD ripping tools that can address the issue at hand.
Therefore, it is recommended to rely on such professional DVD ripping software to ensure successful removal of the Cinavia protection and resolve the no sound problem encountered during DVD ripping with VLC. These tools offer the necessary features and functionality to handle the specific challenges posed by Cinavia-protected DVDs.
Solution 7. Try an VLC Alternative DVD Ripping Software
If the VLC DVD rip no audio issues continue, you can try using other DVD ripping software such as the 70 million users' common choice - WinX DVD Ripper Platinum, which can remove any encryption tech from DVD and choose the right audio track from multi-track DVD discs without downloading any codec library. It can do even more for you:
- Remove DVD protections, including region codes, Disney X-Project, Sony ARccOS, CSS, UOPs, latest schemes, and support scratched/damaged DVDs, 99-titles, workout/exercise discs, etc. without installing libdvdcss library.
- Backup DVDs to MP4, MOV, WMV, MKV, AVI, H264, MPEG-4, HEVC, ProRes, VOB, MPEG-2, etc. with the correct audio track auto selected.
- Free change DVD audio parameters including audio codec, audio channel, audio bit rate, sample rate, etc. all at your willing.
- 1:1 Backup DVD with main/full title or clone DVD to ISO image.
Follow the steps below to skirt DVD copyright protection and digitize DVDs on Windows PC without DVD not reading error.
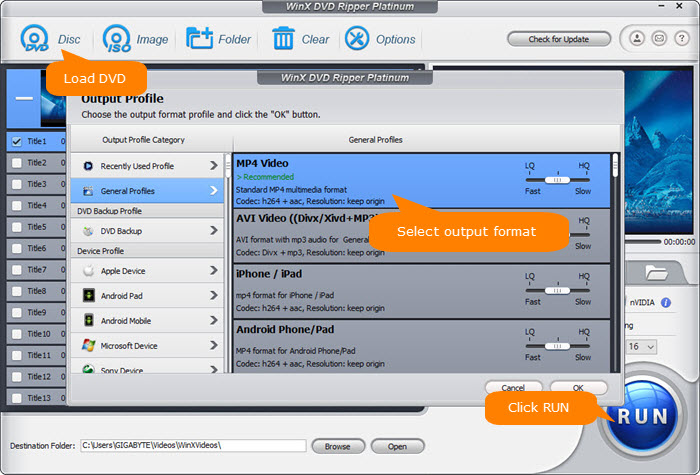
Step 1. Once you have installed this VLC alternative on your Windows 10/11 operating system, insert your DVD disc into the DVD tray of your computer. Fire up this VLC alternative and tap the DVD disc button on the main interface of the application. Click on this button to initiate the DVD loading process.
The VLC alternative software is designed to handle various DVD disc conditions. It can read damaged, scratched, unplayable, and even DVDs with 99 titles that many other DVD rippers struggle with.
Step 2. Wait for a few seconds, the ripper will auto read the movie information and choose the correct title for you, after which you are informed of a readymade profile window. Select MP4 H.264 as the output format, which is regarded as the most compatible format.

If your DVD disc contains several audio tracks or owns foreign language tracks, you can manually opt for the audio track you need (shown as below). The same also applies to subtitle track selection if multi-track subtitles exist in your DVD.

Step 3. Specify the destination folder and click RUN to begin ripping DVDs. After the ripping, you can open the converted movie and then open it directly through your default media player or watch it on your Windows 10/11 without audio missing trouble.
Disclaimer: Digiarty Software does not advocate ripping commercial DVDs for any illegal purpose. You're suggested to refer to the DVD copyright laws in your country before doing so.
Part 4. FAQs about VLC DVD Ripping No Sound
1. Why is there no audio on my VLC converted file?
Several factors might contribute to this issue. The audio stream might not have been included in the conversion process due to incorrect settings or technical glitches. Additionally, the chosen output format might not support the original audio codec, resulting in an audio-less file. It's essential to review the conversion settings, including audio codec selection and bitrate, to identify and fix the issue.
2. How do I rip only audio from a DVD in VLC?
VLC allows you to extract audio from a DVD by going to Media → Convert/Save, adding your DVD source, selecting an audio-only profile (like MP3 or FLAC), and choosing an output location. You can customize audio codec, bitrate, and channels under the Audio Codec tab before starting the conversion.
3. Why is VLC not playing audio?
Common culprits include muted volume, incorrect audio output settings, codec issues, or software glitches. Check if VLC is muted, and ensure the correct audio device is selected. Verify audio settings within VLC, including enabling audio and selecting the right output module. If the issue persists, update VLC or reinstall audio drivers.
4. Why is my DVD rip’s audio out of sync in VLC?
This often happens due to system performance issues during ripping, incorrect conversion settings, or damaged source DVDs. To fix it, increase the audio buffering value in VLC’s preferences, try ripping at a lower bitrate, or convert the DVD using a dedicated ripper like WinX DVD Ripper, which ensures synced video and audio streams.
5. How to fix DVD rip no sound issue in VLC?
First, confirm the DVD’s audio plays fine in VLC before ripping. In the Convert/Save dialog, click the wrench icon beside your selected profile, go to the Audio Codec tab, and make sure 'Audio' is checked, with a valid codec (e.g. MP3, AAC). Increase bitrate for better quality. If problems persist, consider ripping with a dedicated tool like WinX DVD Ripper, then convert with VLC if needed.


