[Proven Ways] How to Fix Windows 11 Constantly Crashing Issue
Has anyone figured out a way to get the Windows 11 OS to stop crashing? My computer is near non-functional as I can't even use it for more than 10 minutes. Over the past week or so that I've had Windows 11 my computer has crashed at least twice a day and today it's crashed 5 times right after start up. Please help! - Microsoft Community
Have you ever encounter the similar Windows 11 constantly crashing issue? If you're on the same boat, we've compiled a list of some working fixes to get you out of Windows 11 crashing error right away.
How to Fix Windows 11 Crashing Issue
1. Shut Down Windows 11 System
Most of us don't shut down our computer system properly. Instead, we just put it in 'sleep' mode, which could sometimes result in issues like crashing or not working. In this case, regularly shutting down Windows 11 system could keep more computer healthier.
- Press the Windows key.
- Click on the Power icon at the bottom corner and select Shut down.
2. Check for Updates
Checking for an update could also be an option to get out of Windows 11 crashing issue. If Microsoft has an update with a bug fix, don't hesitate to update for alleviating the problem. Also, it's important to check for updates from your PC's manufacturer. Find the OEM update app (if it has one) and check for system and hardware updates.
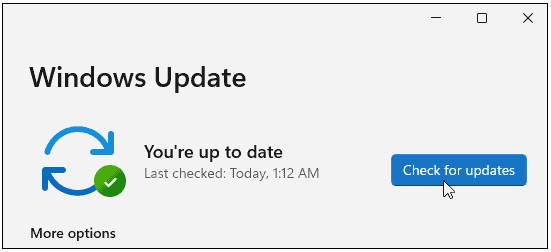
Here is how to check the Windows 11 update maually: Opening Start > Settings > Windows Update and clicking the Check for updates button.
3. Check RAM
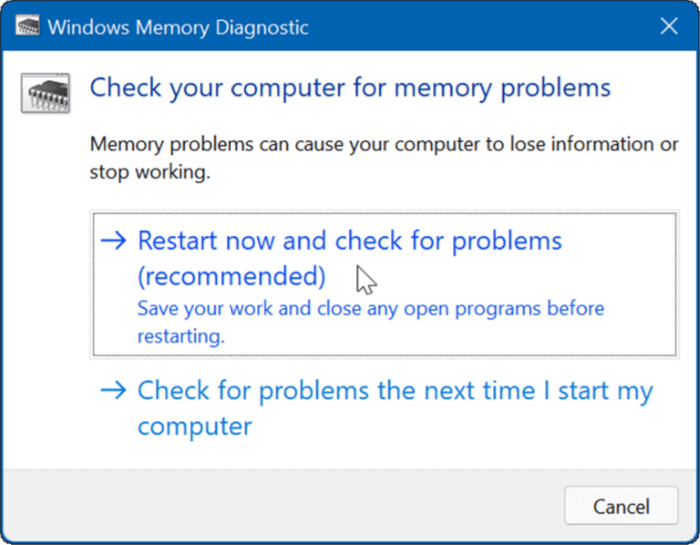
One of the internal causes for Windows 11 keeps crashing could be problems with RAM in your PC. You can check whether it's a matter of RAm through the built-in mermory diagnostics tool with the following steps:
- Press the Windows + R shortcuts on the keyboard to launch the Run dialog, type mdsched.exe, and click OK.
- When the Windows Memory Diagnostic tool opens, click the Restart now and check for problems option at the top.
- After the PC restarts, it will boot into the diagnostic tool and check your RAM for problems.
4. Check for Incompatible Hardware
You know what, faulty or incompatible hardware can also cause Windows 11 crashing. So before you try anything more advanced and further, you can check the accesaaories of your PC that may be an issue of the crash. For example, you can try to disconnect the dock stations or high-end gaming gears like controllers, headsets, speakers and more.
5. Update Your Device Drivers
The Windows 11 crashing may also be caused by your device driver as well. In other words, the faulty or outdated computer driver might make your system unstable, and it often happens after a system upgrade. To solve this issue, you should try updating the device drivers to the latest version. And here's how you can do that:
- Press the "Windows + X" to open the quick links menu and open "Device Manager".
- Expand the "Disk drives" section and right-click on your disk. From the context menu, click on "Update driver".
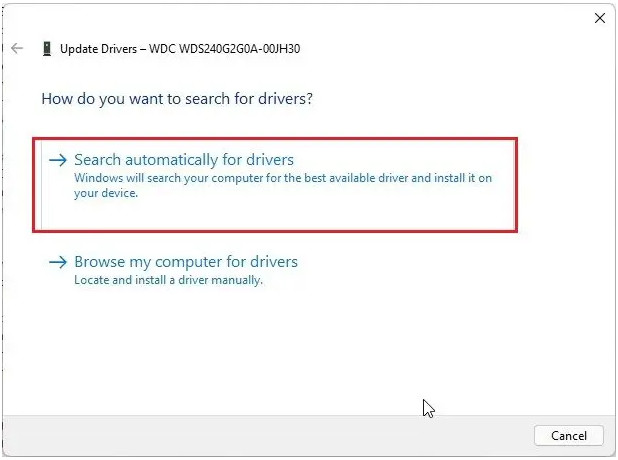
- In the popup window, click "Search automatically for drivers". If there is a new update available, Windows 11 will install it and ask you to restart the PC.
- In case there is no update available with the Device Manager, you can also download the graphics driver on the manufacturer website. But you need to make sure the driver you're going to download matches with the graphics model.
6. Eliminate the Overheated Issues
If your Windows 11 PC overheats, it's likely going to crash. It's actually a protective mechanism by Windows to shut itself down when overheating to avoid component damage. Long gaming sessions, long work hours, streaming, etc., can cause your computer to heat up. So on the one hand, you can wait for it cool down before using it again. On the other hand, if it's an issue of heat dissipation, ensure it has enough ventilation and fans are working. Also, make sure it's clear of dust by using canned air to clean it out. And if you built the PC, check that heatsinks aren't loose.
7. Run DISM and SFC Scan to Restore Corrupted System File
There is a possibility that your Windows 11 PC constantly crashing owing to the system file corruption. You can use the SFC and DISM tools included in the OS to fix it. These utilities will scan Windows for corrupted system files and replace them.
- Right-click the Start button and select Windows Terminal (Admin) from the menu.
- Enter the following command in the terminal and hit Enter: DISM /Online /Cleanup-Image /RestoreHealth
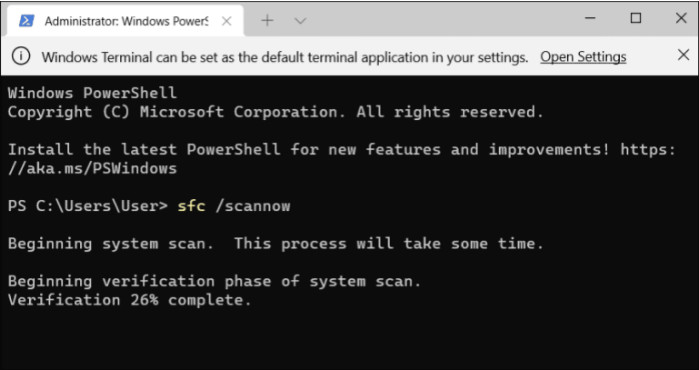
- After the DISM scan completes, run the following command: sfc /scannow
- It'll take some time to run the process. When done, restart Windows 11 and see if your PC still crashes.
8. Fix Software Conflicts
If you have too many apps running in the background, it could also lead to Windows 11 not working. That's because Apps like OneDrive, Dropbox, or even your browser could be conflicting with the print screen function. What you need to do is to disable these background apps to fix the possible software conflicts.
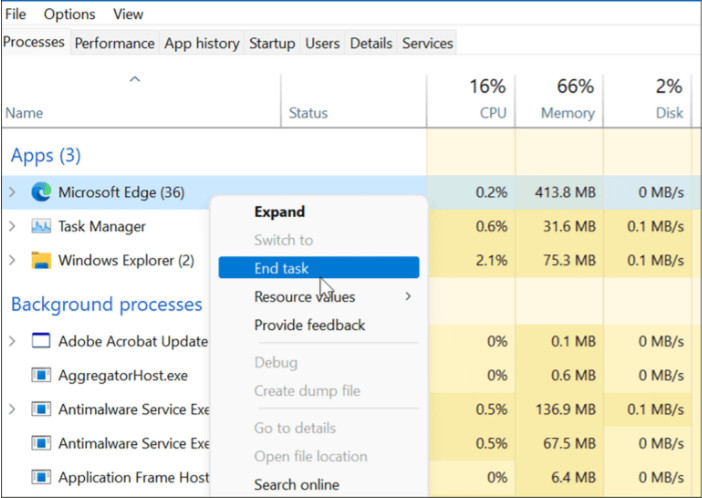
- Open Task Manager on Windows 11 by the Ctrl + Alt + Delete shortcuts.
- Go to the Processes tab and stop them one at a time to find the one causing the problem.
- To stop an app, right-click on it and select End task.
9. Reset PC
If your Windows 11 PC still keeps crashing, you can resst your PC. It will roll back your computer to factory settings, and you can choose to keep or ditch your data. Now check how to reset your computer:
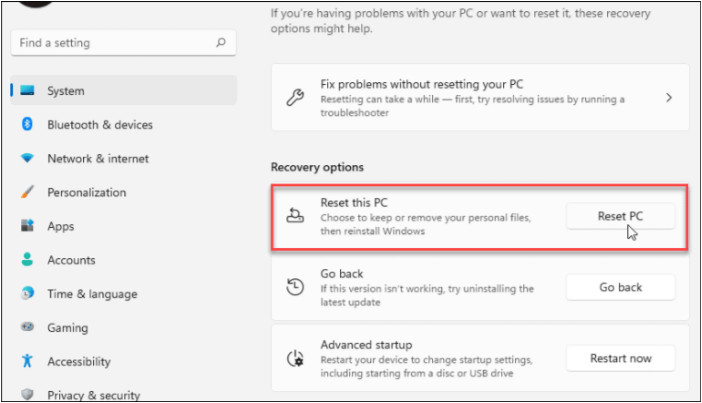
- Open Start > Settings > System > Recovery and click the Reset PC button.
- Choose the type of reset you want to do – either keep your files (which you probably want) or remove everything and start fresh.
- Follow the on-screen instructions and wait while your PC is reset to a working state.
10. Recover Windows 11 System
Recovering Windows 11 can help you run on a stable and clean system. And usually, you have two ways to recover Windows 11 system: from a restore point or system image backup.
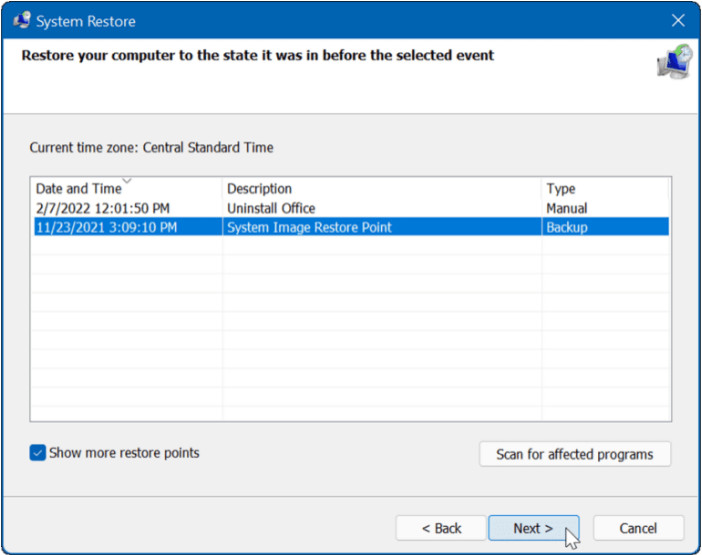
If your PC started crashing at a certain point in time, perhaps after installing a bunch of software, you can recover it from a Restore Point. You have to turn it on and create a restore point. So, if you have one, the good news is you can use it to recover your system to a working state.
- Click the Start button, type restore point, and select the top result.
- When the System Properties window appears, click the System Restore button.
- Navigate through the Restore Point wizard and choose the restore point you want to use.
- The Restore Point utility will apply the changes to your system and return it to a working state. Keep in mind that your PC will restart during the process.
If you have made a system image backup of your Windows 11 system before it starts crashing, you can use it to restore your PC easily. But before that, you need to have a USB installation drive or a Windows 11 USB recovery drive to boot Windows 11 into its recovery environment.
- Select the Windows 11 option under the Choose a target operating system section.
- In the Re-image your computer menu, select the Use the latest available system image option and click Next.
- On the following screen, you can select the Format and repartition disks option before continuing. You don't have to. But if you want to exclude any secondary drives to prevent data loss, it's necessary.
- After you've worked through the wizard and are comfortable with your selections, click the Finish button.
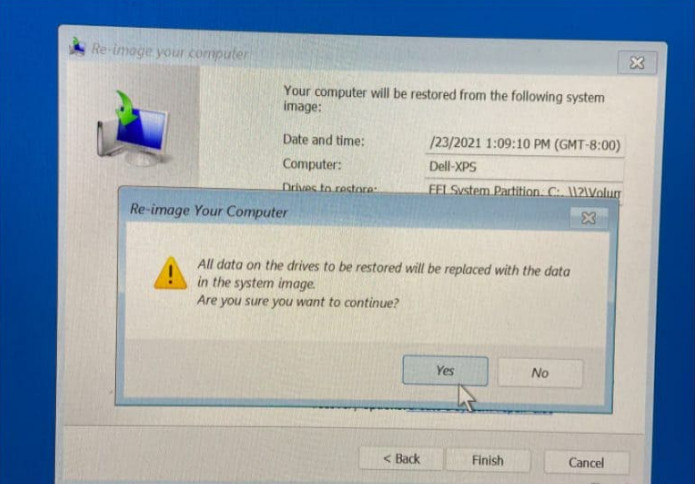
- You'll be warned about data loss - click Yes to confirm and proceed.
- After that, the recovery process will start. The time it takes will vary based on the amount of data and the system's resources.
That's it for troubleshooting Windows 11 constantly crashing. If you have any other solutions to fix Windows 11 crashing issue, feel free to contact us by email.


