How to Fix ‘This PC Can’t Run Windows 11’ Error?
Windows 11 download is already available, but while checking if your PC is compatible via PC Health Check app you may encounter "This PC can’t run Windows 11" error message. Microsoft is strictly picky about the compatibility of Windows 11, requiring supported CPU, Secure Boot and TPM 2.0, otherwise you’re unable to upgrade to Windows 11. Turning on TPM 2.0 and Secure Boot will remove most people’s annoyances, but a few PC owners are still perplexed by the error message even their machines satisfy the minimum system requirements that Microsoft asks. So, this page will offer workable solutions to help fix "Windows 11 this PC can’t run" issue according to different situations.
Hot search: Full Windows 11 update issues and fixes
Table of Contents
Part 1. Why Is There "This PC Can’t Run Windows 11" Error Message?
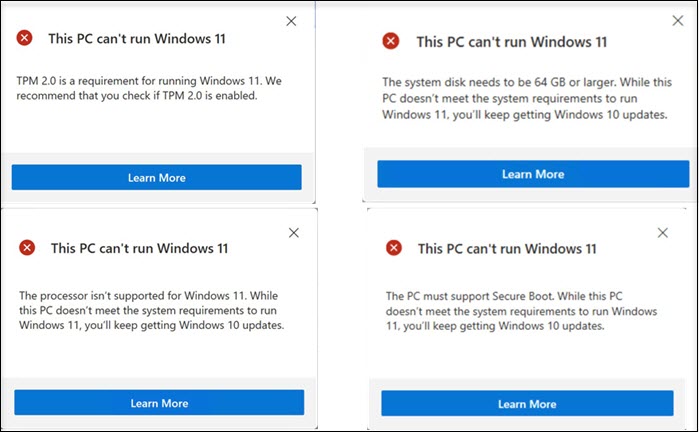
When you use PC Health Check app to scan your computer, it will tell you whether your computer support Windows 11 or not. If you are out of luck, you may receive one of the four types of error message concerning "This PC can’t run Windows 11". To be more specific, you meet the error when TPM 2.0 is not enabled or absent, your system disk space is lower than 64GB, the computer’s processor isn’t supported for Windows 11, and the Secure Boot is not turned on. Among them, TPM 2.0 and Secure Boot are the crucial reasons.

Reason 1: Your computer doesn’t meet the minimum system requirements
- A modern 64-bit processor
- 1GHz clock speed, at least 2 cores
- 4GB of RAM and 64GB Drive
- UEFI, Secure Boot capable
- Trusted Platform Module (TPM) version 2.0 or newer
- 9-inch display with a minimum resolution of 1366 x 768
- Compatible with DirectX 12 or later with WDDM 2.0 driver
- List of Intel, AMD, and Qualcomm processors that support Windows 11
Reason 2: The TPM 2.0 is absent or not enabled
TPM, aka Trusted Platform Module is a "secure crypto-processor" for your computer’s safety by preventing malware, ransomware and any other malicious attacks. TPM now has two versions, say TPM 1.2 and TPM 2.0. To install Windows 11, Microsoft asks you to run the OS only on machines with TPM 2.0, which really counts out a lot of older devices. Luckily, there is still a TPM 2.0 bypass way that Microsoft provides officially top help you upgrade to Windows 11 without TPM 2.0 and without "This PC can’t run Windows 11" error.
Reason 3: The Secure Boot is absent or not turned on
Secure Boot is a feature in your computer’s software that controls which operating system are allowed to be active on the machine. That being said, it doesn’t allow for a second operating system on your machine. Also, it is used as a security setting to prevent your computer from certain classes of invasive malware and ransomware.
Now that you have figured out the reasons causing Windows 11 this PC can’t run issue, you can go on to find out corresponding workarounds.
Part 2. How to Fix 'This PC Can’t Run Windows 11' Problem?
Method 1. Enable TPM 2.0 on Your PC
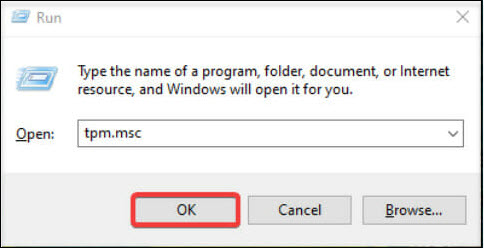
Step 1. Press the Windows + R key on your keyboard to start Run, type tpm.msc, and press Enter or click OK.

Step 2. In the TPM Manufacturer Information screen, check the value of the Specification Version, which should be equal to 2.0.
Step 3. If you receive "Compatible TPM cannot be found" error message, it means the TPM chip is not available or is actually disabled in BIOS.
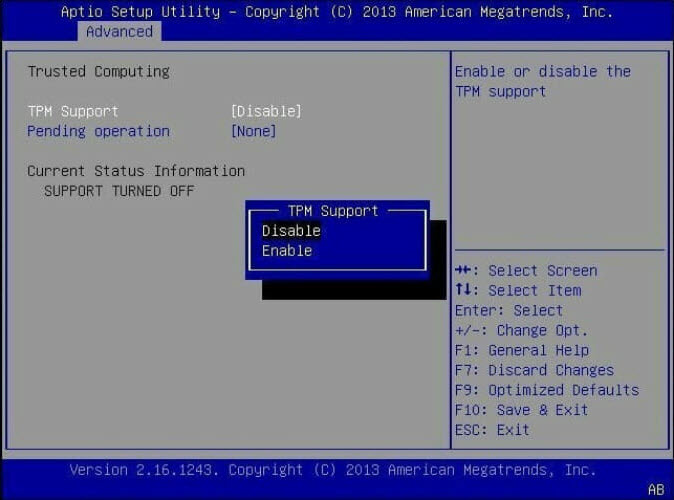
Step 4. To make sure if your PC has a TPM 2.0 chip, you should restart your PC and enter BIOS by press F + Del keys on your keyboard before Windows boots up.
Step 5. Go to Advanced options on your BIOS, find the TPM Support option and enable it.

Step 6. Save and exit BIOS.
Note: If you don’t see any TPM-related options, it means your PC doesn’t have a TPM 2.0 chip. Under such circumstance, you can go to method 3 on this page to learn how to bypass TPM 2.0 check to install Windows 11.
Method 2. Enable Secure Boot on Your PC
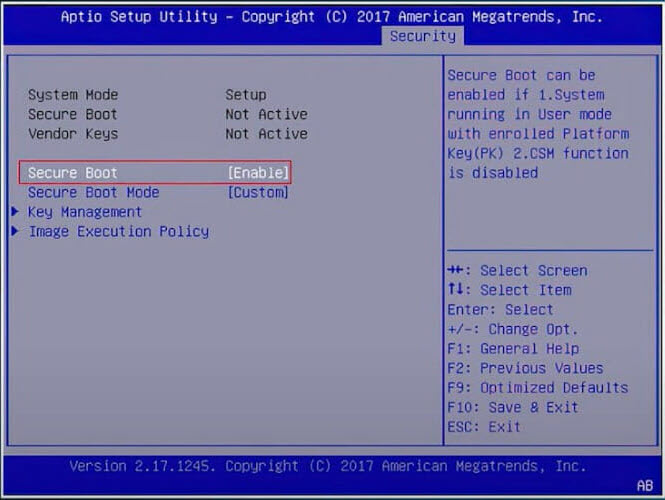
Step 1. Restart your PC and enter BIOS by pressing F + Del keys before Windows boots up.
Step 2. Find the location of Secure Boot option and switch it on.

After turning on TPM 2.0 and Secure Boot, you check again with the PC Health Check app and you should receive a confirmation message. If you still can’t run Windows 11 on your PC, you simply try method 3 – install Windows 11 without TPM 2.0 and Secure Boot.
Method 3. Install Windows 11 without TPM 2.0, Secure Boot and Supported CPU
For Windows users who’s PC has TPM 1.2, Microsoft officially provides a Windows 11 TPM 2.0 bypass way to help install Windows 11 without "This PC can’t run Windows 11" pop up. And this way is also available for PCs without Secure Boot and Supported CPUs.
- Click the Start button, search for "Registry Editor" and launch the app.
- Navigate to "HKEYLOCALMACHINE\SYSTEM\Setup\MoSetup" and add a new REG_DWORD entry with the name AllowUpgradesWithUnsupportedTPMOrCPU and set the value to 1.
- Once the registry key values have been changed, you can manually install Windows 11 without TPM 2.0/ supported CPU by using Windows 11 media creation tool.
For PCs which don’t even have TPM 1.2, there is still a workaround that the process is quite complicated though. If interested, you can follow our guide on how to install Windows 11 without TPM to get the solution.
Method 4. Buy A New Device
This is what Microsoft expects. By purchasing a brand new machine with TPM 2.0 Secure Boot, supported CPU and GPU, and pre-installed Windows 11 OS, you can have a better using experience like gaming, listening to music with Windows 11 media player, online meeting with Microsoft Teams, etc. Microsoft provides a list of PC choices from popular brands on its official website, in case needed, you can go there to pick one.
More Windows 11 errors: How to fix Windows 11 taskbar not working?


