How to Edit Videos with Facebook Video Editor
Facebook has a quite featureless built-in video editor. It even lacks some basic functions such as combining multiple clips, compressing, and changing video and audio settings or parameters. We still need a basic but useful video editor that specializes in enhancing your video for Facebook. WinX HD Video Converter Deluxe should cut the mustard as a video editor for making wonderful videos for Facebook. Look at the tutorial below and make your videos reach millions easily on Facebook.
Download the Facebook Video Editor to Make Videos for FB in One Minute
WinX HD Video Converter Deluxe supports any video format and any resolution, such as MKV, MOV, WMV, HEVC, 8K, 4K UHD, etc. Main features are listed below.
- Convert videos of MKV, HEVC, FLV, WMV, etc. to Facebook recommended format MOV, MP4.
- Merge, trim, crop, remove video black bar, change video aspect ratios, dimensions, etc. for Facebook.
- Change video settings, such as bit rate, frame rate, to meet Facebook video specs requirement.
- Compress videos without losing much quality to Facebook allowed file size or to upload faster.
- Add subtitles to videos when it has a dialogue to help viewers easily understand.
- Support 8K/4K UHD videos footages from GoPro, iPhone, mobile, cams, and other resources.
1. Convert Videos to the Best Format for Facebook
Facebook accepts a wide range of video formats, but MP4 or MOV format is highly recommended. The Facebook video editor has a preset tailored for uploading videos to Facebook.
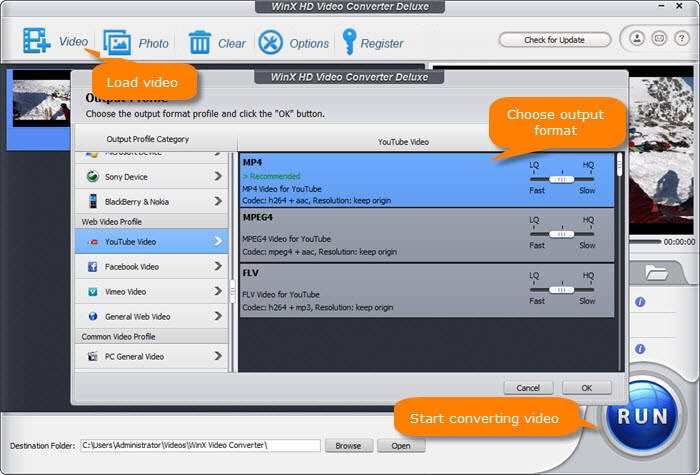
Step 1: Download and install the program on your computer. Click the +Video button at the top menu bar and choose a video to process.
Step 2: You should see the Output Profile window after the video is loaded. On the left pane, under Output Profile Category, find out Web Video Profile. Choose the Facebook Video to get more format options. There are four formats to choose from, MP4, MOV, AVI, and FLV. Select MP4 Video (MPEG4). Click the OK to save the settings. Then move to the next step to do further editing.

2. Make Your Videos Meet Facebook Requirements
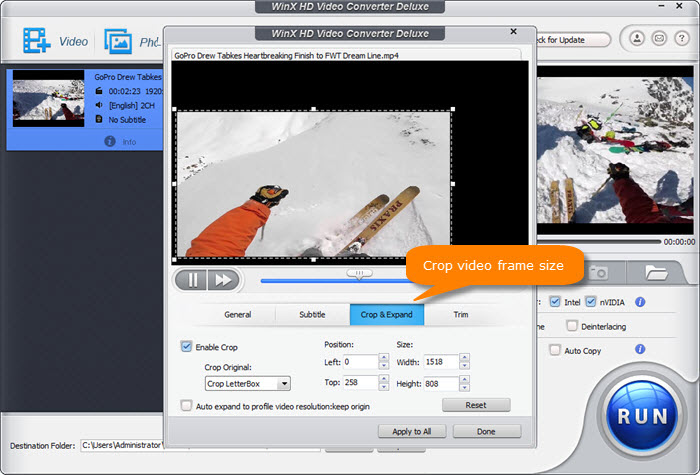
Step 1: Click the Edit icon under the video info area, another video editing window will appear.
- Trim the video to the video length accepted by Facebook. On the video editing window, click Trim, select Enable Trim, set the start time and end time manually, or shorten the video by dragging.
- Crop the video suit Facebook mobile or desktop viewing ratios. Click on Crop & Expand, select Enable Crop, click the Crop Original drop-down icon, choose a preset ratio or Free copy by dragging the edges of the video inward. Or you can customize in the Custom ratio box on the right. A 9:16 aspect ratio is recommended by Facebook.
- Click the Subtitle tab, choose Enable Subtitle to start adding subtitles to your video. SRT file format is compatible with Facebook.
Step 2: Click the Done button to make the changes valid and close the Facebook video editing window.

3. Adjust Video Settings Specs for Posting to Facebook
Facebook limits video size, dimensions, frame rate, and others. Check Facebook required video specs, and use steps below to change video parameters to suit Facebook.
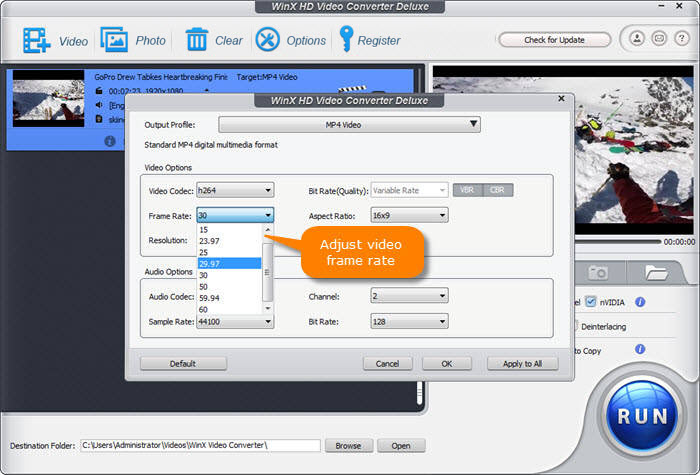
Step 1: Click the Settings icon to show more video and audio options.
Step 2: On the popping up window, change video frame rate, resolution, video audio bit rate, audio sample rate, etc.
Step 3: Click OK to save the settings and close the window.
Step 4: After editing, click the RUN button to start processing.
Learn more about how to reduce video file size for Facebook if your video is too large.

4. Merge Separate Clips into one video for Sharing to Facebook
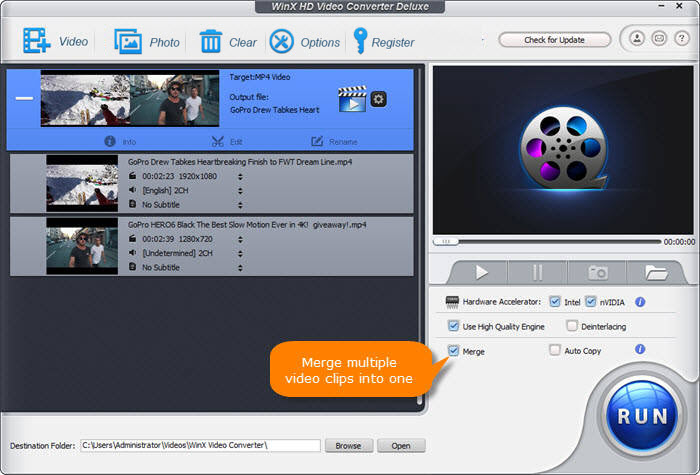
It's quite easy to merge several clips into an amazing video with one click for Facebook. Source videos can be in different formats and specs.
Step 1: Click the +Video button at the top and load the source videos, or directly drag them to the window of the Facebook video editor.
Step 2: Select Merge on the right section above the blue RUN button.
Step 3: After you've done all the editing, click the RUN button to start processing.


