DVD Drive is Unable to Burn Data to a Disc? Fixed Now!
It's known to all that DVD drive is a must have when it comes to burn ISO image or video data to a DVD disc. However, life is not always full of roses. Your DVD drive would bring you to frustration now and then. For instance, last time you successfully used your DVD drive to burn a DVD disc without any hassle. However, it's not the same case this time. Your DVD drive is unable to write or burn any video data or ISO image file to your DVD disc. What's wrong? How to handle this? No biggie! This post demystifies the reasons and effective solutions to fix this DVD drive not burning DVD disc on Windows 10/11 easy peasy.
Solution 1. Check your DVD Disc
Check your DVD disc type and make sure your DVD disc is compatible with your DVD drive. For instance, you can't burn a DVD-R disc in a drive that doesn't support DVD-R technology.
Meanwhile, check your DVD disc storage and physical intactness. If you need to burn more than 4.7GB data, you need a DVD-9 disc with 8.5 storage space, not DVD-5 with only 4.7GB space. Moreover, make sure your DVD disc is physically intact, away from smudge, damage, fingerprint, scatch or DVD rot.
Solution 2. Check your DVD Drive
Check the driver: Go to Device Manager, click on the Driver tab, and see if Roll Back is available. If not, choose Uninstall, restart your PC, and reinstall the driver.
Solution 3. Uninstall Windows Update and Try System Restore
Sometimes, your DVD drive not burning disc issue is caused by Windows Update. Check at Settings > Update & Security > Windows Update > click Installed Update History to see if your Windows 10 gets automatically Windows update. If so, uninstall any affecting updates on your PC. Afterwards, try System Restore.
Go to Device Manager reached by right clicking the Start button. Under DVD Device, click on Driver tab, see if Roll Back is available. If not choose Uninstall, restart PC to reinstall the driver. Next right click Start button to open Disk Management, scroll down to find the DVD drive. Does it have a driver letter? If not, right click to issue a drive letter so it shows up in File Explorer, save and exit. Run Hardware troubleshooter at Settings > Update & Security > Troubleshoot. Now re-use your DVD drive to burn video or ISO image to a DVD disc to see if this issue get fixed.
Solution 4. Use a different type of disc
Using a different type of disc is another way to get you out of the trap. The type of disc you use for burning must be compatible with the type of disc drive in your computer. So try using a different type of disc like DVD+R, DVD-R, DVD+RW, DVD-RW.
Solution 5. Use a Solid DVD Burning Software
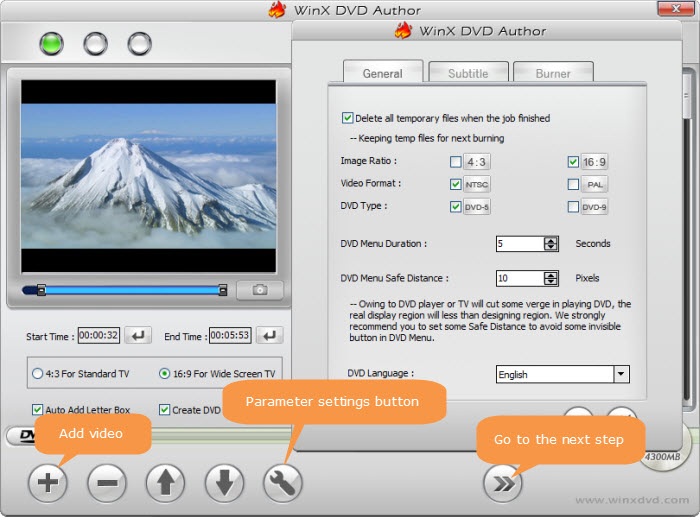
Neither your DVD drive, nor your DVD disc is to blame for. Maybe it's your dvd burning software. Consequently, use a professional yet solid DVD burner software WinX DVD Author to painlessly burn large ISO image file over 4.7GB to DVD-9, as well as burn MP4, VOB, ISO, AVI, MOV, etc. videos to DVD-5/DVD-9 discs on Windows 11, 10, and lower. Rich features are available to create titles, menus, add subtitles, add music, adjust settings, etc. It supports burning files to DVD±R/±RW, DVD DL+R, and DVD DL±RW.
Access to this page to read its detailed how-to guide if you plan to try this top DVD burning tool for disc burning.

Solution 6. Decrease the Disc Burning Speed
If your DVD drive is reluctant to burn discs on your Windows 10 PC, try burning the disc using a slower burn speed. Decrease the burning speed in your disc burning software. When burn speed is reduced, it takes longer to complete the disc, but the writing process is more likely to finish successfully. You can't always have your cake and eat it. Ensure a more stable DVD burning process at the minor price of burning speed.
Solution 7. Update the firmware
Click on the burner to view its properties. From the Driver tab, you can view the driver version. Update the firmware if necessary.
Solution 8. Clear the Registry Filters
Providing, unfortunately, the above solutions don't tackle your trouble, try clearing the registry filters.
- Remove all DVD writing software using the Programs and Features window in Control Panel.
- Unplug all nonessential external plug and play devices, especially cameras.
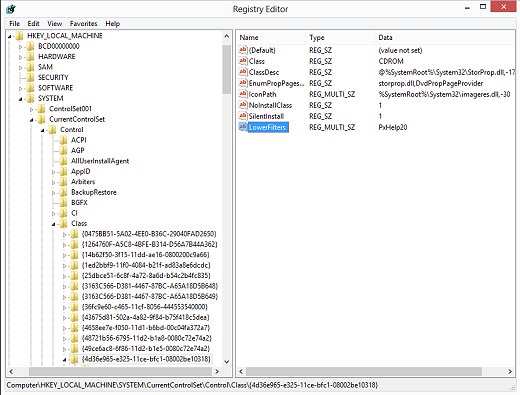
- Search for and open regedit on your Windows 10 PC. Computer selection followed by.
- Hit File > Export, type a filename that is easy for you to remember, and then click Save. A copy of the registry is saved for back-up purposes to the Documents folder. If problems occur after using these steps, browse to the file, and then double-click it to restore the registry.
- Tap the arrow next to the items (HKEY_LOCAL_MACHINE; SYSTEM; CurrentControlSet; Control; Class) in the list to expand the items.
- Opt for '4D36E965-E325-11CE-BFC1-08002BE10318'
- Choose the LowerFilters value and press the delete key. Confirm the deletion by clicking Yes.
- Close the Registry Editor, restart the computer, and then wait until Windows configures the necessary drivers for new hardware.
- After you remove all CD/DVD writing software, restart the computer and reinstall the software. Now try creating your disc again.


