2 Ways to Rip Protected DVDs to Mac Easily
Although online streaming service is rising, DVD disc has not been ditched at all. Still, thousands of millions of people are holding a mass of old discs, and maybe are buying new movie DVDs, but having no idea of how to cope with them. Here's one way we can try - rip DVD to computer, home server, or somewhere else. In this article, we will introduce two methods on how to rip DVD to Mac machines like MacBook Pro, MacBook Air, iMac, Mac mini.
Table of Contents
Before You Rip a DVD to Mac
Before you start ripping DVDs to your MacBook Pro, MacBook Air, iMac, iMac Pro, Mac mini, you need to figure out a few things.
1. Check if it's legal to rip copyrighted DVDs in your country. We don't advocate ripping copy-protected DVDs for any commercial purpose and suggests referring to the DVD copyright laws in your countries. Ripping purchased DVDs for personal use won't get you into trouble though.
2. Apple started its plan to kill optical drive in 2012. However, Apple happily sells you a SuperDrive for dealing with optical media. If you don't have a built-in DVD drive, get a SuperDrive for your Mac computer.
3. Make sure your Mac has enough space to save digital copies of your DVDs. Depending on the output format you choose, a DVD replica needs around 1GB and even more.
Method 1. How to Rip Copy-Protected DVDs to Mac with WinX DVD Ripper for Mac
WinX DVD Ripper for Mac is one of the best DVD rippers for Mac. It can easily bypass all DVD encryptions such as Disney X-project DRM, CSS, region code, RCE, Sony ArccOS, UOPs. It offers options to rip DVDs to Mac computers in MPEG2, ISO file, DVD folder with 100% original quality, as well as rip copy protected DVDs to Mac in MP4, MKV, MOV, AVI, 3GP, and more formats. It provides 350+ output profiles, including presets for Mac, QuickTime, iMovie, PC, Apple TV, iPhone, iPad, Android, and more. It supports Intel, NVIDIA, and AMD hardware acceleration to rip DVDs to Mac at a speed about 5x faster than Handbrake..
100% clean and safe
How to Rip Protected DVDs to Mac in Clicks?
Step 1. Download and install WinX DVD Ripper for Mac on your Mac. The DVD ripper works with MacBook Pro, MacBook Air, iMac, Mac mini running Mac OS X 10.6 or later.
Step 2. Launch this Mac DVD ripping software. Click the DVD Disc button to select your DVD drive. It will take several miniutes to detect and remove any copy protection on the DVD and load the DVD data. Once finished, it will automatically select the main movie title and open the output format window. Then you need to choose which format you'd like to rip the DVD to your Mac.
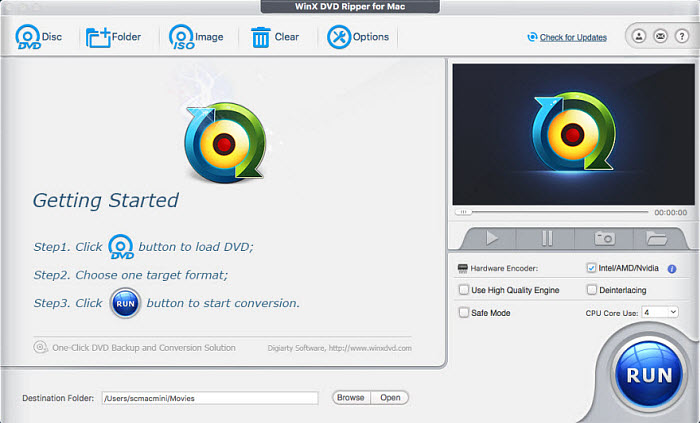
Step 3. Choose an output profile and click Done. You need to specify an output format based on your own needs.
For your reference:
- If you want to save DVD to Mac and play DVD on Mac without using an optical drive, you can scroll down to Mac General Video and choose a profile such as MP4 Video (H.264).
- If you want to rip the DVD to your Mac for later playback on iPhone, iPad, Apple TV, or other devices, scroll down to Apple Device, select to iPhone Video / to iPad Video, and select a profile.
- If you want to make a full backup of your DVD on MacBook Pro/Air, Mac mini, iMac, you can go to DVD Backup and choose Clone DVD to ISO Image or Clone DVD to Folder.
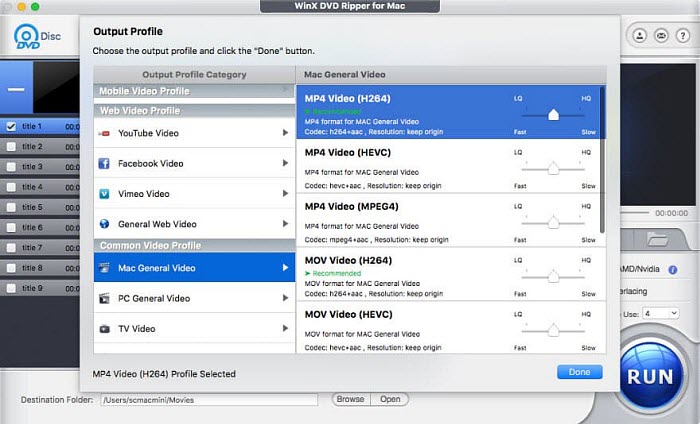
Step 4. Adjust the DVD ripping settings. Back on the main interface, click the gear button next to the selected output profile. Then you can adjust the video and audio parameters if necessary. If you don't know what they mean exactly, just leave them as defaults. You can also click the Edit button to add subtitles, crop, trim, etc.
Futhermore, you can click on the selected main movie title to choose the audio and subtitle track that you'd like to keep in the final ripped video.
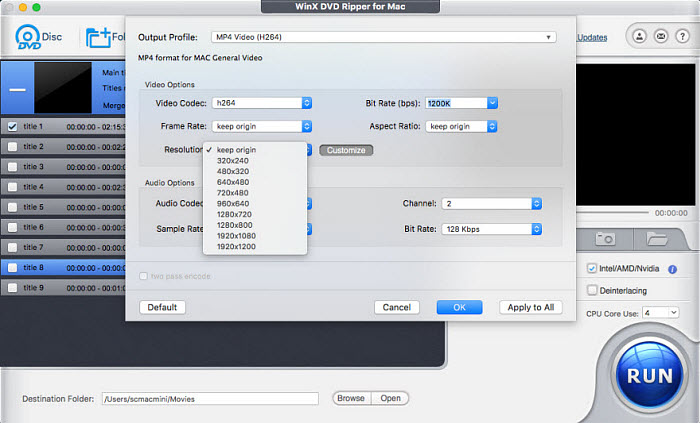
Step 5. Start ripping DVD to Mac.
Set a destination folder on your Mac to save the ripped DVD file. Then click RUN.
If it fails to rip a certain DVD to your Mac, select the Safe Mode on the right lower part of the interface and try again.
Watch Video Tutorial: How to Rip DVD to Mac with WinX DVD Ripper for Mac
Method 2. How to Rip DVD to Mac for Free with HandBrake
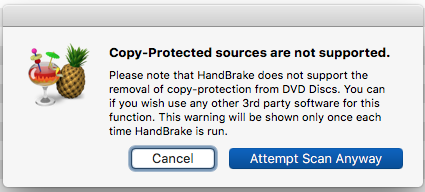
HandBrake is a free and open-source tool compatible with various platforms, such as Mac, Windows, Ubuntu and others. It can rip DVD to MP4, WebM and MKV on Mac. Handbrake is no doubt great, but free things always come with limitations. It cannot rip copy-protected DVD onto MacBook Pro/Air, iMac, Mac mini.
How to Rip Protected DVDs to Mac using Handbrake?
Step 1. Download and install HandBrake
- Download HandBrake from its official site (
 Free download HandBrake for Mac).
 - Open the .dmg file and follow the wizard to get it installed, which normally takes you several seconds.
- Open this DVD ripper for Mac.
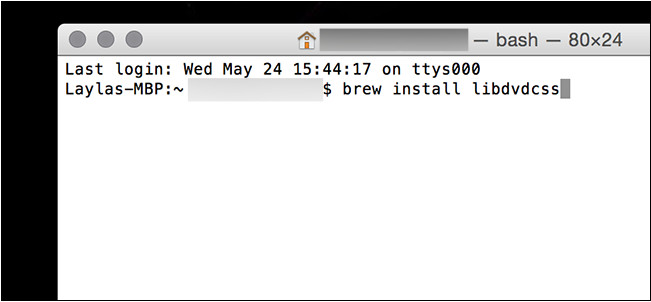
If you need to rip a protected DVD to Mac with Handbrake, you will also need to download libdvdcss on Mac. Using Homebrew is the easiest way to get libdvdcss on Mac. With the Homebrew installed on your Mac, open Terminal and enter 'brew install libdvdcss', hit enter. Homebrew will automatically install libdvdcss on Mac for Handbrake. Then you can use it to rip protected DVDs to Mac.
Step 2. Load the source DVD
Click Open Source in the top left corner, choose DVD disc, e.g. H:\ (TRANSFORMERS2_DISC1), and a banner pops up saying "Scanning source, please wait".
NOTE: Common DVDs will be loaded successfully right away, while copy-protected DVDs like Disney DVD may end in error after scanning up to 99 titles one by one, even with libdvdcss installed on your Mac computer. This is because libdvdcss can only help handle DVDs with CSS and region code protections. To rip encrypted DVD to Mac, please turn to WinX DVD Ripper for Mac.
Step 3. Set the output file
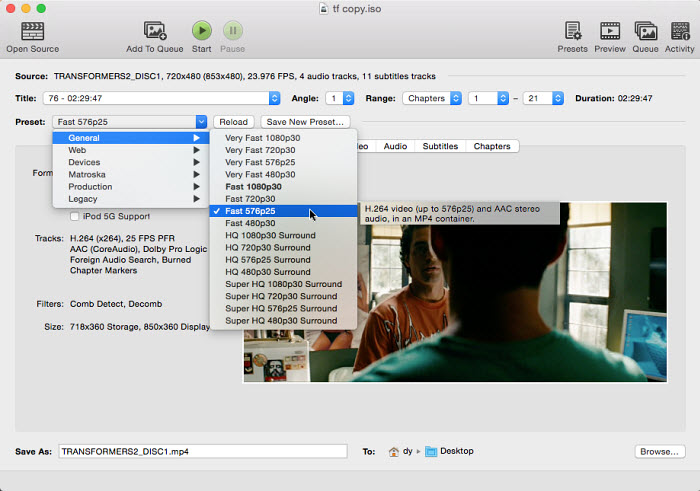
Open the Preset dropdown menu and choose General. Then select a quality preset for the DVD rip. For DVDs, don't choose a quality higher than 576P as it won't make the output file look better.
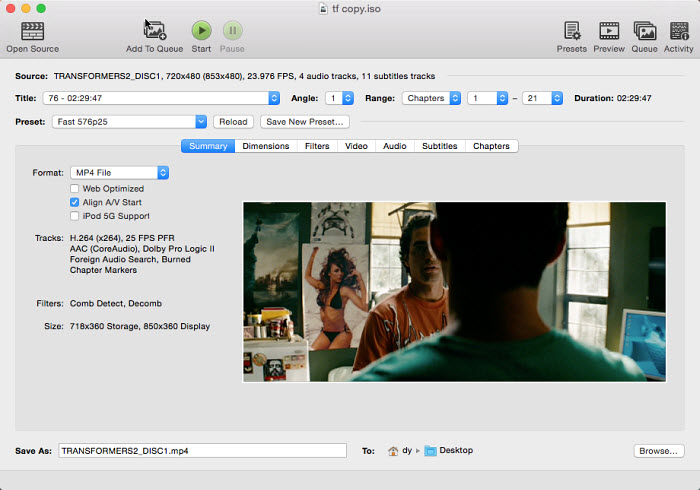
Click on the Summary tabe and choose an output format. HandBrake only offers three video format containers, MP4, WebM and MKV. Lucky for us, Mac OS does support MP4, thanks to its wide compatibility with almost all devices and players. Then go to the Video part, and here comes the most complicated thing - parameters calculating.
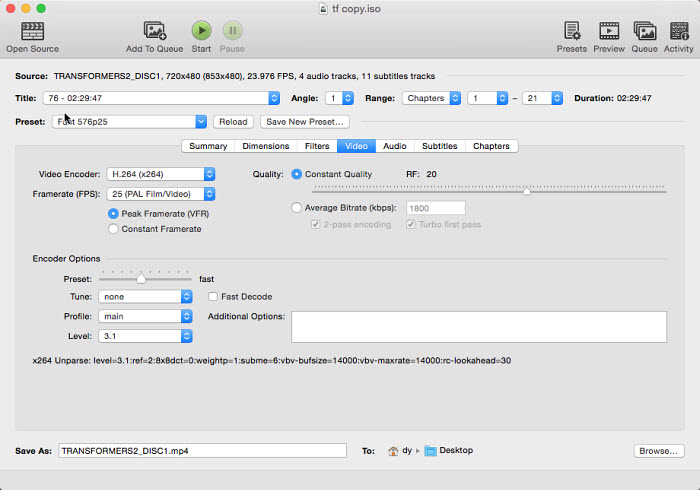
NOTE: If you are totally new to the terms like bit rate, frame rate, resolution, etc, parameter calculating will be too hard to understand, especially the different encoding methods: 1 pass, 2 pass, CRF, and the like. We've tested ripping DVD to Mac (MP4) using all ways it provides, and the results show that 1 pass rips fastest however with unbearable image scenes while CRF reaches the best balance among time, quality and file size. So the next is our recommendation:
- Container: MP4
- Video Codec: H.264 (X264)
- Quality: Contant Quality RF
- Framerate (FPS): same as source
- H.264 Profile: High (takes longer time than the main profile)
Step 4. Start ripping DVD to Mac free
- Click Browse to set an output folder on your MacBook Pro, MacBook Air, iMac, iMac Pro, Mac mini for the ripped DVD movie.
- Press Start button and wait. Normally, ripping a 2.5h DVD disc to Mac needs about 30 minutes, output in a 2GB around file.
Watch Video Tutorial: How to Rip DVD on Mac with HandBrake


