5 Ways Transfer Music from iPhone to Mac (MacBook/Air/Pro, iMac, etc.)
"I once managed to transfer music from Mac to my iPhone 6s with iTunes (a bit cumbersome), but when I attempt to transfer music from iPhone to Mac in case data loss one day, I failed. Can anyone tell me if it is possible to transfer music from phone to Mac via iTunes? If it is, how? If impossible, is there an alternative way to do this job?"
iTunes is a useful tool to play, download and manage music and videos. With this tool, you can sync music from computer to iPhone, but when you want to ask it to work in an opposite direction, say transfer music from iPhone to computer, you will be rejected. So, if you have such a need, you need some help.
This article introduces 5 ways to help sync music from iPhone to Mac (iMac, MacBook, MacBook Air, MacBook Pro, etc.), for backup, freeing up iPhone space, copying music to a new Mac, embedding music to video, PPT, Email, or other purposes.
Best Way to Transfer Music from iPhone to Mac without iTunes
WinX MediaTrans is an easy and convenient way to transfer music songs from any iPhone to Mac computer. No data loss. Without iTunes.
- Transfer music from iPhone/iPad/iPod to Mac, & vice versa.
- Make iPhone ringtones, & manag e Podcast.
- Also transfer photos, videos, books, voice memos, etc.
- Fully compatible with macOS Big Sur, Catalina, Mojave & lower.
Top 5 Ways to Transfer iPhone Music to Mac
- 1. WinX MediaTrans
- 2. Finder
- 3. Apple Music
- 4. iTunes
- 5. AirDrop
Way 1. Transfer Music from iPhone to Mac with WinX MediaTrans
* Available for all types of music transfer between iPhone and Mac.
As a professional iPhone file transfer program, WinX MediaTrans arrives with many fantastic features. You can transfer both purchased and non-purchased songs from iPhone to Mac selectively or in bulk, and conversely transfer music from computer to iPhone for enjoyment on the go.
Besides music transfer, you can also use this tool to organize and manage your iPhone songs, such as editing title, artist, album, composer, year and comment, creating playlists freely, and moving a song from one playlist to another. In addition to that, it is DRM removal available and lets you create iPhone ringtones.
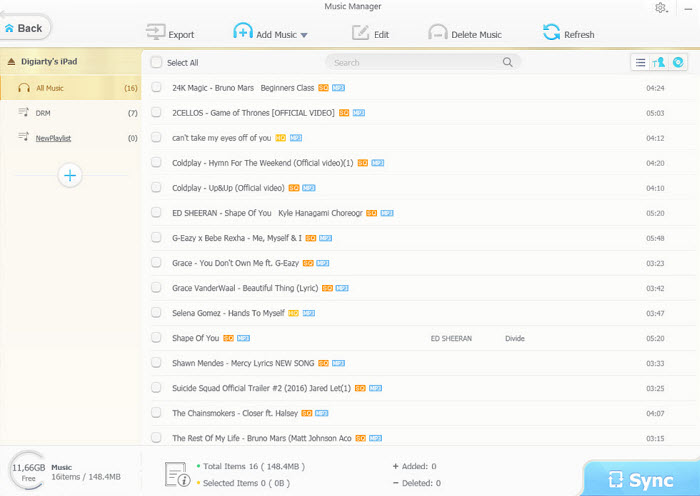
Step 1. Get this iPhone music transfer tool.
Click the button to download WinX MediaTrans for Mac on your computer, install and launch it.
Step 2. Connect your iPhone to Mac.
Use a USB cable to connect your iPhone to Mac. When you first get access to WinX MediaTrans, it will remind you to disable iTunes auto sync for data protection, namely tick "Prevent iPods, iPhones, iPads from syncing automatically". After that, you can close iTunes and you will never need to trouble iTunes in the future.
Step 3. Go to music transfer window.
Now, you have stepped into the main user interface, where you can see several functions.
Step 4. Specify target music on iPhone and export to Mac.
Click on the Music Manager button, and then you will go to the window where you can see your iPhone music songs are organized by name, artist, playlist, date, etc.
To transfer music from iPhone to Mac, just select the target music (one or more songs) and then click Export button on the top bar to export to computer.
Note: This is a cable way that you don’t need to worry about whether there is WiFi or not.
Besides music sync, other options are also available for you like create and delete playlists, delete iPhone music, edit music information, such as title, artist, album, quickly find target items by searching keyword, add music from computer to iPhone, etc.
WinX MediaTrans is a versatile iPhone file manager that you can utilize to transfer videos, photos, eBooks, and more between iPhone and Mac, make iPhone as a flash drive to store all kinds of files. Not a privilege of iPhone, iPad/iPod users can also employ it for media transfer.
Way 2. Sync Music from iPhone to Mac with Finder
* Only Available for downloaded Apple Music songs synchronization.
When you connect an iPhone or iPad to your Mac using a USB or USB-C cable, you can see your device in the Finder sidebar. From the sidebar, you can select your iPhone device and then Finder window will display options including music transfer for you to sync items with your Mac.
It is easy to use Finder to transfer iPhone music to Mac, but first you need to turn off the Sync Library option in Apple Music Preferences. If you subscribe to Apple Music, your music is transferred automatically to all your devices and this method is not required.
Step 1. Connect your iPhone to your Mac with a USB or USB-C cable.
Step 2. If it’s your first time connecting device to Mac, open the Finder on your Mac, click your iPhone device in the Finder sidebar, and then click Trust.( If it’s not the first time, you can go to Music app on your Mac, click the iPhone device in the sidebar, and then click Sync Settings in the top-right corner.)
Step 3. Click Music option in the button bar.
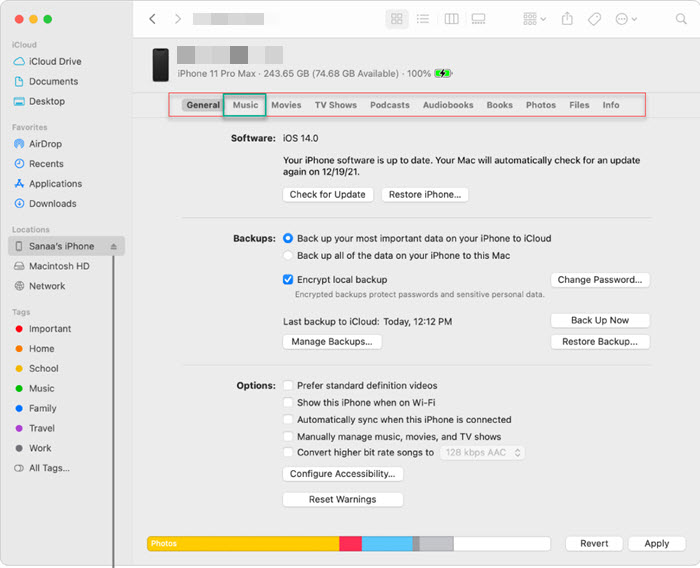
Step 4. Select the "Sync music onto [device name]" checkbox to turn on syncing of your music.
Step 5. Check the "Entire music library" option to transfer all your iPhone music to your Mac. Or click "Selected playlist, artists, albums, and genres" option to sync a selection of music.

Step 6. Select the checkbox for each item you want to sync in the music list. Deselect the checkbox for any item you don’t want to sync.
Step 7. When you’re ready, click Apply.
Way 3. Sync Music from iPhone to Mac with Apple Music
If you are an Apple fans, you will be familiar with Apple ecosystem. You can sync contents like photos, files, contacts, etc. to other Apple devices via iCloud. Also, you can sync Apple Music songs from iPhone to Mac through the Apple Music app. All you need to do is to turn on the iCloud Music Library on both your iPhone and Mac, and also sign in with your Apple ID.
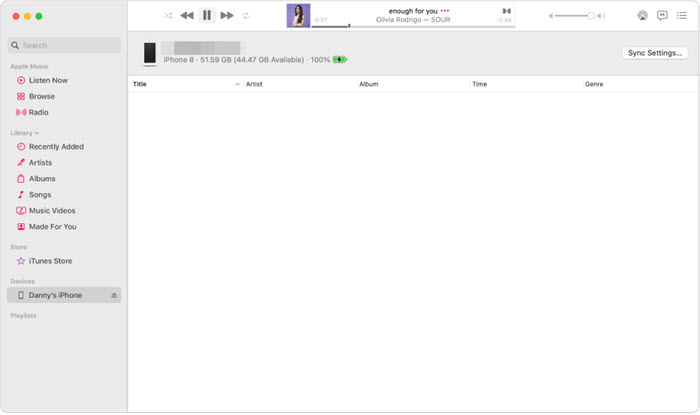
Step 1. Sign in Apple Music with your Apple ID on your iPhone and Mac.
Step 2. Turn on iCloud Music Library or Sync Library on your Mac and iPhone.
- On iPhone, go to "Settings" > "Music" and toggle on "iCloud Music Library" or "Sync Library".
- On Mac, open the Apple Music app and select "Music" > "Preferences". Then go to the "General" tab and select "iCloud Music Library" or "Sync Library" to enable the option. Click "OK".
Step 3. Wait for the syncing to complete.
Way 4. Transfer Music from iPhone to Mac Free with iTunes
If the music you want to transfer is purchased from iTunes Store, you can use iTunes to get it off your iPhone to your Mac. But note that iTunes is only available on macOS Catalina and earlier. Additionally, if you also want to transfer songs downloaded from other sources, iTunes is not advisable.
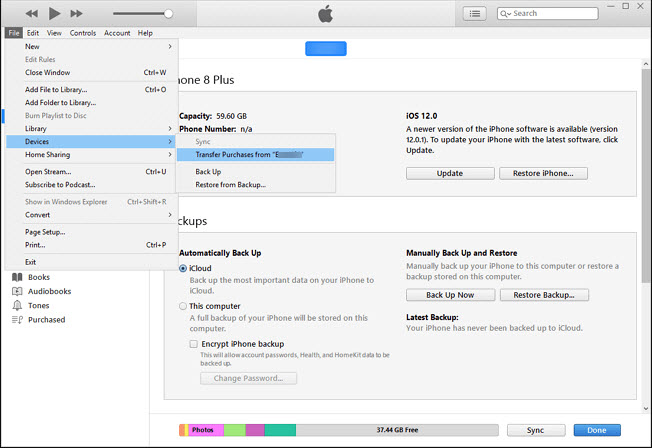
Step 1. Connect your iPhone to the Mac via the USB cable.
Step 2. Open iTunes on Mac and select "Account" > "Authorizations" > "Authorize This Computer" > "Authorize".
Step 3. Go to find the "File" tab > select "Devices" and click "Transfer Purchases from [your device]" from the drop-down menu.
Way 5. Copy iPhone Music to Mac via AirDrop
If the song or MP3 file you wish to transfer is downloaded from the internet, then you can use AirDrop to move them to your iPhone from your Mac wirelessly. Here are the steps.
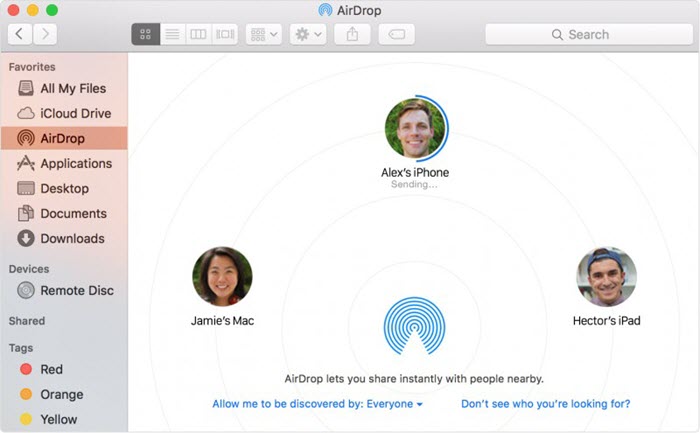
Step 1. Enable AirDrop on your Mac and iPhone.
- On your Mac: Go to the Finder, choose AirDrop from the left sidebar, then change its visibility to everyone.
- On your iPhone: Go to the Settings, tap General, and enable AirDrop.
Step 2. Locate the music file, tap it with two fingers, and select "Share", then "AirDrop".
Step 3. Choose your iPhone as the target device.
Step 4. Tap "Accept" on your iPhone and select an available app to open your music file.


