How to Crop & Zoom in/Out Videos in DaVinci Resolve?
This post is suitable for newbies who have no idea on how to crop video frame size in DaVinci Resolve. Meanwhile, this post is also helpful for even DaVinci Resolve experts who are familiar with DaVinci Resolve cropping feature, but not Fake letterbox, zooming or Dynamic zooming. Thus, it's also worth a stay for DaVinci Resolve savvy users. You will absorb the essence from this article regardless of what skill level you're in.
DaVinci Resolve Cropping Not Working? DaVinci Installation Failed? Try Better Solution
Winxvideo AI! Unlike DaVinci, this video cropping software won't ask you any personal info like phone number, company number for registeration. Plus, it can be successfully installed without varied types of components attached. You can use it to crop video dimensions, as well as trim, merge, split, rotate, add subtitles to video, convert video format, compress video size, AI enhance video quality without "Not working" error!
Table of Contents
- Part 1. How to Crop Video without Black Bars in DaVinci Resolve?
- Part 2. How to Crop Video with Fake Letterbox to Reach Cinematic Look?
- Part 3. How to Zoom in Video to Crop without Changing Aspect Ratio?
- Part 4. How to Change Timeline Resolution to Crop Video in DaVinci Resolve?
- Part 5. How to Crop Video in DaVinci Resolve via Dynamic Zoom?
- Part 6. DaVinci Resolve Cropping Not Working? Try Best Alternative
Part 1. How to Crop Video without Black Bars in DaVinci Resolve?
The most commonly used Cropping feature is to remove black bars from your video footage. If this is what you need, check the below steps:
Step 1. Select the clip you are itching to crop in the timeline.
Step 2. Head to the inspector (right side) if it did not open, click on "Inspector".
Step 3. Scroll down to where it stands "Cropping". Double-click on it to open it.
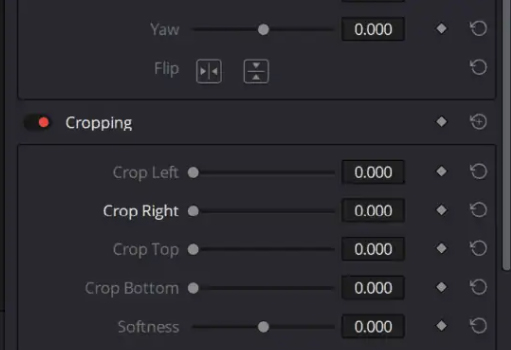
Step 4. Now you're able to crop it from whatever side you prefer! For instance, Crop Left, it will crop video image size from the left side of your video. Be care to fine tune the cropping setting if you don't wanna lose too much video frame size.
Read more: How to crop video edge/video layer in After Effects
Part 2. How to Crop Video with Fake Letterbox to Reach Cinematic Look?
This feature is well-crafted for those who need cinematic look for their videos. In such case, add fake letterbox to videos or add vertical black bars to reach your desired visual effect. The specific operations are:
Step 1. Head over to "Timeline>Output Blanking" and choose whatever aspect ratio you would like.
Step 2. Select the aspect ratio you need, from 1.33 to 2.40. Be noted that every number lower than 1.77 will crop from the sides and every higher number wil crop from top and bottom.
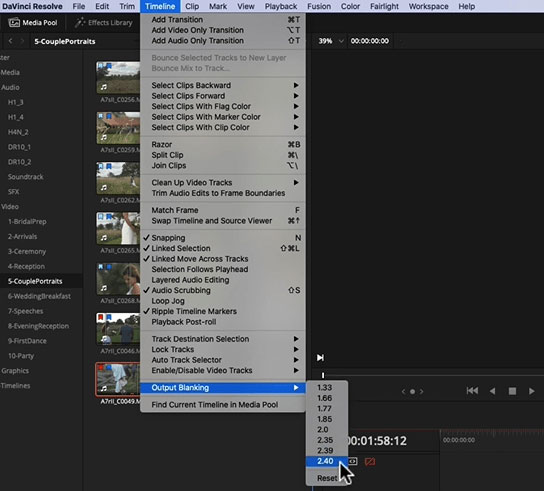
Step 3. Preview your video footage in timeline after aspect ratio selection to see if it's okay. If so, the job is done after you export video file.
Part 3. How to Zoom in Video to Crop without Changing Aspect Ratio?
Providing aspect ratio change is not what you need, you can resort to Zoom feature to resize your video frame size.
Step 1. Similar to the 1st method, you also need to select the clip in the timeline you want to zoom and head over to the inspector.
Step 2. Hover your mouse over the boxes and drag to the sides to zoom in or out. The "link" icon between "x" and "y" means that they're linked together. Whenever you change the X-axis, the Y-axis will change correspondingly. If you want to unlink them, tap the icon until the icon color changed from white to gray.
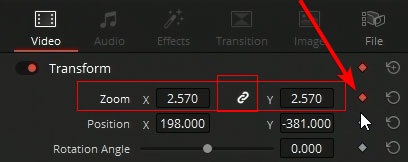
Tap the arrow circle icon on the right side if you wanna undo what you conduct.
Step 3. Export your video footage to see its cropping effect.
Part 4. How to Change Timeline Resolution to Crop Video in DaVinci Resolve?
Suggesting the aspect ratio of your screen is larger than that of your video file, you ought to increase your video aspect ratio to match your screen. Let's say your 16:9 video needs to be changed if your screen aspect ratio goes to 21:9. Well, how to augment video aspect ratio without black bars on the sides? Upscale video resolution.
Step 1. Head to DaVinci Resolve > File > Project setting. The shortcut is Shift+9.
Step 2. Change Timeline Resolution to "Custom" under Master Settings panel. Now change those numbers to whatever screen you want to fit. For instance, change 1920x1080 (16:9) to 2560x1080 (21:9) or other resolution for playback on wider screen.
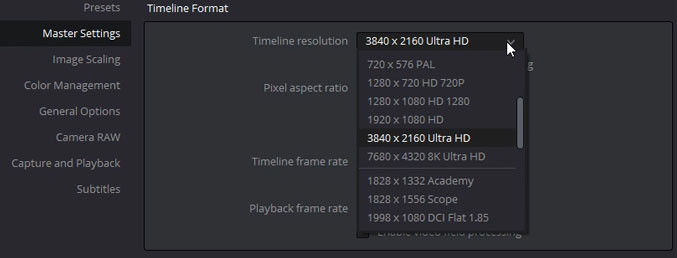
Step 3. Access to "Image Scaling" and Input Scaling. Change the mismatched resolution files option to "Scale full frame with crop". Then save the new settings. And that's it!
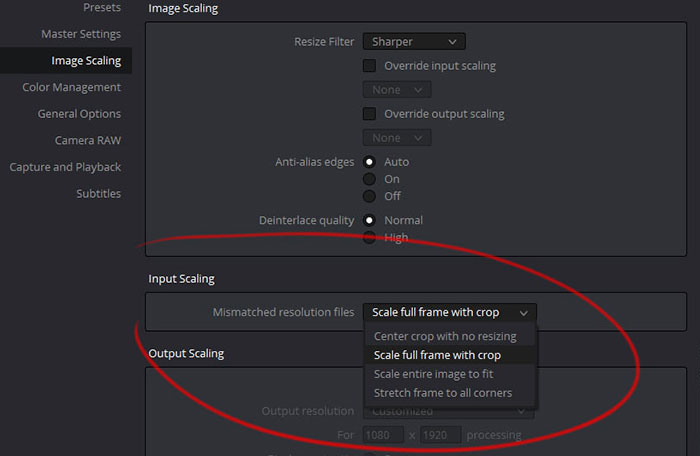
Now you've successfully changed the resolution of the video to match with that of your display. When you load your export file on your monitor with larger screen, it can be perfectly match with the screen aspect ratio without black bars ruining it.
Part 5. How to Crop Video in DaVinci Resolve via Dynamic Zoom?
On top of the common methods to crop video footage, there is another one - dynamic zoom, which aims to help you add some movement effects to your object, like your video object moving from small to big, or vice versa. Let's start with dynamic zoom if you need this cool feature:
Step 1. Drag your video to the timeline in DaVinci Resolve. Down in the right corner of the viewer, you have a rectangular button, which will expand after you click on. Choose "Dynamic Zoom", which covers the basic "cropping" and "zoom" features, as well as creates a zoom in or out motion.
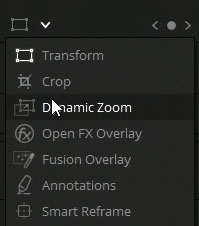
Step 2. When the dynamic zoom is activated, you'll get a green rectangle on the viewer. You can drag it where you want and regulate the size with the white dots in the corner. By default settings it will zoom out, but you can set it to zoom in as well. Then, the adjustments you set will be applied to your video clip.
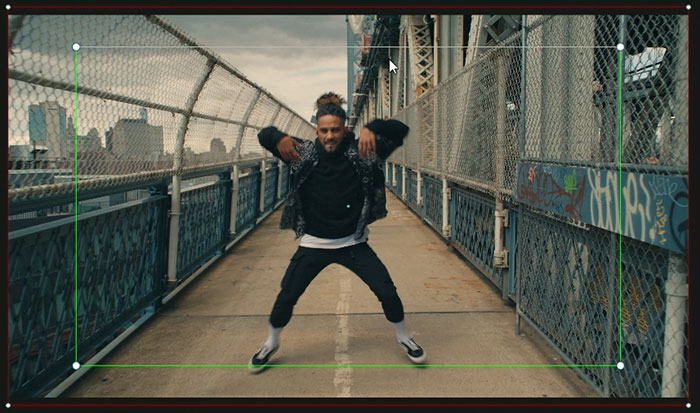
When the video clip you've applied it to starts playing, what's inside the rectangle will fill the whole screen. And gradually, the object in the selected rectangle will be fully zoomed out. That's the dynamic zoom.
Part 6. DaVinci Resolve Cropping Not Working? Try Best Alternative
DaVinci Resolve is a nice tool if you've it installed already on your laptop or desktop. Or, you will encounter "failed to install Davinci Resolve 18 components" error message at high frequency, like failed to install Blackmagic RAW player, failed to install Davinci Control Panels, etc. Meanwhile, you will also receive "error writing to file" message during DaVinci Resolve setup, let alone the latter cropping not working error.
Instead, a 100% free yet trouble-free video editing software is more worthy a mention. Winxvideo AI is the very one! It helps you free crop any videos without watermark, as well as trim, merge, convert, compress, download videos without any installation, setup, not working errors. Check its simple guide:
Step 1. Free download this all-in-one video converter & editor, install and launch it.
Step 2. On the main UI, click on "Video Converter" button to navigate to the video conversion window.
Step 3. Click the +Video button to load your video. Bulk video cropping is supported, too.
Optionally, choose an output format by clicking on "Target Format" at the bottom, varying from MP4, MOV, M4V, ProRes, iPhone iPad, iMovie to AVI, MKV, WebM, WMV, VOB, MTS, Android, PS4/5, Xbox, Microsoft, Google Pixel, etc. 420+ preset profiles.
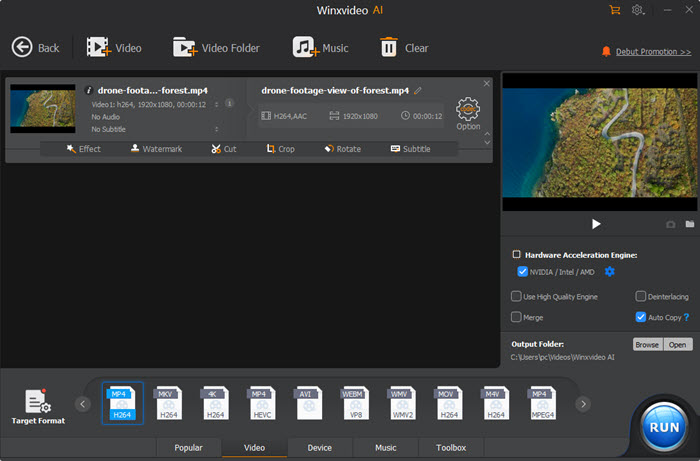
Step 3. Hit the "Codec Option" button to enter the video cropping window.
Step 4. Navigate to Edit section > check Enable Crop option > drag the video edge, input a value or select aspect ratio from the presets to decide which part to keep. After that, click Done. Or you can directly enter the size number into the Position and Size section.
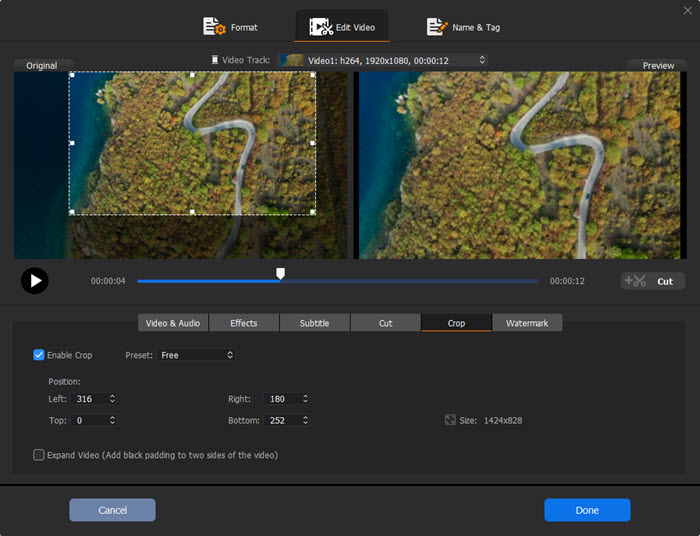
Step 5. Click RUN to start cropping a video. Once done, the folder with the cropped video will pop up.


