HandBrake Tutorial About How to Rip DVDs & Transcode Videos
Did you know that 90% of people started their first DVD ripping or video transcoding by using Handbrake? While a fraction of them feel good about Handbrake, and many more are confused by the non-intuitive steps, complicated settings, unexpected errors, slow encoding speed, and poor output quality. For that, you might wonder what you've done wrong with Handbrake. So here we provide a step-by-step HandBrake tutorial to help you use HandBrake software on Windows 11/10/8/7, along with the best HandBrake alternatives to rip DVDs and transcode videos.
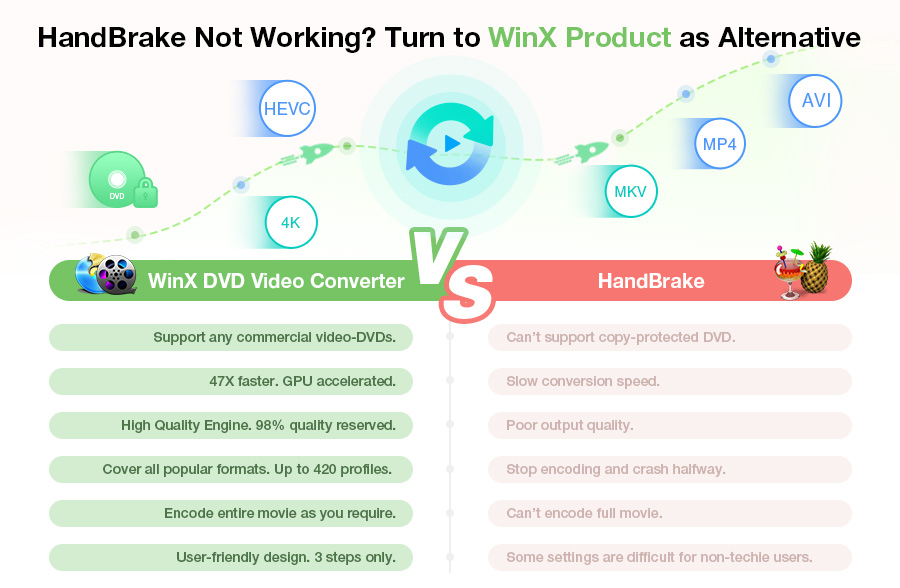
Given that HandBrake is complained due to a wide variety of problems. Trying a HandBrake alternative could help you rip DVDs and transcode videos smoothly and flawlessly. WinXDVD offers specialized programs to digitize DVDs and convert and compress 4K/HD videos equal or even better than HandBrake does, but with no errors!
- WinX DVD Ripper Platinum: Rip both homemade and encrypted DVDs to MP4, MKV, MPEG-2, iPhone, Plex, Xbox etc and backup DVDs flawlessly at 47X real time faster speed with GPU acceleration enabled without installing any libdvdcss or other DVD decrypters.
- Winxvideo AI: Convert 4K/HD videos to 420+ video formats/devices, reduce video size greatly with no quality loss, edit videos and add subtitles with one click, no output video as M4V not MP4 error.
Check why it's a wise option to stay away from HandBrake >>
Table of Contents
Part 1. Handbrake Tutorial: How to Use HandBrake to Rip DVD on Windows (10)
1. How to Use HandBrake to Free Rip DVDs Properly
Step 1: Download and install HandBrake DVD ripper on Windows.
You'd better download HandBrake from its official website to get a legit and clean version. So far, HandBrake has been upgraded to version 1.5.1 which requires Windows 10 and later. If you are using an old Windows system, you can download an old version of HandBrake. And to make sure your computer can run HandBrake, check the minimum system requirements for HandBrake:
Processor:
- AMD Ryzen, Threadripper, or Epyc
- Intel Core (6th generation and newer) i3, i5, i7, i9, or equivalent Xeon
- Apple Silicon M1 and newer, recent Intel Macs supported per the above
Free memory:
- 1 GB for transcoding standard definition video (480p/576p)
- 2 GB for transcoding high definition video (720p/1080p)
- 6 GB or more for transcoding ultra high definition video (2160p 4K)
System storage:
- 150 MB for the HandBrake app
- 10 GB or more recommended for processing and storing your new videos
Display resolution:
- 1280x960 minimum, proportionately higher with display scaling. (See section below)
Once downloaded, simply double click the setup file of HandBrake to install it. Follow the directions on your screen and you'll be fine.
Step 2: Select the source DVD.
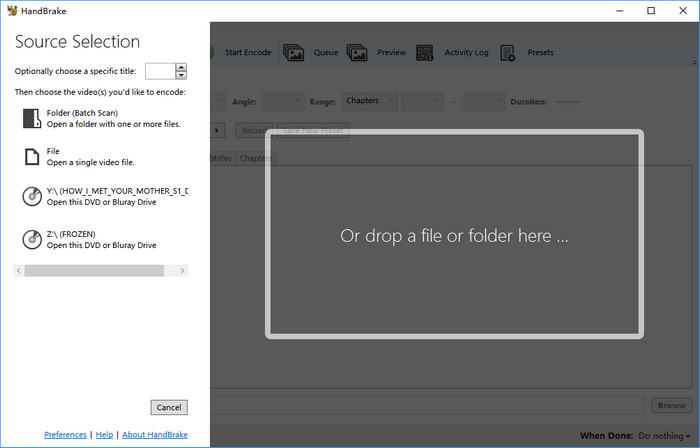
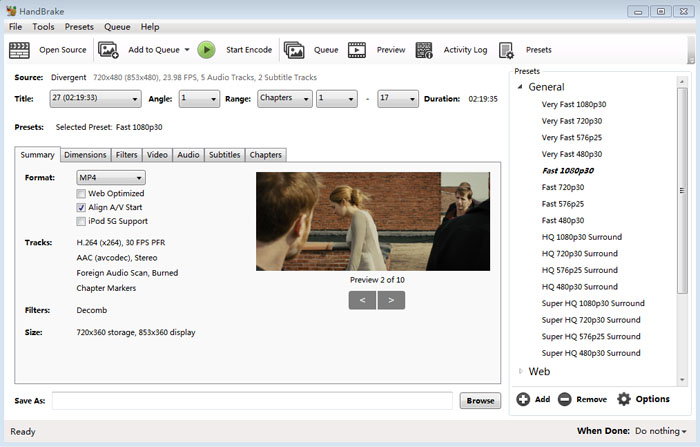
Firstly, insert the DVD you want to use HandBrake to rip into the DVD drive of your computer. Then, open HandBrake and you should see your DVD under Source Selection. Now, just click your DVD to open. HandBrake will scan your DVD titles one by one in no time. You just need to wait until it finishes scanning.
Note: HandBrake cannot read copy-protected DVDs unless you install libdvdcss - a DVD playback library for freeware. libdvdcss can help HandBrake to decode CSS encrypted DVDs. However, libdvdcss doesn't work for DVDs encrypted with other DRM techniques, such as region code, Disney X-project, and Sony ARccOS Protection. To handle these DVDs, you may need an alternative to HandBrake.
Step 3: Select the titles and chapters you want to export.
After the scanning finishes, click the Title drop-down menu and select the right title and chapters to copy.
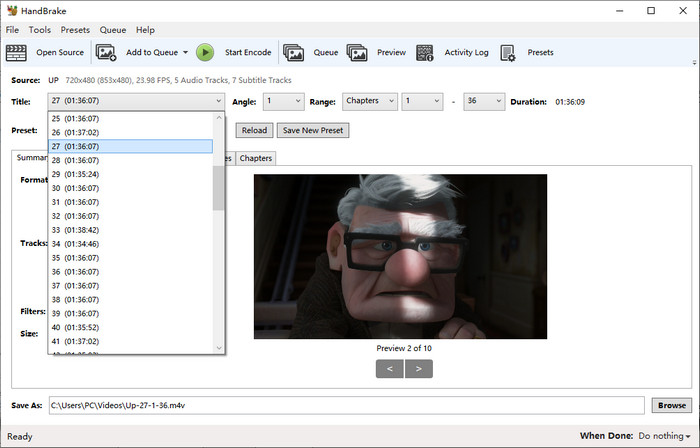
If you want to rip more than one title at a time, simply click Add to Queue -> Add Selection -> Choose titles.

Tips: Your DVD is usually to have several titles (some as much as 99 titles) and chapters (like headings and sub-headings) for the main movie, and other special features. The title with the longest duration might be the main movie, but not always. If you are not sure which title is the correct one, you can play the DVD with VLC first and take down the title number when the main movie starts.
Step 4: Choose preset.
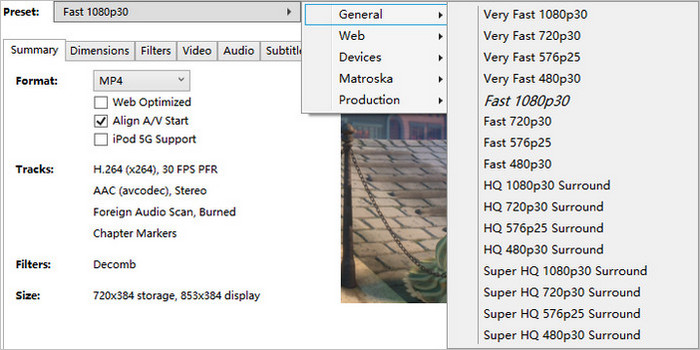
Click the Presets drop-down menu and choose a preset from the list. It offers various settings for popular software, devices, web, etc. General Presets use the MP4 format that is widely accepted and named based on quality and speed. Note that HandBrake can't rip DVDs to ISO image and Video_TS folder.
Step 5: Make some adjustments for the output.
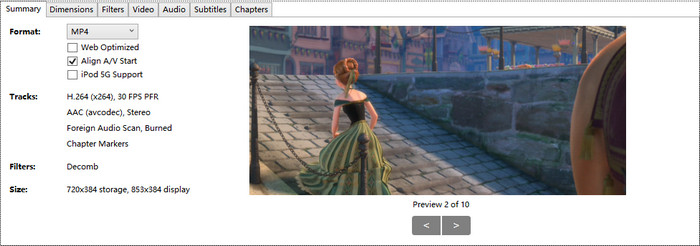
Below the Presets, you should see Summary, Dimensions, Filters, Video, Audio, Subtitles and Chapters. You'll find many options here. You can keep the settings here as default. The default settings offer good quality and usability. Certainly, you can make some changes. You can change container format, encoding format, select a preferred audio track for the region you live in, specify subtitle track, and so much more.
Step 6: Specify destination.
Click the Browse button at the bottom right corner of the window and specify the directory where the output will be stored.
Step 7: Start ripping DVD.
Now you just need to click the Start Encode or Start Queue button to start ripping DVDs with HandBrake. Some DVDs may take hours.
Other HandBrake tips that may be useful:
- Always check the copyright notices on the DVDs you plan to copy (in fact it is fair legal to backup your DVDs). Make sure you have the full copyright of your DVDs or source video, and never use HandBrake for illegal purposes, such as for piracy or commercial gain.
- If you want to rip TV episodes instead of a movie, you either need to convert the episodes one at a time or try a simpler solution: build a queue: select the Enable Queue options > set up all of the options for each episode > click Add to Queue > repeat for each episode.
- Create chapters. An outstanding feature. Now you can play and watch DVD/video movie upon your PC, TV or mobile devices with freely selectable chapters. It is just like enjoying the original DVD.
- To add subtitles. Use the subtitle section of HandBrake to select from the ones available on your DVD/video. Once you've selected a subtitle, HandBrake will imprint it onto your finished movie.
So, this is how to use HandBrake to rip DVDs on Windows.
2. Recommended Best HandBrake Settings & Presets for DVDs
• Best Quality Settings for DVDs
First, you have to know that the highest resolution that an NTSC DVD supports is 720 x 480, and a PAL DVD 720 x 576. Any settings higher than the resolution are a waste of time. Higher quality gives your larger file size. If you want to get the video and audio quality close to the source DVD, use the following tips.
Quality Settings |
NTSC DVD |
PAL DVD |
Blu-ray discs |
Presets |
General - Super HQ 480p 30 Surround. |
General - Super HQ 576p25 Surround. |
General - Super HQ 1080p30 Surround. |
Video Settings |
H.264 (x264) codec, 30 Peak Framerate, Constant Quality 16 RF, Encoder Preset (VerySlow), Encoder Level 3.1, Encoder Profile High. |
H.264 (x264) codec, 25 Peak Framerate, Constant Quality 16 RF, Encoder Preset (VerySlow), Encoder Level 3.1, Encoder Profile High. |
H.264 (x264) codec, 30 Peak Framerate, Constant Quality 18 RF, Encoder Preset (VerySlow), Encoder Level 4.0, Encoder Profile High. |
Audio Settings |
AAC, 160 Bitrate. |
AAC, 160 Bitrate. |
AAC, 160 Bitrate. |
• Best Settings for Faster DVD Ripping
Settings affect DVD decoding and encoding speed a lot. Generally, lower resolution and faster preset will make the process faster. It's a trade-off between quality and speed. Some high quality presets and settings may slow down the DVD ripping process, such as HQ/Super HQ/H.265 MKV 2160p60 presets, Slow Encoder Preset, Placebo Quality under Video settings, Denoise NLMeans filters, etc. "Best" here means a good balance between quality and speed. We recommend the following settings for fast DVD copying and acceptable video audio quality.
- Presets: General - Very Fast 480p30 or Very Fast 576p 25.
- Video: Medium Constant Quality and Encoder Preset.
Note: Settings that suit your needs are the best, you can adjust the quality slider and select the presets according to how you use the output file. Learn more instructions on how to improve HandBrake DVD encoding and decoding speed.
3. Oops, HandBrake Went Wrong. What to Do?
HandBrake is good, but it can crash or behave unusually when encoding and decoding DVDs. The error message itself doesn't explain what went wrong. We pick the most common HandBrake problems and basic troubleshooting steps. Try the tips below before posting on forums.
• Poor output quality: Many users are experiencing bad output video and audio quality problems. Ripped DVDs has blocky or scrambled video and crackling sound, output produces pixilated results, the image has a flicker bar, video and audio are out of sync, the aspect ratio is distorted, to name a few. Main causes of errors are DVD copy protection and wrong settings. You can follow the solutions to HandBrake video quality problems
• HandBrake won't read DVDs correctly: HandBrake fails to recognize/read DVDs, for example, HandBrake not scanning some DVD titles, too many titles for a DVD, no valid source found, HandBrake hanging between 50% and 99%, etc. DVD copy protection, damaged DVDs, outdated HandBrake and libdvdcss can lead to such errors. We have complete solutions for these problems, check the tip below. HandBrake valid source not found error
• HandBrake only rips part of a DVD: Only part of a DVD is ripped by HandBrake. It outputs the first a few minutes, one title/chapter, or other parts of a DVD, instead of a complete copy. Main reasons for HandBrake not copying an entire DVD may be DVD copy protection and software error. Try the following solutions.
- Restart your computer or relaunch HandBrake.
- Rip DVDs first, then use HandBrake to copy DVDs.
- Update the latest version of libdvdcss.
- Fix scratched or damaged DVDs.
• HandBrake can't backup DVDs: HandBrake doesn't offer a DVD backup option. If you want to clone DVDs to ISO Image, Video_TS folder, etc. wihtout quality loss, you have to resort to other professional DVD backup software.
• HandBrake crashes: HandBrake stops halfway/freezes or crashes when opening a DVD file, encoding a certain segment of DVDs, etc. The error may be caused by high CPU usage, hardware breakdown, copy protection, and software bugs. Try to shut down other programs running background, repair hardware breakdown, update HandBrake/libdvdcss. Check more tips for solving HandBrake crashing error.
4. Handbrake is a Troublemaker? Here's Your Lifesaver!
Confused with HandBrake settings and hate the endless errors? Here's the your lifesaver - best HandBrake alternative:
WinX DVD Ripper Platinum, a DVD copying program for DVD collectors looking for ease of use, faster processing, and stable performance. Look at its main features below.
- Work with any type of DVDs requiring no third party help, including homemade & commercial DVDs, damaged DVDs, 99-title DVDs, unplayable discs, DVD with bad sector, region code DVD, workout DVD and more.
- Rip DVDs with 5x faster speed than HandBrake does thanks to its unique level-3 GPU acceleration.
- Backup DVDs to lossless ISO Image, Video_TS folder, copy main/full title, copy DVDs to MPEG2 files (Handbrake has no backup mode).
- Rip DVDs to MP4, MOV, MKV, H.264, H.265, iPhone, Android phones and tablets with 350+ profiles, more than handbrake.
Part 2: Handbrake Tutorial: How to Use HandBrake to Convert Video in Windows (10)
In addition to rip DVD, HandBrake is also commonly used to transcode videos, reduce video file size, and do some easy editings. Here, we'd like to show you how to use HandBrake software to convert videos individually or in batch, as well as best settings for different purposes.
1. How to Transcode a Single 4K/HD Video with HandBrake
Step 1: Download and install HandBrake on your computer, and open it up.
Step 2: Click "Open Source" button, and tap on "File" to open a single video file. After loaded, the detail video information is listed in "Source" section.
Step 3: Click "Browse" button to specify the destination folder path to save your transcoded video.
Step 4: In "Output Settings" section, choose MP4, WebM or MKV as the output container. And in the following, there's a ton of stuff available to adjust your video and audio quality, add subtitles, and much more. Of course, you can also directly choose the specific presets according to your demands.
Know More about Best HandBrake Settings and Features
Users might convert video for playing through Plex/Kodi, uploading to YouTube, or storing to hard drive etc., which requires different in audio video parameters, quality, dimension and more. Thus, the HandBrake settings vary from purpose to purpose.
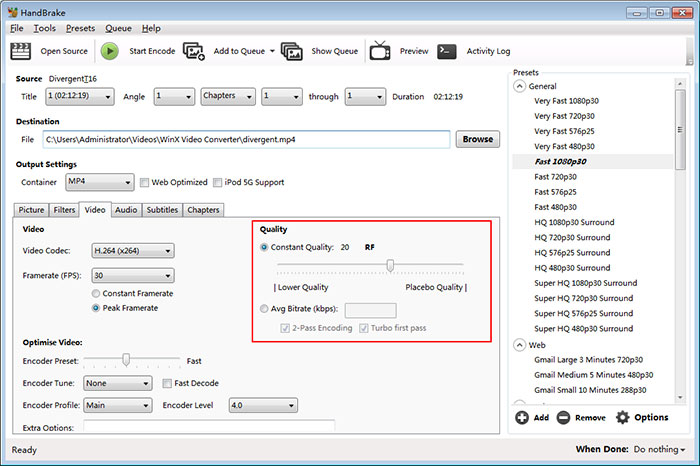
To compress 4K/HD video but no quality loss: Video file size is closely related to video quality. For x264 and x265 encoders, RF 19-23 is recommended for 720p HD, RF 18-22 for 480p/576p SD, RF 20-24 for 1080p, and RF 22-28 for 2160p 4K. Raising quality minus 1-2 RF may produce better results, and lowering quality settings may be used to produce smaller files. Learn more details on how to use Handbrake to compress videos >>
To speed up HandBrake video transcoding: Yes, HandBrake supports Intel QSV and Nvidia Nvenc, and AMD VCE GPU acceleration. If your computer is embedded with supported hardware, go "Tools" > "Preferences" > "Video" to enable it. Then click "Video Codec" under "Video" panel to choose H.264/H.265 (Intel QSV) or H.264/H.265 (Nvidia Nvenc) to speed up video transcoding. Also, Encoder Preset (Pacebo, VerySlow, Slower, Slow, Medium, Fast, Faster, Veryfast, Superfast and Ultrafast) also matters for HandBrake processing speed.
Note: Nvidia Nvenc, Intel QSV and AMD hardware encoder have a limited set of advanced encoder options, which is not recommended to change these parameters.
To do some minor editings: In HandBrake's graphical interface, you can easily trim, crop, flip, rotate videos, and add subtitles etc. While if you're using CLI interface, things turned out differently. It's confused for novices to use command lines to trim, crop, flip, rotate videos and more. For example:
Trim off the first 390 frames and last 200 frames: --start-at frame:390 --stop-at frame:200
Crop the frame size 20px on the top, 100px on the left and 10px on the right: --crop (20:0:100:10)
Rotate 90 degrees clockwise: --rotate=4
Learn more about HandBrake command line reference >>
Step 5: Tap on the "Start Encode" button to transcode your video right now.
2. Step-by-step Guide to Use HandBrake for Batch Conversion
Step 1: Go the same step to install and open HandBrake. Please note that batch conversion is only available on HandBrake 0.9.5 or above version.
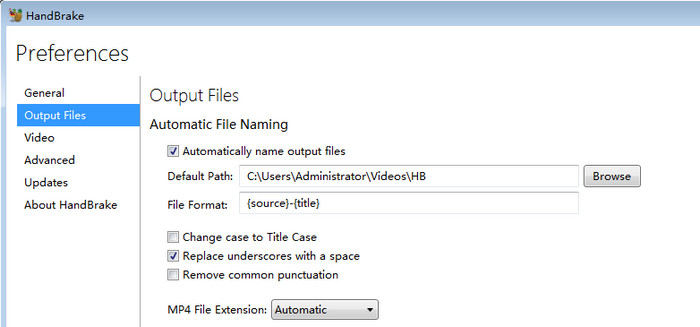
Step 2: Go "Tools" > "Preferences", and choose "Output Files". Make sure the "Automatical File Naming" option is ticked on, and click "Browse" button to choose a folder for saving output profiles. After you've done, click "< Back" button to go back to the main interface.
Step 3: Also, click "Open Source" button, but choose "Folder" to load a folder with one or more files (Make sure you've put all videos to be converted in a folder in advance).
Step 4: Choose output presets after file scanning. Or manually set output presets based on your needs and best settings tips above.
Step 5: Drop down the "Add to Queue" list and choose "Add All" to add multiple files for bacth conversion task. You can view the pending jobs by tapping "Show Queue" button.

Step 6: When everything is okay. Hit "Start Encode" button to perform the batch video conversion task.
3. Then, HandBrake Video Transcoding Goes Well?
Not really. Knowing how to use HandBrake doesn't mean that you can accomplish video transcoding successfully and smoothly. It has been criticized for the endless problems during 4K/HD video conversion.
• Unexpected crashing/freezing. A great deal of users complained that they installed HandBrake but it won't convert anything. For example, HandBrake is unable to scan source video files; "An unknown error happened" message pops on the screen; or HandBrake crashes on the startup etc.
• Very slow speed and HEVC GPU acceleration is disabled. HandBrake slow encoding has been an issue that plagued many users, even though the latest HandBrake was built with hardware encoder and decoders, namely AMD VCE, Nvidia NVENC, Intel QSV and Apple VideoToolbox for acceleration. That's mainly becuase your HandBrake was not optimized by hardware acceleration or multi-core CPU utility. Especially when you're encoding 4K HEVC files, H.265 (NVidia NVEnc) or H.265 (Intel QSV) option usually comes unavailable.
• Output file size is larger than input. What a terrible thing that your output file goes larger than what you've inputted. But it does happen in HandBrake sometimes, when you've enabled hardware acceleration or applied improper quality setting in HandBrake.
• Editing command line not working. It's almost commonplace that HandBrake editing command line not working. As a video transcoder, HandBrake is weak on video editing indeed, merely allowing you to trim, crop, rotate, flip, adding subtitles etc. But many of users would like to convert and edit video in one program.
• Video audio out of sync, and even no audio. Audio issue is also a frequently happened error in HandBrake. There are times that audio is damaged or audio and video go out of sync after conversion with HandBrake.
Worse still, being an open source program, HandBrake has no support to troubleshoot the above mentioned error point for point. That is to say, you have to search for the similar problem in HandBrake forum and figure out whether the provided tips working for your own issue. Therefore, how can you root out these video transcoding errors? A HandBrake alternative would be a nice choice!
4. Any Infallible HandBrake Alternative for Video Transcoding?
Winxvideo AI is a HandBrake alternative to be reckoned with, as it's capable of transcoding 4K/HD videos like HandBrake and even faster and more effective, but insulated from the vexed HandBrake video processing problems. It enables you to:
- Convert 4K/HD videos to MP4, MKV, HEVC, H.264, VP9, AVI, WMV, iPhone, iPad, Android, Xbox, PS4, YouTube, Instagram and 420+ profiles.
- Compress source 4K/HD video size surely, up to 90% reduction, but almost no visually quality loss with the support of High-quality engine, interframe and intraframe coding algorithms, along with advanced entropy encoding.
- One-click to make easy editing for your videos, such as trimming video length, cropping frame size, rotating, flipping, merging several clips into one, adding external subtitles and embedding watermarks etc.
- Expedite (4K HEVC) video transocding speed to 47X faster when the Intel QSV, Nvidia CUDA/NVENC, AMD GPU acceleration is enabled. Meanwhile, it ensures a smooth and stable video conversion without any worring about half-way crashing.
After you've download the 4K video converter on your computer, follow the wizard to install it, then open it to convert videos by following the steps below.
Step 1: Load your source video.
Select Video Converter and click "+Video" button or simply drag and drop to import the target video you're going to convert. You're able to load multiple videos for batch conversion as well (it goes no different with single one).
Step 2: Choose output format.
After loaded, an output profile window pops up embedded with more than 420 profiles available for your choice, from mainstream formats like MP4, MOV, MKV, AVI, FLV etc., the latest devices such as iPhone, iPad, Galaxy, Huawei, Xbox, PS5, to YouTube, Facebook presets. You're highly recommended to go "General Profiles" > "MP4 Video" > "OK" for wide compatibility.
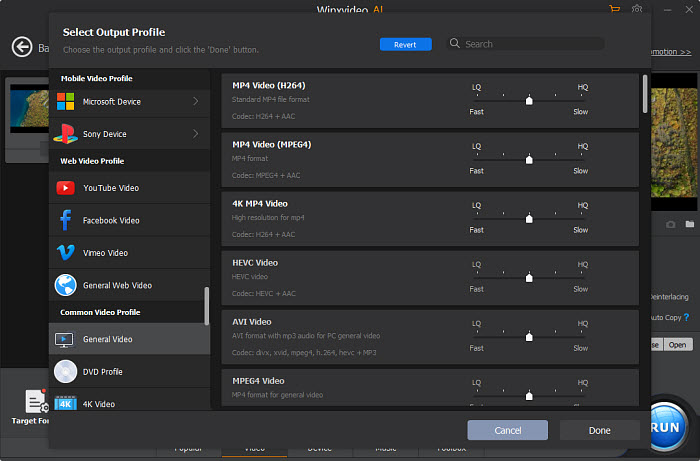
Before any further, this alternative to HandBrake allows for some advanced settings to customize your video audio parameters, enhance video quality, do some editings on video, and boost video conversion speed.
Tweak video/audio parameters: Click the gear-shaped Settings button, then you're able to downscale 4K to 1080p, change frame rate and bitrate, adjust aspect ratio to meet video the video uploading requirements, or tweak audio bitrate, channel, sample rate etc.
Enhance output video quality: Actually, you can firstly slide the module to HQ/Slow in output profile window (though it affects converting speed slightly). To further improve the output video quality, you're suggest to tick on the box of "Use High Quality Engine" and "De-interlacing" on the main interface.
Make minor video editings: Click on the scissors-shaped Edit button to enter a window where you're able to adjust audio volume, add subtitles, crop video frame size, and trim off video length etc.
Speed up video transcoding speed: Likewise, you can move the module to LQ/Fast in output profile window (not recommended since it'll degrade video quality). The best way comes to tick on the box of Intel or nVIDIA Hardware Accelerator if your computer is built with hardware acceleration graphic cards.
Step 3: Start converting videos right now.
Once done, hit the blue "RUN" button to start transcoding 4K/HD videos instantly.
More info about HandBrake
HandBrake, after hitting the 1.0.0 version in December 2016, has also experienced many updates regarding presets, video codecs and GPU hardware acceleration. Let's just check some crucial performance enhancements out here:
More presets General/Web/Devices/Matroska presets have been added to HandBrake to get it updated. And afterward, you can rip DVD or convert video to x264 (Intel QSV)/x265 and VP9 MKV on Windows PC using HandBrake to get better picture quality faster at a smaller size. In the not long past, the improvement of this video transcoder may be attributed to:
- 4K and more presets debut: New profiles on General, Web, Devices, Matroska, Production are added, which include YouTube, Vimeo, Chromecast, Xbox, Fire TV, and Roku.
- Associates with x265/VP8/VP9/AMD/Nvidia: Benefits from the VP8/VP9 project, HandBrake has a large portion of speed, size, and quality improvements. 10- and 12-bit HEVC support on encoding is added for Kaby Lake and newer CPUs. For hardware encoding, HandBrake initially supports AMD VCE & Nvidia NVENC for Windows and Apple VideoToolbox for macOS.
- HandBrake Core Decoding Library: Starting from 1.2.0, HandBrake has switched the core decoding library from Libav to FFmpeg.
- Revamped User Interface: In terms of feature parity, this 1.0 is the best one compared to the previous versions.
Watch Video Tutorial - How To Use Handbrake


