How to Solve WiFi not Showing up on Windows 11?
"I woke up to go on my laptop. And I noticed I wasn’t connected to the wifi. I went to connect it, and there was no wifi option (only Bluetooth, flight mode, battery saver, focus assist, and accessibility.)…" – from Microsoft Community
After updating to Windows 11, one of the headaches to most people is WiFi option not showing up Windows 11. Put succinctly, the issue can be caused by corrupted WiFi driver, network adapter issues, hardware issues or Windows OS issues. Whatever, this issue must be addressed immediately otherwise you have problems in surfing the Internet wirelessly. Fret not, you are on the right page focusing on solving Windows 11 WiFi issues.
Hot search: Full Windows 11 update issues and fixes, fix laptop not connecting to wifi
Quick Fixes to Windows 11 WiFi not Showing Up Issue
- Fix 1. Restart Windows 11 PC
- Fix 2. Enable WiFi Adapter in Network Connections
- Fix 3. Turn off the Airplane Mode
- Fix 4. Run File Explorer
- Fix 5. Modify the WLAN AutoConfig Service
- Fix 6. Run the Internet Connection Troubleshooter
- Fix 7. Update Network Adapter Drivers
- Fix 8. Reinstall the Network Adapter Device
- Fix 9. Perform a Network Reset
- Fix 10. Ensure WiFi Icon is Enabled via Group Policy
- Fix 11. Check for Windows 11 Updates
Fix 1. Restart Your Windows 11 PC
1. Go to the Desktop and press Alt + F4 to launch the Shut Down Windows box.
2. Click on the dropdown menu and select Restart from the list of options.
3. Click OK at the bottom.
Also, you use your mouse to choose Restart from Windows 11 Start. This is the quickest way to solve sudden Windows 11 WiFi missing error if you have used WiFi last time.
Related: Quick Fix for Windows 11 Can't Connect To This Network.
Fix 2. Enable WiFi Adapter in Network Connections
WiFi option won’t show up if the WiFi adapter is disabled. You should turn it on by going to Control Panel or following the below method.
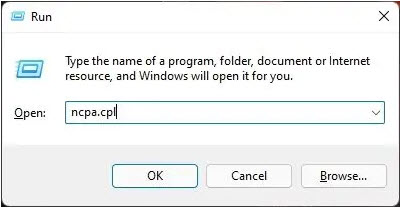
1. Press the nifty Windows 11 keyboard shortcut Windows + R to open a Run window. Here, type ncpa.cpl and hit Enter. This will open the Network Connections window quickly.
2. If the WiFi icon is greyed out, just right click on it and choose Enable to activate it. If it was already enabled, you can disable it first and then enable it again.
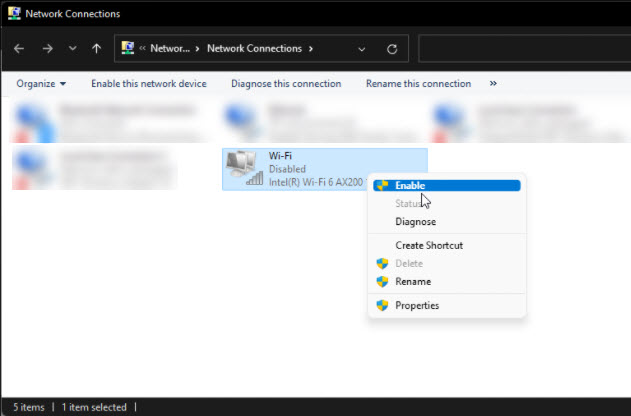
You can also run the network diagnostic by right clicking on the WiFi adapter and then select Diagnose. Then, your Windows 11 PC will automatically scan your computer and recommend a possible solution. Hit the Apply button to let Windows 11 fix the WiFi network error itself. If it is not working, just follow the on-screen instructions to get other methods Windows 11 recommends to you.
Fix 3. Turn off the Airplane Mode
As is known, Airplane Mode will prevent your device from connecting to network. All the radio services, including WiFi, Bluetooth, Cellular mode, etc. will be disabled. So, Windows 11 WiFi is not working or WiFi connection drops suddenly without doubt. If the Airplane Mode is turned on, you need to disable it.
1. Use the Windows 11 keyboard shortcut Windows + A to open the Action Center. Here, click on the Airplane mode toggle to turn on or disable the Airplane mode. If it is turned off, the icon becomes grayed-out.
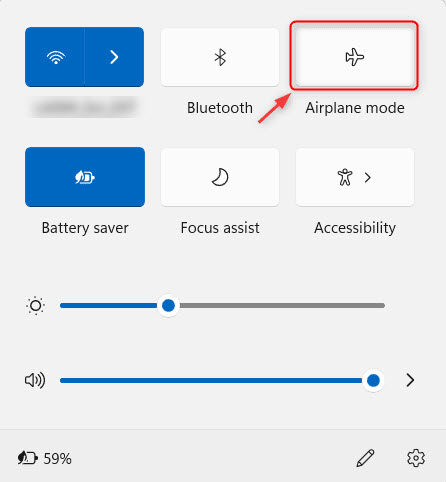
2. You can also use Windows + I to open Windows Settings > move to the Network and Internet settings from the left sidebar > scroll down to Airplane mode > toggle the button to turn it off if it is on.
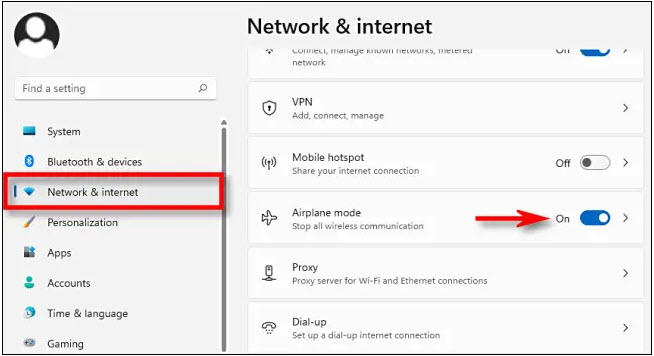
To make sure if this method has solved your Windows 11 WiFi issue, you can go to Action Center using the Windows + A shortcut again, and access the WiFi options if they are available. Otherwise, go on to find more solutions.
Fix 4. Run File Explorer
This is a known workaround to fix WiFi issues in all versions of Windows 11. Running the File Explorer can eliminate and remove any bug preventing the WiFi icon from appearing.
1. Press Ctrl + Shift + Esc to launch the Task Manager.
2. Click on the File menu at the top-right corner and select Run new task.
3. Type explorer.exe in the text field, and either click on OK or hit Enter to launch File Explorer.
4. After the File Explorer process starts, check if the Wi-Fi icon reappears.
Fix 5. Modify the WLAN AutoConfig Service
WLAN AutoConfig service is responsible for the WiFi service. If it isn’t activated when you boot up your Windows 11 computer, you need to change some key settings to make WiFi icon shown.
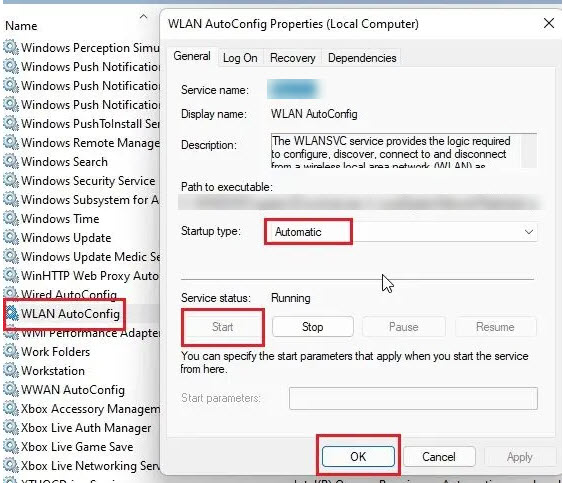
1. Open the Run window by pressing the Windows + R shortcut. Type in services.msc and hit Enter. It will open the Services window.
2. Scroll down and look for the WLAN AutoConfig service. Double-click to open it. Then, change the Startup type to Automatic and click on Start below to kick off the service right away.
3. Now, click on Apply > OK, and you are done.
4. Restart the computer and see if Windows 11 WiFi not showing up issue is resolved or not.
Fix 6. Run the Internet Connection Troubleshooter
The built-in Troubleshooters in Windows 11 can help fix common issues with network devices and computer peripherals. The Internet Connection troubleshooter will scan the problem of your WiFi network and fix it automatically.
1. Press Win + I to open Settings.
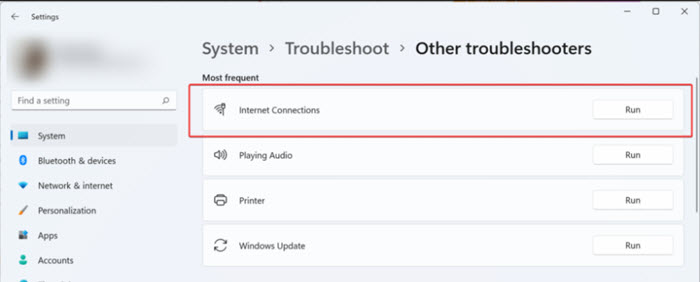
2. Open the System tab in the left pane, scroll down and click on Troubleshoot.
3. Under Options, click on Other troubleshooters.
4. Click the Run button for Internet Connections. Windows will launch the troubleshooter and show the issues for which Windows can troubleshoot.
5. Click on Troubleshoot my connection to the Internet. Then, the troubleshooter will scan the system for issues and recommend potential fixes. Hit Apply to fix the WiFi issue and check for any improvements.
You can also enable Network Adapter Troubleshooter if the above method is not working.
1. Press Win + I to open Settings.
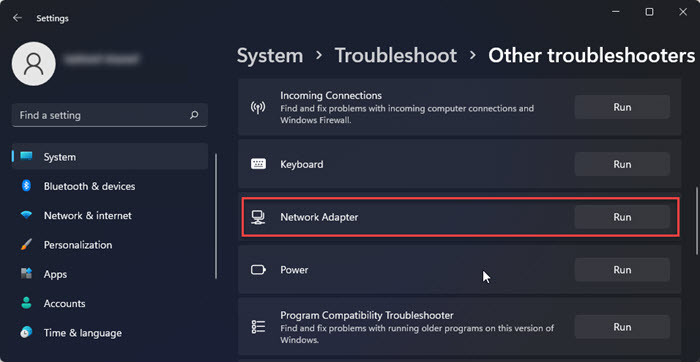
2. In the System tab, go to Troubleshoot > Other Troubleshooters.
3. Scroll down and click the Run button for Network Adapter.
4. In the troubleshooter window, select All network adapters and click Next.
5. Select the appropriate option and follow on-screen instructions. If available, apply the recommended fixes to restore your Wi-Fi connectivity.
Fix 7. Update Network Adapter Drivers
The latest network drivers may not be installed during Windows 11 update. You can update the network adapter drivers to the latest version to solve the issue.
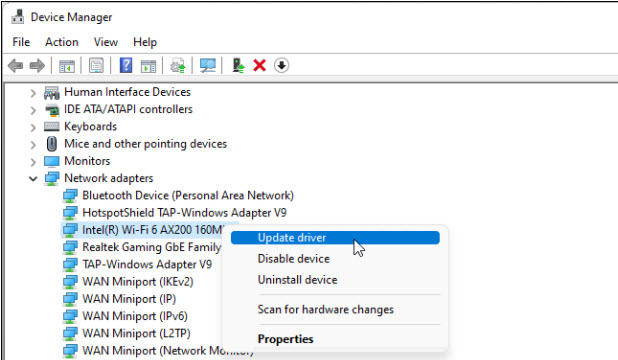
1. Press Windows + X to access the Quick Links menu.
2. Select and open the Device Manager.
3. Find the Network adapters > expand Network adapters > right click on your WiFi option > choose Update driver.
4. From the popup window, click on Browse my computer for drivers and then click on Let me pick from a list of available drivers on my computer.
5. Now, select one of the drivers that are suitable for your WiFi adapter. You can also click try other drivers available on the list to find a proper driver.
6. Click on Next to apply the change.
7. Now, Windows 11 will install the WiFi driver again. You are recommended to restart the PC after applying the driver to fix Windows 11 WiFi not working issue completely.
Fix 8. Reinstall the Network Adapter Device
If updating the network adapter drivers doesn’t make any sense, you can also try to reinstall the network adapter device.
1. Navigate to Device Manager as explained above.
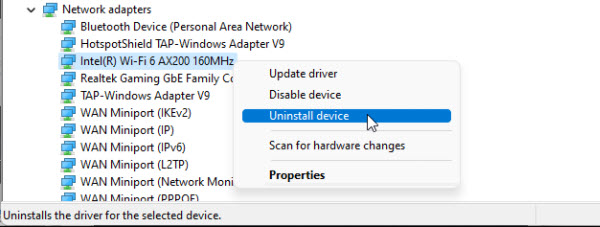
2. Right click on the WiFi adapter under Network adapters, and select the Uninstall device option from the context menu.
3. Click on Uninstall in the pop-up prompt. This will temporarily remove the WiFi driver from your PC.
4. Now, restart your Windows PC and your system will automatically reinstall the drivers for the network card. And your Windows 11 WiFi problem should be tackled.
Fix 9. Perform a Network Reset
This solution will remove and reinstall the network adapters so as to solve can’t find WiFi network in Windows 11 issue. Also, other network components will reset to their default settings to fix problems triggered due to incorrect network configuration.
1. Go to the Start menu search bar, type in settings, and select the Best match. You can also use the keyboard shortcut Win + I to do the same thing.
2. Select the Network & Internet option from the left.
3. Now, scroll down and click on Advanced network settings to get to network reset.
4. Under the More settings section in Advanced network settings, select Network reset.
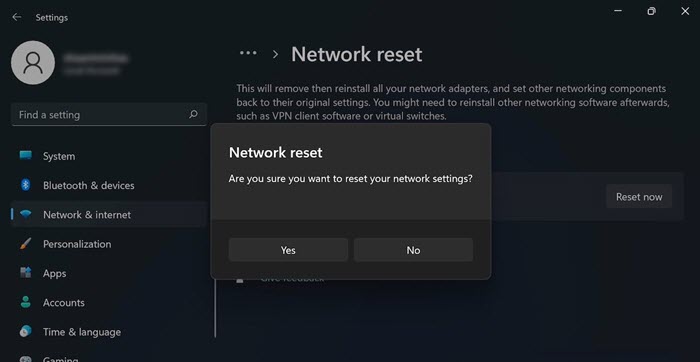
5. Finally, click on Reset now and click Yes to confirm the action.
Fix 10. Ensure WiFi Icon is Enabled via Group Policy
Sometimes when WiFi icon is not showing up in Windows 11 from the Action Center or the Taskbar, it might be because of an erroneous modification in the Group Policy. This is a typical error to Windows 11 Home users as they need to enable Group Policy Editor manually.
1. Press Windows + R to open the Run window. Here, type gpedit.msc and hit Enter. It will open the Group Policy Editor.
2. Move to User Configuration in the left pane and navigate to Administrative Templates > Start Menu and Taskbar. Here, choose Remove the networking icon to open.
3. Now, select Disabled on the top-left corner and press OK.
4. Finally, restart your PC, and now the WiFi icon should appear in the Windows 11 Action Center.
Fix 11. Check for Windows 11 Updates
The fresh Windows installation can contain bug fixes and essential drivers releases for the network devices. By updating to the newest Windows version, the WiFi issue may be solved automatically. Simply click on the Check for updates option in Settings to download and install them. You can also manually install the updates from the Microsoft Update Catalog.
If the WiFi connection issue on Windows 11 occurs after performing an upgrade, you can consider going back to the previous version of Windows 11. To do this, open Settings > System > Recovery. Under Recovery options, click the Go back button and follow on-screen instructions to restore the earlier version of Windows. But please note, you can use this feature within 10 days after performing an upgrade.
In conclusion:
When the WiFi icon isn’t showing up, you can’t connect to the network and complete tasks. So, the above methods will help you use WiFi on Windows 11 without any issue.


