


How to Effectively Record Lectures for Online Teaching and Learning
 Mike Rule
Updated on
Recording lectures has become a valuable asset in modern education. Educators can use recorded content to reach a wider audience, while students benefit from the ability to revisit complex material. Using modern tools like Winxvideo AI, recording lectures is now more accessible and efficient than ever. In this article, we'll dive into the step-by-step process of how to record a lecture using Winxvideo AI, share practical tips for producing quality content, and answer frequently asked questions.
Part 1. Why Record Lectures?
Recording lectures has become a key component of modern teaching and learning. Whether you're an educator looking to create online courses, a trainer recording a workshop, or a student capturing classroom content for later review, the need for effective recording tools is clear. High-quality recordings allow educators to expand their reach, offer students flexibility, and ensure that complex subjects can be revisited and understood fully.
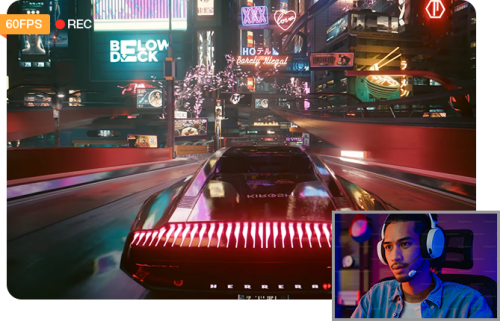
Video recorders like OBS Studio, Camtasia, Winxvideo AI etc. are essential for achieving this goal. With their excellent recording capabilities, you can record screen or webcam seperately, or both screen content and the presenter simultaneously, creating a more engaging and interactive lecture experience.
Part 2. How to Record a Lecture with Winxvideo AI
Winxvideo AI is a powerful tool for recording lectures. It offers a comprehensive suite of features designed to streamline the process and enhance the quality of your recordings. One of the key features of Winxvideo AI is its ability to capture both screen content and webcam feed simultaneously. This allows you to create more engaging and interactive lectures by visually demonstrating concepts or presenting yourself alongside your slides.
Additionally, Winxvideo AI offers high-quality audio recording options, ensuring that your lectures are clear and easy to understand. For added flexibility, you can schedule recordings in advance, allowing you to capture lectures even when you're not present. The software also provides features like annotations by drawing, and basic editing tools like trimming, merging, comressing etc., making it a versatile solution for educators.
1. Download and Install Winxvideo AI
To get started, you'll need to download Winxvideo AI from its official website. Follow the installation instructions, ensuring your computer meets the necessary system requirements, such as sufficient processing power, memory, and storage. Properly configuring your hardware will ensure a smooth recording process.
 Free Download
 Free Download
Note: AI tools for Mac are currently unavailable, but they're coming soon. Stay tuned.
2. Initial Setup and Equipment Preparation
Before you start recording, it’s important to set up both your hardware and software for optimal performance. Here’s how:
• Connect Your Devices: Ensure that your camera, microphone, and any other external devices (e.g., external displays or speakers) are connected properly. Test them to confirm that they are working correctly.
• Set Winxvideo AI for Lectures Recording:
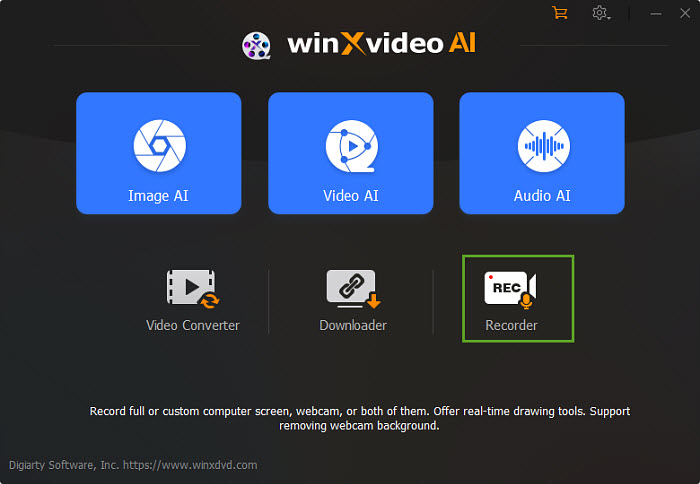
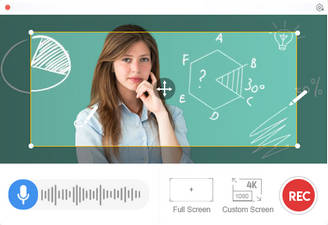
Open Winxvideo AI and choose "Recorder" to get ready for lectures recording.
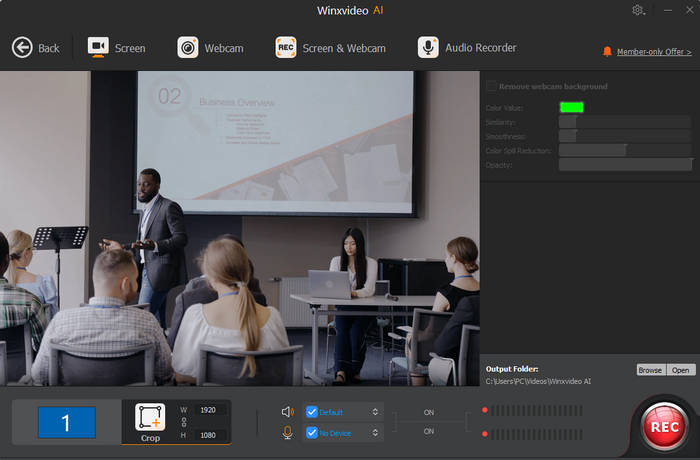
Then choose the recorder mode based on your content. For example, choose the "Screen" to capture the screen activities on your monitors, or "Screen & Webcam" mode for both capturing your screen of presentation or slides and yourself as a speaker. This mode allows you to simultaneously record the screen (ideal for presentations or slides) and the webcam feed of the speaker. It’s perfect for lectures where both visual content and face-to-face engagement are important.

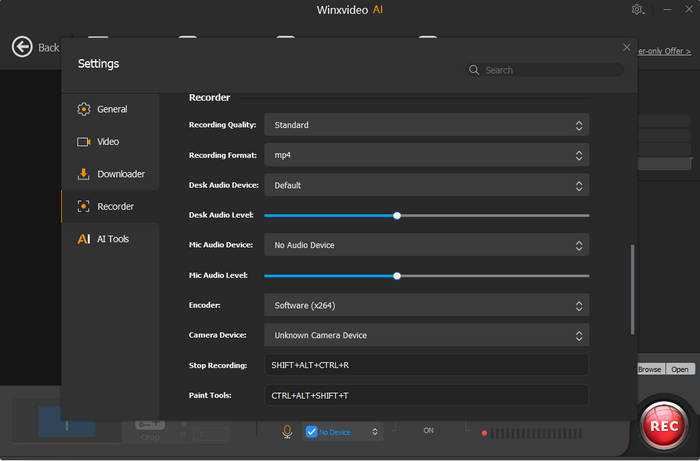
Tap the Setting icon on the top right corner of the UI and choose Recorder to adjust settings if needed. You're allowed to change recording quality, format, audio level/device, and know the shortcut for drawing (Ctrl+Alt+Shift+T).
Set the recording resolution in "Crop" section. Make it at least 1080p for crisp, high-definition video quality. BTW, a frame rate of 30 frames per second (FPS) is recommended for smooth playback.
Select your microphone from the audio settings menu, and adjust the volume accordingly. Make sure to test the microphone to ensure the audio is clear. Recording in a quiet environment will help improve sound quality.

3. Content Preparation Before Recording
• Prepare a Lecture Outline: Before hitting the record button, create a detailed outline of your lecture. This will help you stay on track and ensure that you cover all key points without unnecessary detours.
• Prepare Supporting Materials: If you're using PowerPoint slides or other visual aids, make sure they are organized and ready. Winxvideo AI will record everything happening on your screen, so it's crucial to have your materials prepped and easy to navigate.
• Environment Check: Choose a quiet, well-lit space for recording. Lighting should be even, avoiding direct sunlight on your face or screen to prevent overexposure.
4. Start Recording Your Lecture
Once your setup is complete, it’s time to start recording:
• Start Recording:
Back in Winxvideo AI video recorder, click the "REC" button.
Winxvideo AI will begin capturing both your screen and your webcam feed, ensuring that your audience can see both the material you're presenting and you, the speaker.
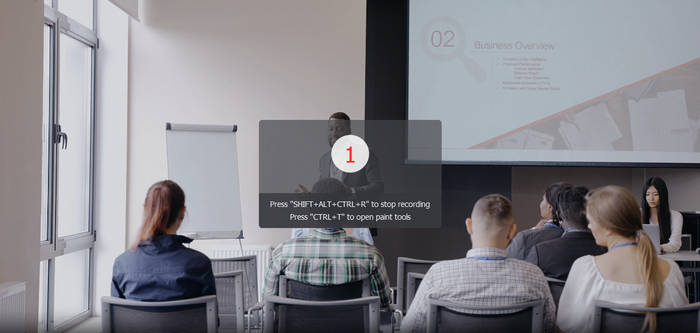
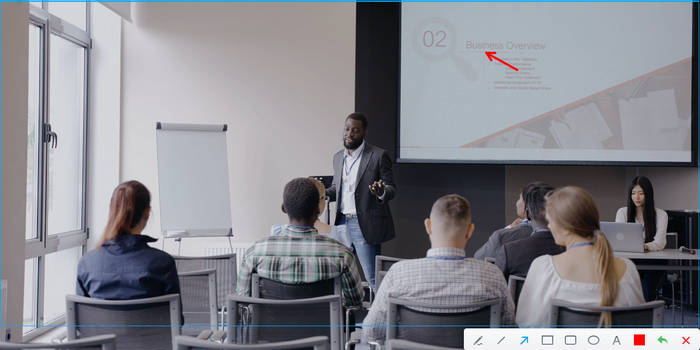
• Highlight using the Draw feature: While recording, take advantage of Winxvideo AI’s "draw" function. It allows you to mark key points directly on the screen in real time, helping to emphasize important sections of your lecture and keeping students engaged. Whether you're explaining a complex diagram or underlining key terms on a slide, it's great for enhancing understanding.
• Pacing: Speak clearly and at a moderate pace to ensure your audience can follow along. If you're explaining something particularly complex, slow down and use the highlight tool to emphasize your points. If you have trouble keeping up with the pace, you can also use the "Audio Recorder" to record audio in advance and then sync it to the screen during post-processing.
5. Post-Recording Editing and Exporting
After you’ve finished recording, you can enhance your lecture with basic post-production edits using Winxvideo AI:
• Simple Trimming: Use Winxvideo AI’s built-in editing tools to trim unnecessary parts from the beginning or end of the video. For example, you can remove long pauses or interruptions, making the final video more polished and professional.
• Add Annotations or Captions: If needed, you can add captions or text annotations to reinforce key points, especially for viewers who might need extra clarity.
• Export the Video: Once editing is complete, export the video in your preferred format, such as MP4, which is widely compatible with most platforms. Adjust the resolution if necessary, but keeping the output in 1080p is ideal for maintaining quality.
Your One-Stop Solution to Record High-Quality Lectures
- Record lecture in 4 modes: screen, webcam, screen & webcam, audio
- Highlight key points in lectures real-time using drawing feature
- Trim, merge, add subtitle, add background music before exporting.
- Export recorded lectures to MP4, MOV, MKV, WMV, YouTube etc.
- Compress video file size to fit all the platforms like YouTube, TikTok
- Bonus: Stabilize, deinterlace, upscale video to cinema-like quality.
Part 3. Essential Tips for Recording High-Quality Lectures
1. Keep Content Structured and Focused
A well-structured lecture is easier for your audience to follow and retain. Stick to your outline, and avoid going off on tangents. Use your visual aids wisely, and make sure they align with your talking points.
2. Speak Clearly and Control Your Pace
Your audience will appreciate a moderate speaking pace. If you talk too fast, you risk confusing your listeners; too slow, and they may lose interest. Use pauses effectively to give your audience time to absorb information, especially after explaining complex topics.
3. Use Visual and Audio Aids
Make your lecture more engaging by incorporating visuals and sound when appropriate. The drawing feature in Winxvideo AI can bring extra clarity to complicated topics, and adding music or background audio (sparingly) can create a more immersive experience.
 FAQs for Recording Lectures
In general, recording lectures is legal with the instructor's permission. However, laws vary by location, and it's important to check institutional policies and local regulations before recording.
To improve your audio, use a high-quality microphone and choose a quiet recording environment. Using a pop filter and placing the microphone at an optimal distance can help eliminate unwanted noise.
The drawing tool is great for emphasizing key points during your lecture. You can use them to underline or circle important parts of a slide or diagram, making your lecture more interactive and engaging.
If your lecture video is too large, use Winxvideo AI’s converting feature to reduce the resolution or change the file format to something more compressed, like MP4. This will help make the file smaller without sacrificing too much quality.
Yes, you can add subtitles or captions during the post-production process using third-party tools or Winxvideo AI’s built-in text editing features. This is particularly helpful for accessibility or for students who may need additional support.


