VLC Deinterlace Settings: How to Enable Deinterlacing Mode in VLC
Have you ever been troubled with interlaced horizontal lines when playing videos with VLC media player? Is there any way to fix this issue? Certainly, VLC does support to deinterlacing videos, but very few users know how to activate deinterlacing in VLC media player. Scroll down this article to find out how to enable deinterlacing mode in VLC and the fix for VLC deinterlacing not working.
VLC Deinterlace not Working? How to Fix Interlaced Videos?
Here comes Winxvideo AI that you can use to deinterlace any videos (e.g. 1080i to 1080p) for VLC to play without issues, or directly play any videos files up to 4K smoothly without interlaced lines.
Table of Contents
Part 1: What's Deinterlacing?
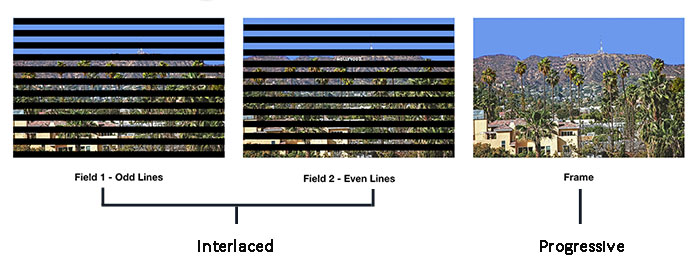
Deinterlacing is a process to convert interlaced video sources to progressive scanned videos. Then, you may come across another problem. What's interlaced scanning and progressive scanning?
- Interlaced scanning: It divides a frame video into odd-number and even-number lines of pixels, and takes turns to scan the field formed by odd rows and the field formed by even rows.
- Progressive scanning: It scans each frame from left to right, top to bottom, one by one to display all the pixels.
As a field only contains half of the information of a frame, interleaving scan can save half of the information and maintain the same update rate in the case that the processing speed of the device or the transmission bandwidth cannot process the information of the whole frame in time. Broadcast and television systems, such as NTSC or PAL, usually use interlaced signals instead of progressive signals.
On the other hand, modern devices are fast enough to process and scan entire frames in no time, so they are using progressive scanning. However, if you play interleaving scanning videos on such modern devices, you will get screen scintillation with horizontal lines and half the brightness. That's why you need to deinterlace videos.

Part 2: How to Activate Deinterlacing Mode on VLC?
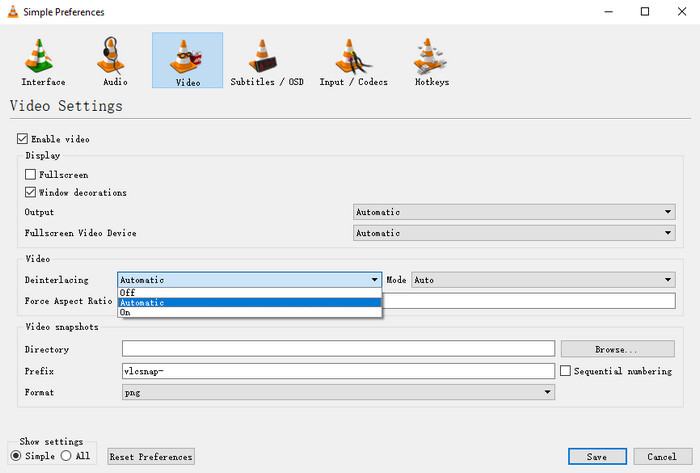
As for how to deinterlace videos, VLC can get it across. It's quite easy. You can use the hotkey or shortcut key, D on the keyboard to activate or deactivate deinterlacing in VLC. But before that, you need to set the default deinterlacing method in VLC.
- Open VLC Media Player and go to Tools > Preferences.
- Navigate to Video column, and select Off, Automatic, or On in Deinterlacing drop-down list.
- Also choose the proper deinterlacing mode according to your needs. There are various modes available in VLC: Auto, Discard, Blend, Mean, Bob, Linear, X, Yadif, Yadif (2x), Phosphor. More details about VLC deinterlace modes >>
- Click on Save button.

Part 3: How to Fix VLC Deinterlacing Not Working Issue?
There are also cases of VLC deinterlacing not working even if you set the default deinterlacing mode. Sometimes you can solve it through Tools -> Preferences -> Input/Codecs -> Hardware-accelerated decoding -> Set to Disable to deactivate the hardware acceleration. But more often than not, you cannot even figure out what the cause is.
For that, you can turn to Winxvideo AI to deinterlace videos in advance. With the support of any interlaced videos like older, televised broadcasts, or videos captured by analogue cameras, it's able to convert interlaced videos to progressive ones in MP4, MOV, AVI, MKV, AVCHD etc. fast with excellent output quality.
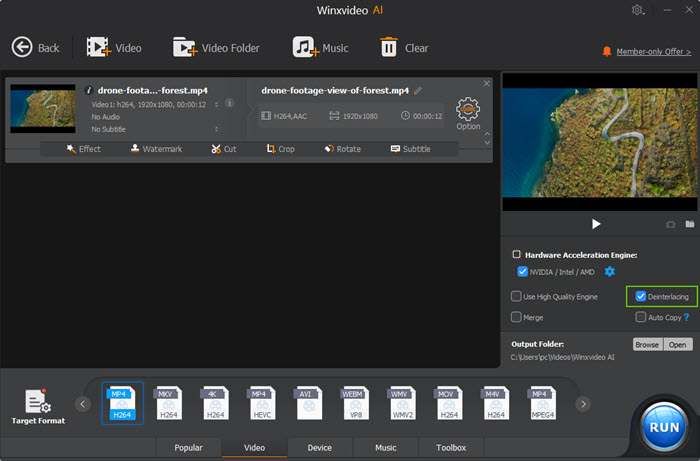
Step 1: Launch Winxvideo AI on your computer and click the Video Converter button on the main UI. Click +Video to load the source interleaving scanning video.
Step 2: Pop up the Output Profile window by clicking on the Target Format option at the bottom, and then choose an output format for your video. MP4 Video is always recommended owing to its wide compatibility.
Step 3: Tick on the box of Deinterlacing, and tap RUN button to convert the interlaced video to progressive video in MP4.


