


How to Zoom In on Premiere Pro: A Comprehensive Guide
 Mike Rule
Updated on
Zooming in on a video clip is one of the most common editing techniques used to highlight details, create motion effects, or reframe shots. Whether you're a beginner learning how to zoom in on Premiere Pro or an experienced editor seeking a better solution for enhancing quality, this guide has everything you need.
In this article, you'll learn detailed steps for zooming in on Premiere Pro using different techniques, understand the limitations of manual scaling, and explore an AI-powered alternative—Winxvideo AI, to upscale videos without sacrificing quality.
Zooming isn't just enlargement; it's a storytelling tool emphasizing expressions, cropping backgrounds, and adding motion. Wistia found subtle zooms boost engagement by over 21% compared to static shots. However, Reddit users often find Premiere Pro's zoom buggy, citing quality loss, and difficulty with smooth animations, making it frustrating and time-consuming.
To ensure quick zoom in on videos in Premiere Pro without quality loss, consider Winxvideo AI as an intelligent copilot for upscaling your footage. It allows you to upscale videos to 4K/8K with enhanced quality, eliminating noise, compression artifacts or blur with greater ease and speed, for further zoom in within Premiere Pro.
 Free Download
 Free Download
Note: AI tools for Mac are currently unavailable, but they're coming soon. Stay tuned.
Part 1. How to Zoom in on Premiere Pro: Step-by-Step Guide
Premiere Pro offers a couple of key ways to zoom in on video for emphasis, reframing, or dynamic movement. While powerful, achieving precise, quality zooms can be tricky for some. The main methods are directly adjusting the Scale in Effect Controls for basic zooms, and using the Transform effect for more advanced animations. Let's explore both to effectively zoom in on your footage within Adobe Premiere Pro.
Method 1. How to Zoom in on Premiere Pro Using the Scale Property
Step 1. Begin by launching Adobe Premiere Pro and initiating a new project. Next, import your video footage by navigating to File > Import, selecting your desired video file, and clicking Open.
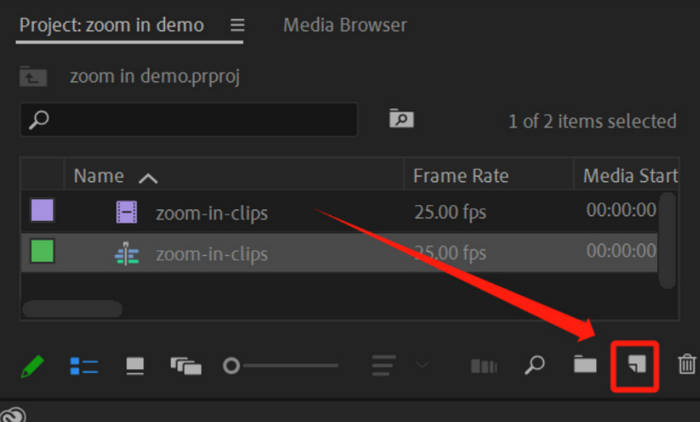
Step 2. Within the Project Panel, simply drag your imported video clip onto the New Item icon at the bottom. This action will instantly generate a new sequence that automatically matches your video's properties.
Step 3. With your footage placed on the timeline, select it. Then, locate the Effect Controls panel. If it's not immediately visible, access it via Window > Effect Controls.
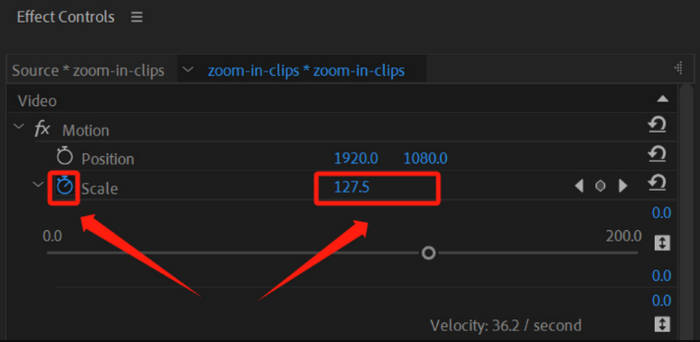
Step 4. In the Effect Controls panel, you'll find the Scale and Position property under the Motion dropdown.
Step 5. To achieve a zoom effect, you'll manipulate this Scale property over time by adding keyframes. Keyframes act as markers, defining specific points where the Scale value will be recorded, thus initiating or concluding the zoom animation.
- Position your playhead on the timeline at the desired zoom start time.
- Click the stopwatch icon beside the Scale property in Effect Controls to establish your initial keyframe.
- Advance the playhead to the point where the zoom should conclude.
- Increase the Scale value to zoom in; for instance, setting it to 200% will double the video's size. Also, adjust the Position values (X and Y) to center the zoomed-in area.
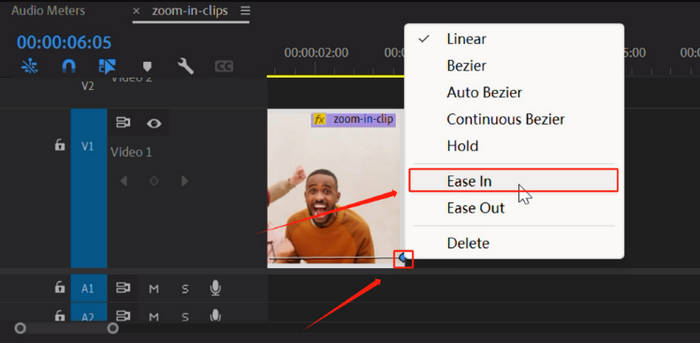
Step 6. To achieve smoother zoom transitions, apply easy ease interpolation by right-clicking on a keyframe and navigating to Temporal Interpolation > Ease In or Ease Out, or Ease In/Out for a softened start and end.
Step 7. Review your zoom effect by playing the sequence. Adjust keyframes and Scale values as needed until satisfied.
Method 2. Using the Transform Effect to Zoom in for More Control
While the default Scale property works fine, the Transform effect gives you greater flexibility, especially useful if you want to add motion blur or work independently of the clip’s default properties.
Step 1. Follow the same steps to import your video clip and create a sequence.
Step 2. Go to the Effects panel. In the search bar, type Transform to quickly locate the effect under Video Effects > Distort.
Step 3. Drag and drop the Transform effect directly onto your video clip in the timeline. You should now see it listed in the Effect Controls panel along with your clip’s default Motion settings.
Step 4. Expand the Transform section. Adjust Scale and Position values just like before.

Step 5. Check the box for Use Composition’s Shutter Angle to enable motion blur. Set the Shutter Angle to 180 for a natural-looking blur during movement. This creates a smoother, more cinematic feel—something you won’t get with the default Motion properties.
Step 6. Add keyframes to animate the zoom, just like in Method 1.
Step 7. Use Ease In and Ease Out on keyframes (right-click on them) for a smoother zoom effect, avoiding abrupt starts or stops.
Step 8. Play back your sequence to review the zoom effect and adjust keyframes and Scale until satisfied.
Limitations of Zooming in on Premiere Pro
Okay, so learning to zoom in on Premiere Pro is a must-know, but let's be real, it's not always perfect, right? Here's where it can kinda stumble:
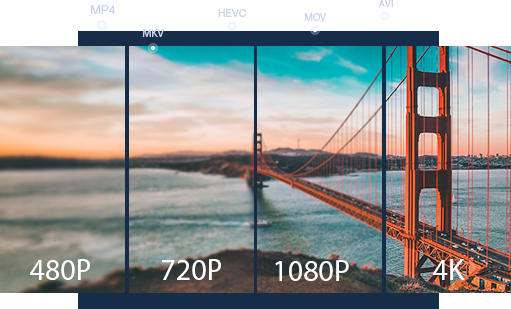
- Degraded Video Quality: Zooming via Scale enlarges the pixels, which often leads to a noticeable loss in sharpness, especially if the original resolution is low. A 720p video zoomed in by 150% will look significantly blurrier.
- No AI Enhancement: Premiere Pro does not enhance video quality—it simply scales it. There’s no AI upscaling or detail restoration built in.
- Time-Consuming Manual Workflow: Creating smooth zooms requires manual keyframes, making the process tedious for long or multiple clips.
- Not Ideal for Low-Res Footage: If your footage is grainy or compressed, zooming in will amplify artifacts and noise, making the final output less professional.
Learn More: How to Upscale a Video in Premiere Pro >>
These limitations are why many creators are now turning to AI-powered upscaling tools that do more than just enlarge video—they enhance it intelligently.
Part 2. How Winxvideo AI Delivers Sharp Zoom-Ins with No Blurriness
Winxvideo AI is a powerful desktop software designed to intelligently upscale and enhance videos using advanced deep learning algorithms. Unlike traditional video editors that simply stretch pixels, Winxvideo AI analyzes each frame to identify and reconstruct fine details, delivering sharper and more refined results.
It can effectively increase your video resolution, for example, from 720p to 1080p or even 4K, while simultaneously restoring lost textures, reducing visual noise, and eliminating common compression artifacts such as blockiness or blurring. This makes it an ideal solution for creators who want to zoom in on footage without compromising image quality.
Free Download
Free Download
Note: AI tools for Mac are currently unavailable, but they're coming soon. Stay tuned.
How to Use Winxvideo AI to Zoom In with Quality Boost
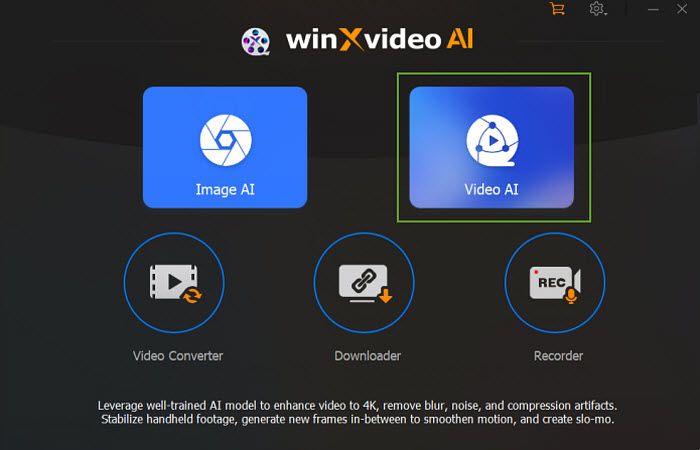
Step 1. Download and install Winxvideo AI on your computer. Launch the software, click "Video AI," and drag your video clip that you want to zoom in into the interface. You can add multiple videos for batch enhancement.
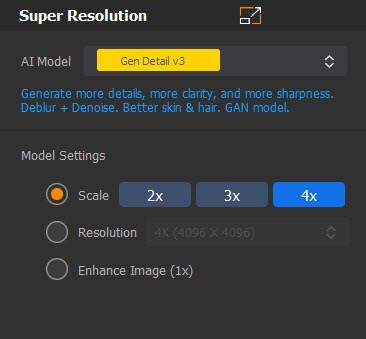
Step 2. Select the "Super Resolution" mode to begin the upscaling process. For best results, choose the "Gen Detail" AI model, ideal for general video enhancement and zoom-in clarity.
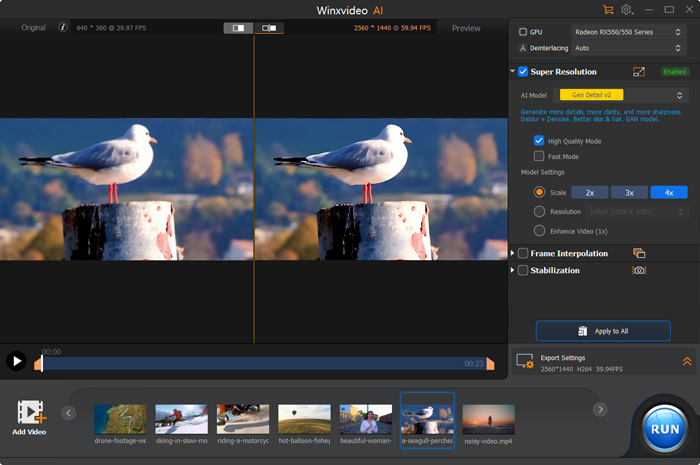
Step 3. Set your preferred zoom level by choosing a 2x, 3x, or 4x upscaling option. You can also enable custom resolution output, like 720p, 1080p, or 4K to match your project needs.
Step 4. Preview the zoomed-in video for quality. Adjust output format, resolution, and destination folder, then click "RUN" to upscale and enhance your video without blur.
Part 3. FAQs
Q1: Can I zoom in on a specific part of the screen in Premiere Pro?
Yes. After increasing the Scale value, adjust the Position settings to shift the frame and center the zoom on the specific area you want to highlight.
Q2: Is zooming the same as cropping in Premiere Pro?
Not exactly. Cropping removes edges from the frame, reducing the visible area, while zooming scales up the entire image. Zooming is more flexible for focus effects without permanently cutting out parts of the video.
Q3: Will zooming in degrade my video quality?
It can—especially if you're working with lower-resolution footage. As you scale beyond 100%, pixels are stretched, which can cause blur or softness. For a sharper result, consider using AI-powered tools like Winxvideo AI, which can upscale and enhance video quality as you zoom in.
Q4: What’s the best zoom level to avoid quality loss?
For standard HD footage, try to keep zoom levels between 120% and 150% to maintain acceptable quality. If your source video is 4K, you have more flexibility to zoom without noticeable degradation.


