


Achieve Crisp Footage: A Guide to Davinci Resolve Denoise & Plugins
 Mike Rule
Updated on
Davinci Resolve's Denoise feature tackles unwanted noise and grain, especially in low-light footage, leaving you with crisp, professional-looking videos. Davinci Resolve Denoise also protects fine details and offers faster rendering times compared to third-party plugins. In the next section, we'll explore the perfect scenarios to use Davinci Resolve Denoise and provide a detailed guide to get you started. You'll learn when to use it, why it's beneficial, and how to leverage its power to achieve stunning image quality.
Step-by-step guide on How to Use Davinci Resolve Denoise
Davinci Resolve offers noise reduction tools to clean up your footage. Here's a step-by-step guide to using them and some tips to achieve the best results.
Learn more: 6 Best Video Noise Reduction Software 2024
1. Accessing Noise Reduction
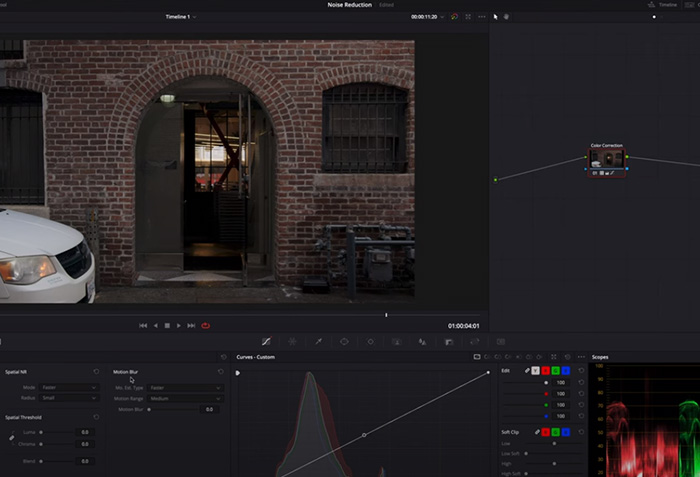
There are two ways to access noise reduction in Davinci Resolve. Motion Effects Panel: This is the traditional method. Go to the Color page and find the last icon above the primary grading tools. This opens the Motion Effects panel. OpenFX Library: You can also find "Noise Reduction" in the OpenFX library and apply it to a node.
2. Applying Temporal Noise Reduction
- Temporal noise reduction leverages information from nearby frames to reduce noise. Here's how to use it.
- Select the correct node in the Color page.
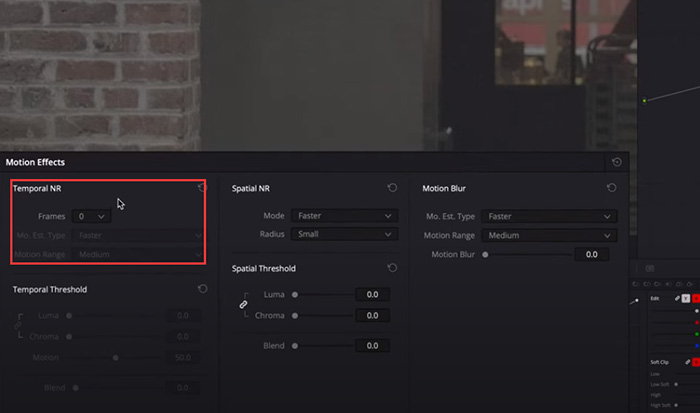
- In the Motion Effects panel, activate "Temporal NR."
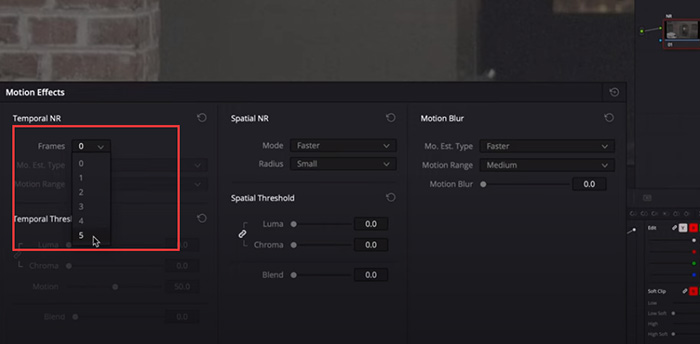
- Choose the number of frames to analyze for noise reduction (1-5 frames is a good starting point).
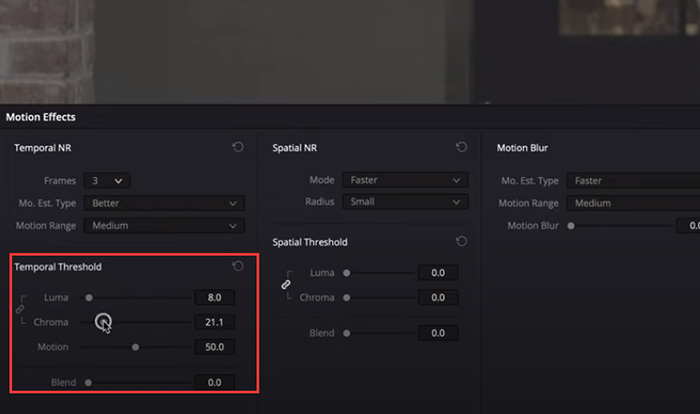
3. Adjusting Temporal Thresholds
The "Temporal Threshold" controls how much noise reduction is applied. Here are some tips. Use the "Luma" and "Chroma Threshold" sliders (0-100 range). Increasing them reduces noise but can also remove details. Start with them linked and gradually increase one slider until you see noise reduction in static areas. Unlink them if your footage has more color noise (chroma) than light noise (luma).
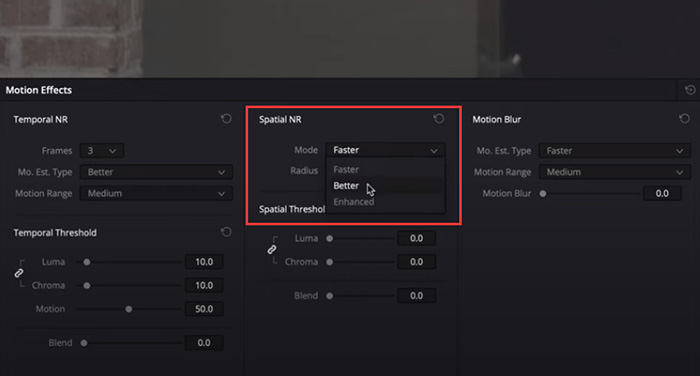
4. Applying Spatial Noise Reduction (Optional)
If temporal noise reduction isn't enough, you can use spatial noise reduction, which analyzes individual frames.
- Activate "Spatial NR" in the Motion Effects panel.
- Adjust the "Radius" slider to control the area affected by the noise reduction. A lower radius focuses on smaller details.
5. Refining Results and Rendering
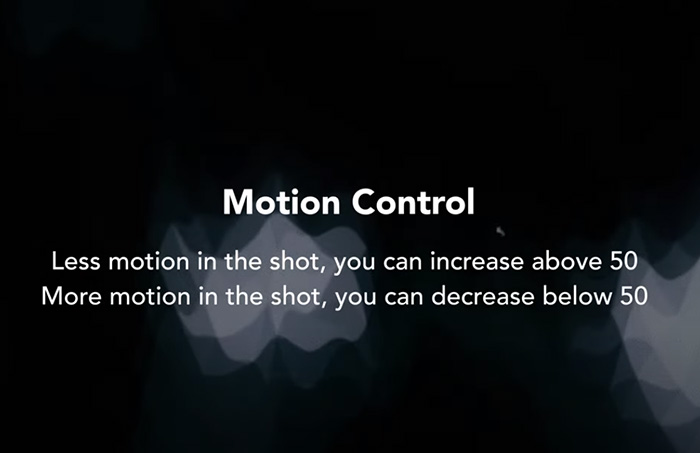
Motion Estimation: For footage with movement, adjust the "Mo. Est. Type" and "Motion Range" to optimize noise reduction while minimizing artifacts.
Sharpening: Denoising can soften the image. Apply slight sharpening afterwards to recover details (use the OpenFX library or dedicated sharpening tools). Once you're happy, render your footage.
Tips
Experiment with different threshold values and preview the results to find the right balance between noise reduction and detail preservation. Consider using noise reduction earlier in your color grading workflow, especially if you plan on making heavy adjustments.
Noisy footage benefits from proper exposure during filming. If possible, try to avoid shooting in overly dark conditions. Davinci Resolve offers different noise reduction algorithms. If the default "Neat Video" doesn't work well, explore alternatives.
2. Davinci Resolve Noise Reduction Settings
By understanding these settings and following these tips, you can effectively adjust Davinci Resolve's noise reduction tools to achieve clean, high-quality footage while minimizing unwanted side effects. Davinci Resolve offers two main noise reduction tools: Temporal and Spatial. Each has its own set of settings to control the effect.
Temporal Noise Reduction
Frames: This defines how many frames are analyzed together to identify noise patterns. A higher number offers better noise reduction but can cause artifacts in fast-moving scenes. (Start with 1-5 frames)
Temporal Threshold (Luma/Chroma): Controls the amount of noise reduction applied to brightness (luma) and color (chroma) information. Higher values reduce more noise but also remove detail.
Mo. Est. Type (Motion Estimation Type): This setting defines how the software analyzes motion within the frames. Choose between "Small" for minimal movement, "Large" for significant movement, and "Block Matching" for complex motion.
Motion Range: Defines the area considered for motion estimation. "Small" focuses on minor movements, while "Large" considers larger movements within the chosen frame range.
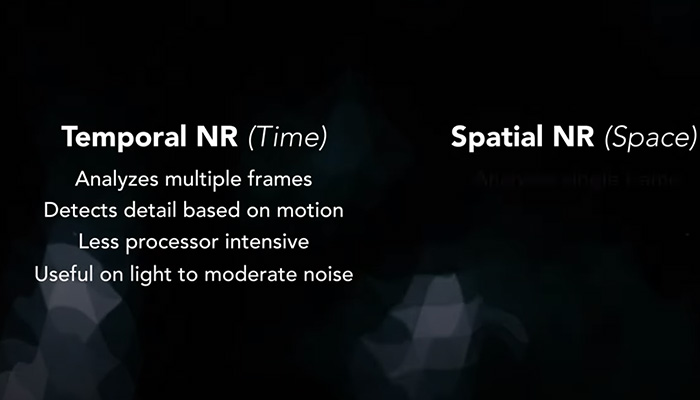
Spatial Noise Reduction
Radius: Controls the size of the area analyzed for noise reduction within a single frame. A lower radius focuses on smaller details, while a higher radius affects broader areas.
Adjusting Settings for Desired Noise Reduction
Start Low, Increase Gradually: It's always better to begin with minimal noise reduction and gradually increase it until you see the desired effect. This helps avoid removing too much detail.
Balance Between Luma and Chroma: If your footage has more color noise, unlink the Luma and Chroma thresholds. Then, adjust the Chroma threshold specifically to target color noise without affecting brightness as much.
Optimize for Motion: For footage with camera movement or objects in motion, adjust the Mo. Est. Type and Motion Range to find the right balance between noise reduction and minimizing artifacts caused by movement. Experiment with different options and preview the results.
Avoiding Common Problems
Over-Reduction: Excessive noise reduction leads to a soft, blurry image. Monitor your preview closely and avoid pushing the thresholds too high.
Loss of Detail: Denoising can remove fine details along with noise. Use a light touch and consider alternative methods like sharpening to recover details after denoising.
Artifacts in Motion: Incorrect Motion Estimation settings can introduce unwanted artifacts in moving areas. Experiment with different Mo. Est. Type and Motion Range options.
Color Shifting: In extreme cases, noise reduction might cause slight color shifts. Keep an eye on your color balance after applying denoise and make small adjustments if needed.
Additional Tips
- Apply noise reduction earlier in your color grading workflow, especially if you plan on making substantial color adjustments. Noise can be amplified during grading.
- Remember, the optimal settings will vary depending on your specific footage and desired outcome. Experiment and preview the results to find the sweet spot.
- Consider using noise profiles (available in some versions) for specific camera models to potentially achieve better results.
Best Davinci Resolve Denoise Plugins
Remember, the built-in Davinci Resolve noise reduction tools offer a solid foundation for most noise reduction needs. Consider third-party plugins only if you require advanced features or aren't satisfied with the built-in options. Here's a list of some popular third-party Davinci Resolve Denoise plugins, along with their key features, pros, and cons.
1. Neat Video (by Neat Video)
Neat Video stands out as a premium Davinci Resolve plugin for noise reduction. It tackles noise through both temporal and spatial processing, meticulously removing noise while preserving image details. This is particularly impressive considering its ability to leverage camera profiles for targeted noise reduction and its excellent detail retention. Batch processing and hardware acceleration further enhance its efficiency, making it ideal for handling large projects.
However, Neat Video comes with a price tag, requiring a subscription or perpetual license. Additionally, its extensive features and settings might present a learning curve for beginners. If you're a professional editor or an advanced user seeking top-notch noise reduction with exceptional detail preservation, Neat Video is a powerful tool to consider. For basic noise reduction needs, the free, built-in Davinci Resolve tools might be sufficient.
2. Waves Clarity VX (by Waves)
Waves Clarity VX offers a unique approach to noise reduction in Davinci Resolve. Leveraging AI technology, it provides separate modules for tackling voice and background noise. This makes it particularly well-suited for cleaning up dialogue recordings, a common challenge for video editors. The real-time processing capability is a further advantage, allowing you to make adjustments and see the results instantly, ideal for live editing or workflows where quick turnaround is essential.
However, compared to some other Davinci Resolve denoise plugins, Clarity VX offers a more streamlined interface with less granular control over the noise reduction process. This can be a plus for beginners or those who prefer a simpler workflow. However, for users seeking highly customized noise reduction for complex noise issues, Clarity VX might not provide the level of control they require.
RX (by iZotope)
iZotope RX goes beyond a simple Davinci Resolve denoise plugin. It's a comprehensive audio repair suite offering a vast array of tools for tackling even the most challenging audio issues. One of its key features is spectral editing, a visual representation of audio frequencies. This allows for incredibly precise noise reduction, enabling you to target specific noise types while minimizing impact on the desired audio content. RX also boasts dedicated modules for removing common audio problems like hums, clicks, and pops, making it a valuable tool for restoring old recordings or cleaning up noisy audio.
However, this power comes at a cost. RX is a high-end audio repair suite with a price tag to match. Additionally, its extensive features and interface can be overwhelming for beginners who might not need the full spectrum of its capabilities. If you're dealing with complex audio restoration tasks or require precise noise reduction beyond the scope of Davinci Resolve's built-in tools, RX is a powerful solution. However, for basic noise reduction needs in your video editing workflow, a more streamlined Davinci Resolve plugin might be a better fit.
Topaz DeNoise
Topaz DeNoise offers an AI-powered approach to noise reduction within Davinci Resolve. Standing out for its user-friendly interface, DeNoise makes noise reduction accessible even for beginners. This is further enhanced by its dedicated noise reduction models for both photos and videos, allowing you to tailor the process to your specific content. Additionally, DeNoise is a more affordable option compared to some high-end Davinci Resolve denoise plugins.
However, the user-friendliness comes with a trade-off. DeNoise offers less control over targeting specific noise types compared to plugins with more granular settings. While it might handle basic noise reduction well, it may not be ideal for professional editors tackling complex noise issues in challenging footage. If you prioritize ease of use and affordability for basic noise reduction needs in your video projects, Topaz DeNoise is a good option to consider. For more demanding workflows or the need to address specific noise types, a plugin with more control over the noise reduction process might be necessary.


