


How to Remove Camera Shake in Premiere Pro
 Mike Rule
Updated on
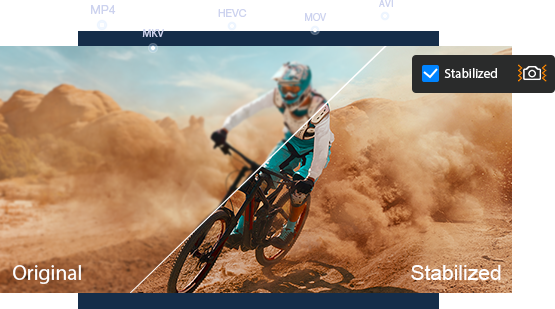
If your camera shakes, your video will appear shaky, which doesn't convey a professional look. Fortunately, you can often remedy this issue using Premiere Pro's Warp Stabilizer. In this guide, we'll walk you through the steps to remove camera shake in Premiere Pro. Let's get started.
How Does Camera Shake Happen?
Camera shake is that annoying jiggle in your videos that makes them look amateurish. It can happen for a bunch of reasons. Sometimes, it's just from holding the camera unsteady (we've all been there!). Other times, it's because your tripod slipped or the ground was uneven.
A few things can make camera shake worse, like using a long lens or shooting at a slow shutter speed. Long lenses magnify any little movement, while slower shutter speeds let more light in, but they also make it easier for your camera to shake.
How to Prevent Camera Shake during Shooting?
The best way to deal with camera shake is to prevent it in the first place. There are a few tricks to keep your footage steady while you're shooting.
First, try to find a stable surface to rest your camera on, like a table or a sturdy wall. If you're shooting handheld, hold your camera close to your body and use both hands for extra support.
You can also try using a tripod or a gimbal stabilizer for extra stability. Remember, the slower your shutter speed, the more likely your footage is to shake, so try to use a faster shutter speed when possible.
How to Remove Camera Shake in Premiere Pro?
Once you have Premiere Pro installed on your computer, just follow the steps below to reduce camera shake in Premiere Pro.
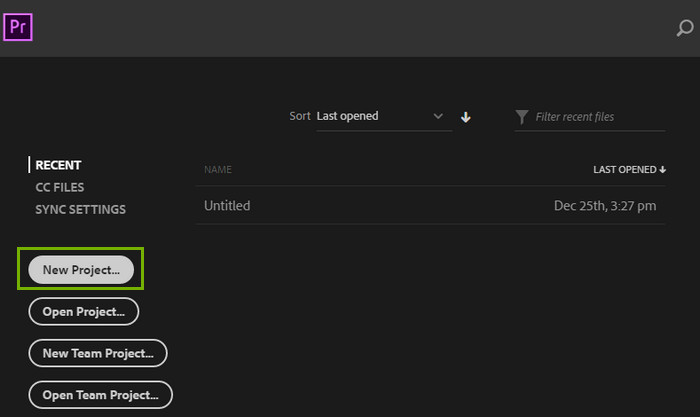
Step 1. Create new project.
Open Adobe Premiere Pro and then click the New Project option. After that, New Project dialogue will open where you can specify the project name, location, and other settings.
Step 2. Import the shaky video.
Navigate to the File menu and choose Import. Then, find the shaky video and click Open. This will bring your video into the Project panel.
Step 3. Create a new sequence.
To start editing, you'll need to create a new sequence. To do this, go to File > New > Sequence. Then, choose a sequence preset that matches your video's specifications (resolution, frame rate, etc.) or create a custom preset.
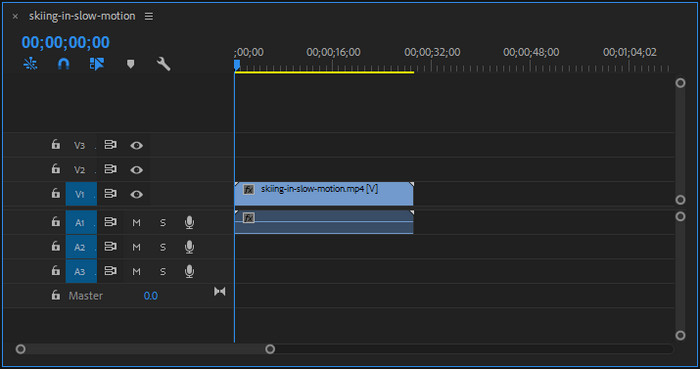
Step 4. Add video to the timeline.
Drag and drop your video from the Project panel onto the V1 track in your timeline.
Step 5. Optimize performance by trimming your clip.
Warp Stabilizer is resource-intensive. To maintain performance, identify the shaky segments within your footage and split the clip to isolate those portions. Apply Warp Stabilizer only to these shorter clips.
To split clips, position the playhead at the points where you want the splits. Ensure the relevant channels are highlighted, including the audio track if you want to split the video and audio together. Moving the video without the audio can cause synchronization issues elsewhere in your project.
When dealing with overlapping clips or tracks, switch to the Expert View Timeline. Select the overlapping clips by dragging a marquee over them, then position the playhead at the frame where you want to make the split.
You can then use the keyboard shortcut Command/Control + K (depending on whether you’re using a Mac or PC) or go to Timeline > Split Clip. This will create two separate clips from the same file, allowing for independent editing.
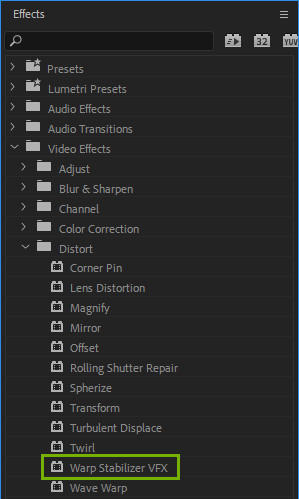
Step 6. Apply the Warp Stabilizer effect.
Select the clip you wish to stabilize. Then, go to the Effects panel and navigate to Distort > Warp Stabilizer. Next, apply the Warp Stabilizer effect by double-clicking or dragging it onto the clip in the Timeline.
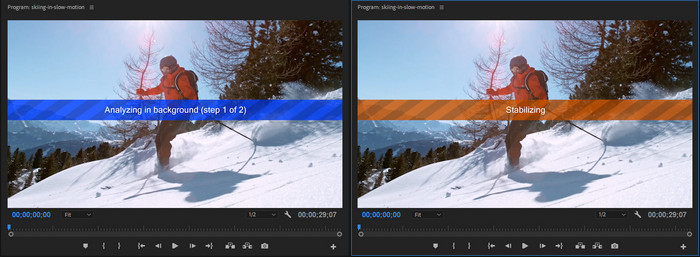
Once applied, Premiere Pro will initiate background analysis. This process may take some time depending on your clip's duration.
Once the analysis is complete, it will start stabilizing the video.
Tips: Extremely shaky footage can be challenging for the Warp Stabilizer to correct effectively. However, re-analyzing the clip can dramatically improve stabilization results. This is particularly beneficial when removing unstable sections from the beginning or end of your footage.
Step 7. Adjust Warp Stabilizer settings.
Once the stabilization is complete, preview the stabilized video and see if you're satisfied with the result. If not, you can fine-tune the stabilization settings.
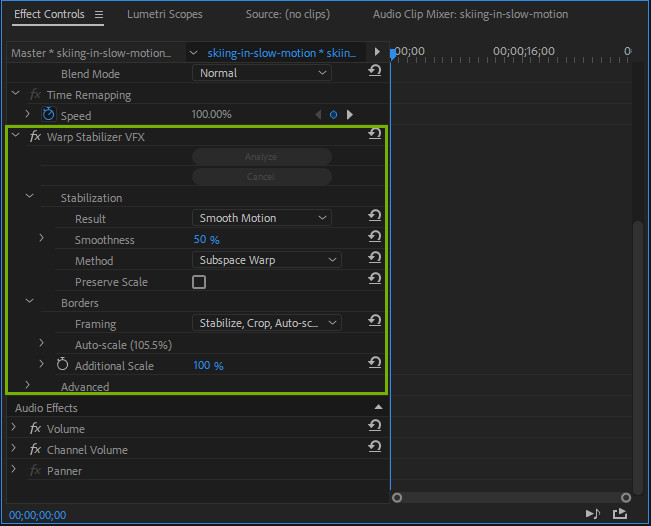
Result: Determines the overall stabilization level.
- Smooth Motion: Retains original camera movement but makes it smoother.
- No Motion: Attempts to remove all camera motion.
Smoothness: Controls how smooth the stabilized footage becomes. Higher values lead to smoother footage but require more cropping.
Method: The "Method" option in Premiere Pro's Warp Stabilizer offers four different approaches to stabilizing your footage. Each method tackles camera shake in a unique way.
- Subspace Warp: This is the default and often the most effective method. It works by distorting different parts of the frame to compensate for camera shake. It is ideal for complex camera movements and when other methods fail to produce satisfactory results.
- Position: This method only adjusts the position of the footage, moving it horizontally and vertically to counteract shake. It's simpler than other methods but often less effective for severe shake.
- Position, Scale, Rotation: In addition to position, this method also adjusts the scale and rotation of the footage. It can handle more complex camera movements than the "Position" method but might introduce distortions if overused.
- Perspective: This method uses corner pinning to stabilize the entire frame. It's suitable for footage with severe perspective distortion, such as wide-angle lenses. However, it can be computationally intensive and might produce less natural results compared to other methods.
The best method for your footage depends on several factors:
- Severity of shake: For mild shake, "Position" or "Position, Scale, Rotation" might suffice. For more severe shake, "Subspace Warp" or "Perspective" are better options.
- Camera movement: If your footage has complex camera movements, "Subspace Warp" is generally the preferred choice.
- Lens distortion: If you're dealing with significant lens distortion, "Perspective" might be necessary.
You can try different methods to see which one produces the best results for your specific footage.
Preserve Scale: Prevents the stabilized footage from being scaled up or down.
Framing: The "Framing" option in Premiere Pro's Warp Stabilizer controls how the stabilized footage is positioned within the frame. There are 4 options for you.
- Stabilize Only: This option applies stabilization without changing the original frame. The stabilized footage will have the same composition as the original, but the camera shake will be removed. It is ideal when you want to preserve the original framing or when there's minimal shake.
- Stabilize and Crop: This option stabilizes the footage and crops it to remove areas affected by the shake. It maintains the original aspect ratio but reduces the image size. It is useful for footage with moderate shake where cropping is acceptable.
- Stabilize, Crop, and Auto-Scale: This option stabilizes the footage, crops it, and then scales it up to fill the entire frame. This can result in some image quality degradation due to upscaling. It is ideal for footage with significant shake where you need to maintain the original frame size.
- Stabilize, Synthesize Edges: This option stabilizes the footage, crops it, and then fills in the cropped areas with generated content. This can introduce artifacts and might not always look natural. You should use this option with caution and only when necessary.
The best framing option depends on the severity of the shake, the desired output resolution, and the importance of preserving the original composition.
- Minimal shake: "Stabilize Only"
- Moderate shake: "Stabilize and Crop"
- Severe shake: "Stabilize, Crop, and Auto-Scale" or "Stabilize, Synthesize Edges" (with caution)
Step 8. Export the stabilized video.
Once you're satisfied with the stabilization, you can export your video. Go to File > Export > Media. Choose an export preset or customize your export settings. Click Export to save your stabilized video.
By following these steps and experimenting with the different settings, you can effectively remove camera shake and improve the overall quality of your videos.
Fix Common Issues with Warp Stabilizer
Some users have reported encountering issues while attempting to remove camera shake using Premiere Pro’s Warp Stabilizer. Here, we list common problems and their solutions in case you run into them.
1. Preview Size Changes
After applying Warp Stabilizer, some users notice fluctuations in clip size during playback. To address this, you can try the following solutions.
- Reduce preview quality: Lower the preview quality from "Full" to "Half" for smoother playback. Rendering should still produce the final size.
- Nest the clip: Nest the clip before applying Warp Stabilizer. This can sometimes resolve preview issues.
- Render after adding Warp Stabilizer: Render the clip after applying Warp Stabilizer. Sometimes, the size issue disappears after rendering.
2. Distortion with Warp Stabilizer
If your footage is excessively warped or distorted, switch the Method to Position, Scale, Rotation. For occasional rippled distortions, especially if the footage was shot with a rolling shutter camera, set Advanced > Rolling Shutter Ripple to Enhanced Reduction.
3. Avoiding Extreme Cropping
Premiere Pro might display“to avoid extreme cropping” error message after analyzing the footage with the warp stabilizer tool. This message indicates the stabilizer needs to crop significantly to achieve smooth results. To minimize cropping, you can try:
- Increase smoothness: Higher "Smoothness" settings reduce camera shake compensation, resulting in less cropping.
- Reduce crop: Lower the "Crop" setting to preserve more of the original frame, even if some shake remains.
- Try different methods: Experiment with "Position" or "Position, Scale, Rotate" methods instead of the default. These often create less cropping.
- Shoot wider: Consider shooting with a wider field of view than your final composition requires to allow for cropping.
- Alternative stabilization: If cropping is excessive, explore the built-in "Stabilize" effect or third-party plugins.
- Experiment and find balance: The optimal settings depend on your footage. Experimentation is key to find the best balance between stabilization and cropping.
4. Warp Stabilizer Not Working or Freezing
Not all footage works well with Warp Stabilizer. Certain formats (codecs) can cause issues, especially heavily compressed or variable frame rate footage from consumer devices.
If you encounter problems with Warp Stabilizer not working or freezing, try the following steps:
- Check for Updates: Ensure that you have the latest version of Adobe Premiere Pro installed. Software updates often include bug fixes and improvements that can resolve stability issues.
- Restart Premiere Pro: Sometimes, restarting Premiere Pro can resolve temporary issues or glitches affecting Warp Stabilizer.
- Uncheck "Fast Analysis": For longer clips, try unchecking "Fast Analysis" under the Advanced menu. This can help if Warp Stabilizer is freezing or failing to analyze the footage properly.
5. Re-analysis Due to Corrupted Data
If you meet error message: "Warp Stabilizer requires re-analysis because saved data has been damaged", you can restore a previously saved project version or re-analyze the affected clips.
6. Re-analysis Due to Project Format Incompatibility
Another common re-analysis error is "Warp Stabilizer requires re-analysis because the project data is from a newer version...".
This error occurs when opening an older project format with Warp Stabilizer effects in a newer Premiere Pro version. You can consider disabling automatic updates for time-sensitive projects to avoid this issue. Additionally, you can use the Premiere Pro Downgrade Tool if working with newer project formats.
Remove Camera Shake with Premiere Pro Alternative
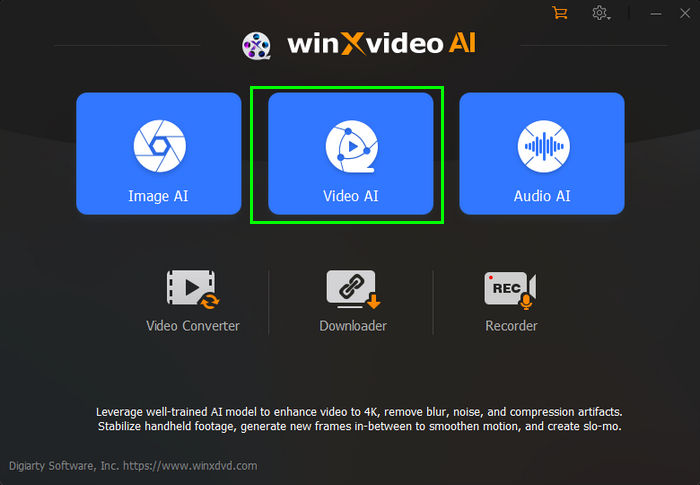
If you still have issues with Premiere Pro's Warp Stabilizer, you can try an alternative stabilization method – Winxvideo AI. This tool is built with an AI video stabilizer that leverages the power of AI to remove camera shake. This AI-powered tool simplifies the process of removing camera shake, offering a user-friendly experience compared to Premiere Pro's complex settings.
Now let's show you how to remove camera shake with Winxvideo AI.
Step 1. Download and install Winxvideo AI on your computer.
 Free Download
  Free Download
Note: AI tools for Mac are currently unavailable, but they're coming soon. Stay tuned.
Step 2. Open Winxvideo AI and then select Video AI.
Next, import the video you want to stabilize by clicking "Add Video" or using drag-and-drop. Multiple videos can be processed simultaneously for batch stabilization.
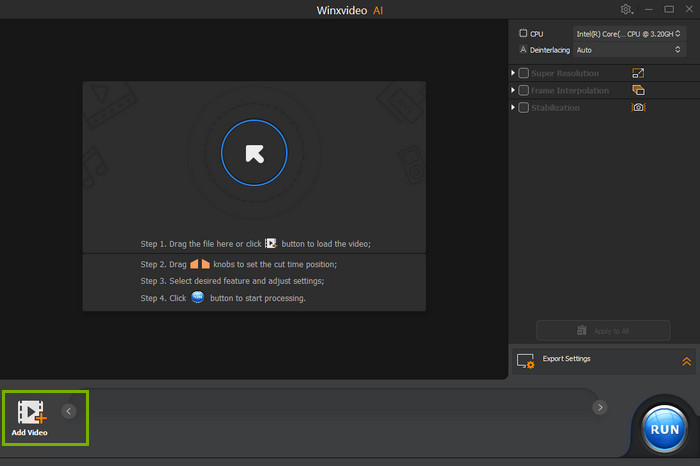
Step 3. Enable the "Stabilization" option and choose the desired analysis mode (One Pass or Two Pass) and preset (Best Stability, Balanced, Fastest, or Minimum Crop).
One Pass is quicker but offers slightly lower quality, while Two Pass provides better results at a slower pace.
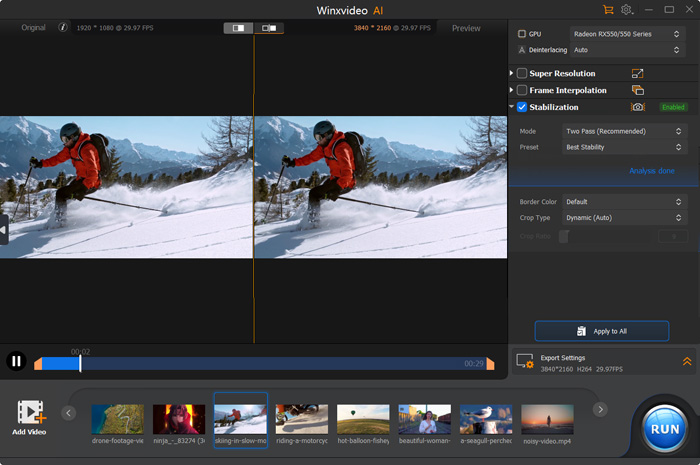
Step 4. Click "Analyze" to initiate the analysis and stabilization process. Once done, you can preview the result. If you're not satisfied with the result, you can re-adjust the settings and then analyze again.
Step 5. Once satisfied with the results, specify the export settings and click "RUN" to save the stabilized video.
Winxvideo AI offers a streamlined approach to camera shake removal, making it an attractive option for those seeking a simpler alternative to Premiere Pro's Warp Stabilizer.
Final words
Effectively removing camera shake is essential for achieving professional-looking videos. Premiere Pro's Warp Stabilizer offers powerful tools for stabilizing footage, with various settings and methods to tailor stabilization to your needs. For those seeking an alternative, Winxvideo AI provides a simpler, AI-driven approach that can be quicker and easier to use.
However, it's important to remember that the best way to minimize camera shake is to aim for steady filming from the outset. Good filming techniques can significantly reduce the need for post-production stabilization and result in a more polished, professional appearance.


