


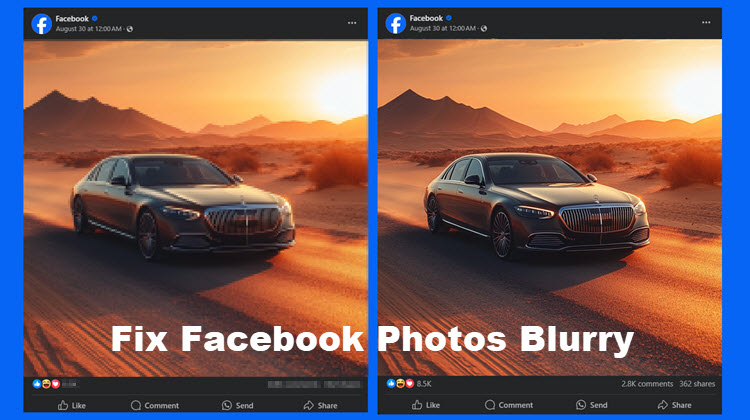
How to Fix Blurry Pictures on Facebook?
 Mike Rule
Updated on
Facebook is a popular social media platform that allows users to share photos with friends and family. However, sometimes, photos uploaded to Facebook can appear blurry. This can be frustrating, especially if you're trying to share a special memory to others.
If you are encountering Facebook photos blurry issue, in this article, we will discuss the various reasons causing the blurry pictures on Facebook and provide some tips on how to fix them.
Why Are My Facebook Photos Blurry?
Currently, when you upload a photo to Facebook, it appears blurry, indicating a decline in quality compared to the original image. This is a primary factor contributing to the blurriness of pictures on Facebook. Besides that, there are several reasons why your Facebook photos may be blurry.
Reason 1. The original photo is blurry.
When you upload a photo that low in resolution and quality, it is probable that it will continue to appear blurry on Facebook. This occurs because Facebook does not enhance the quality of images during the uploading process. To solve this, you should adjust your camera to shoot a high-quality photo or just upscale images with optimized clarity, sharpness, and details with an image enhancer software like Winxvideo AI.
Reason 2. The upload resolution is too high.
When a photo that exceeds the allowable dimensions (2048 pixels at max) is uploaded, Facebook may utilize compression methods to reduce its file size in order to comply with the platform's photo upload size limitations. This procedure can sometimes cause a decrease in image sharpness, leading to blurry images post-upload.
Reason 3. The upload file format is JPG/JPEG.
The image file format must be optimized to ensure high-quality uploads on Facebook. JPEG or JPG formats are subject to compression, which may result in artifacts and diminish the overall clarity of the image. Compared to this image format, PNG is better.
Reason 4. The Facebook photo settings are improper.
If the HD quality settings for your Facebook photos are not properly configured, photos on your Facebook may appear unclear and blurry.
Reason 5. The Data Saver on Facebook is turned on.
When the Data Saving mode is activated on your device, Facebook will lower the resolution of any photo you upload, thereby minimizing the data consumption associated with the upload. As a result, your high-quality images will be submitted in a reduced resolution and blurry status. To ensure that your photos maintain their original quality, it is necessary to disable the Data Saving mode.
Reason 6. The internet connection is poor.
A slow or unstable internet connection may hinder the proper uploading and displaying of your photos, potentially leading to images that appear blurry.
How to Fix Blurry Pictures on Facebook?
Someone suggests you to click on the picture and swipe back and forth between photos a few times, and then they may become clear. Or prevent the blurry images problem by updating the Facebook app. If they don’t work for you, there are several things you can do to fix your blurry Facebook photos issue.
Solution 1. Upload High-quality Photos
Facebook supports images of 720, 960, or 2048 pixels at max. the recommended pixel size is 1080 x 1350 pixels for Facebook Feed and 1080 x 1920 pixels for Facebook Stories. The best way to ensure that your Facebook photos are clear before uploading. This means using a camera that takes high-resolution photos and ensuring that your photos are well-lit. Another way is to use an AI image enhancer to deblur images before uploading to Facebook.
Winvideo AI is such a tool to help remove blur and noise from Facebook photos to recover clarity, sharpness, and details. Powered by AI, this AI image enhancer can address issues such as motion blur, out-of-focus shots, camera shake, and other forms of blurriness so as to restore clarity to various types of images, including general photographs, portraits, and text, ensuring sharp details in features such as eyes, hair, fur, and textures.
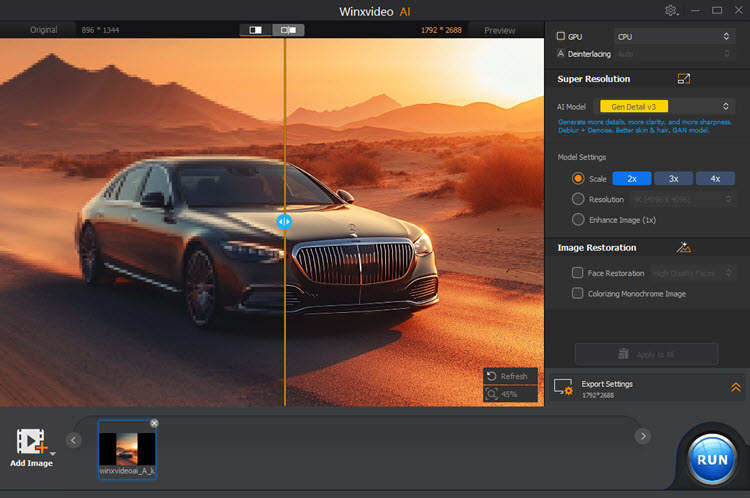
Step 1. Download Winxvideo AI, install and launch it.
Step 2. On the main UI, click on the "Image AI" button. Then, drag and drop your blurry image to it.
Step 3. Choose an AI model based on your image type.
- Gen Detail model: Enhance the original details and generate more details while removing image blur. This model is recommended most as it is suitable for almost all image types, including photography, portraits, landscapes, anime, AI arts, product images, etc.
- Real Smooth model: Create smoother & brighter images, especially those don’t emphasize details.
- Anime model: Create better and clearer anime and cartoon images.
Step 4. Adjust Model Settings by choosing one of the options.
- Choose a scale from 2X, 3X, and 4X. For example, if your original image is 512px, you can choose 2X or 4X to upscale your image to 1024px or 2048px to get a high-quality image while not exceed the maximum Facebook upload dimensions.
- Alternatively, choose a resolution from 1K, 2K, 4K, and 8K. FYI, Facebook supports 1K and 2K photo upload.
- Alternatively, choose Enhance Image (1x) if your photo is 1080px or 2048px but you need more details.
Step 5. Optionally, choose Image Restoration for restoring faces and colorizing monochrome photos.
Step 6. Choose PNG as the output file format by expanding the Export Settings.
Step 7. When everything is OK, hit the RUN button to fix blurry pictures on Facebook.
 Free Download
 Free Download
Note: AI tools for Mac are currently unavailable, but they're coming soon. Stay tuned.
Solution 2. Meet the Facebook Upload Requirements
Facebook has specific requirements for the size and resolution of photos. If you upload a photo that does not meet these requirements, it may appear blurry, or be cropped to square or badly.
Facebook resolution and size recommendations for uploading photos:
- It is advisable to select images for profile pictures and cover photos that adhere to the minimum recommended dimensions of 360 pixels in width for profile pictures and 820 pixels in width for cover photos.
- When sharing photographs, ensure that they are of high definition quality, with a minimum width resolution of 720 pixels. For enhanced clarity, consider utilizing images with resolutions of 1080 pixels or even 2048 pixels in width.
Adhering to these guidelines guarantees that images remain clear and sharp across various devices. It is essential to utilize high-resolution images and to refrain from excessive enlargement or reduction in size to preserve optimal quality when your images are published on Facebook.
Solution 3. Adjust Facebook Upload Settings
Various settings on Facebook can influence the clarity of your photographs. Should your Facebook photos appear blurry, it may be necessary to modify these settings.
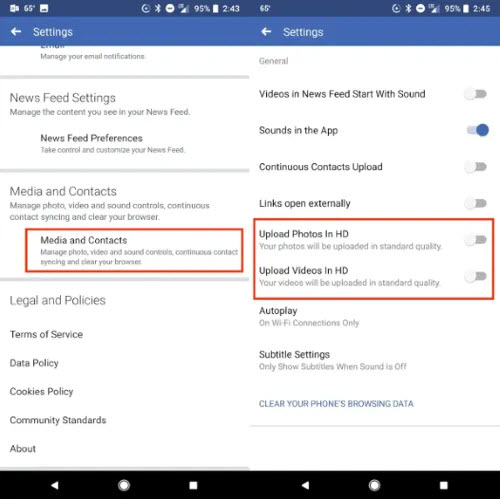
Adjust on Android:
- Open the Facebook app and tap on the menu button (three horizontal lines).
- Tap on "Settings & Privacy" and select "Photos".
- Tap on the "Media and Contacts" option.
- Enable the "Upload Photos in HD" option and it will avoid the problem of blurry pictures on Facebook.
Adjust on iOS:
- Open the Facebook app and tap on the three horizontal lines at the bottom-right corner.
- Tap on the "Settings & Privacy" tab and select Settings from the drop-down.
- Scroll down to tap on "Media".
- From the "Videos and Photos" option, carefully choose options that will improve your Facebook picture quality.
Solution 4. Turn off Data Saver on Facebook
When the Data Saving mode is activated on your device, Facebook will lower the resolution of any photo you upload, thereby minimizing the data consumption associated with the upload. As a result, your high-quality images may appear blurry on Facebook due to this reduction in resolution. To ensure that your photos maintain their original quality, it is necessary to disable the Data Saving mode. Below are the steps to prevent uploading blurry pictures on Facebook by turning off this feature.
On Android:
- Open the Settings app. Tap on the Network & Internet option.
- Tap on the Data Saver option.
- Toggle off the Data Saver option.
On iOS:
For Wi-Fi connection
- Open the Settings app and tap on the Wi-Fi option.
- Tap on the Wi-Fi network you are connected to.
- Scroll down and turn off the Low Data Mode option.
For cellular connection
- Open the Settings app and tap on the Cellular option.
- Tap the Cellular Data Options or Data Mode option.
- Scroll down and turn off the Low Data Mode option.
Solution 5. Use a Strong Internet Connection
A slow or unstable internet connection may hinder the proper uploading or display of your Facebook photos, potentially leading to blurriness. To guarantee successful uploads, consider utilizing a more robust internet connection.
 FAQs
FAQs
There are several reasons why your Facebook photos may be blurry after uploading. Some of the most common reasons include bad upload quality, high upload resolution, poor internet connection, improper Facebook photo settings, and so on.
To fix blurry photos on Facebook, you can enhance your photos to high-quality like 1080px or 2048px with Winxvideo AI before uploading, upload PNG images, adjust Facebook settings, turn off data saver on Facebook, use a strong internet connection, and so on.
Go to Facebook app settings, look for the photo and video settings, and enable the option for uploading photos in HD. Also, before uploading, edit your photos to match Facebook’s recommended dimensions and file size.


