How to Convert MOV to GIF on Windows Mac iPhone Android
GIF stands for Graphics Interchange Format. Since its debut in 1987, it has become widespread for its broad support and portability between applications and operating systems and the feature of expressing complex ideas and messages in a matter of a few seconds. We post GIFs to social media platforms. We insert GIFs to our blog posts. So much more examples. Well, how to make a gif? It's easy. You can simply convert video to gif. And here we're going to show you how to convert MOV to gif on Windows, Mac, iPhone, and Android. MOV is a video format that we are often exposed to. Apple iPhone and many cameras use MOV as a video package format.
How to Convert MOV to GIF?
- Method 1: Convert MOV to GIF Online for Free
- Method 2: Convert MOV to GIF with FFmpeg
- Method 3: Convert MOV to GIF with Adobe Photoshop
Method 1. Convert MOV to GIF Online for Free
MOV to GIF conversion can be done without downloading any software on Mac, iPhone, Android, or Windows PC. There are many online MOV to GIF converters, such as CloudConvert, Convertio, and Zamzar. Now let's take a close look at CloudConvert.
CloudConvert allows you to convert MOV file less than 1GB to animated gif for free. Free users are allowed to perform up to 25 conversions per day. If your MOV file exceeds the maximum file size limit, you can compress the video beforehand or buy a Cloudconvert package (starting from $8). If you don't have video compression software, you can try Winxvideo AI which can convert MOV files in any resolution and any file size quickly without degrading quality. Try now>>
Now, let's check how to convert MOV to GIF online with CloudConvert for free.
Step 1. Open a web browser on your Windows, Mac, iPhone, or Android, and then access CloudConvert MOV to GIF Converter.
Step 2. Find the red Select File button, click the drop-down menu, and then choose to import the MOV file by URL, or from your computer, Google Drive, Dropbox, or OneDrive.
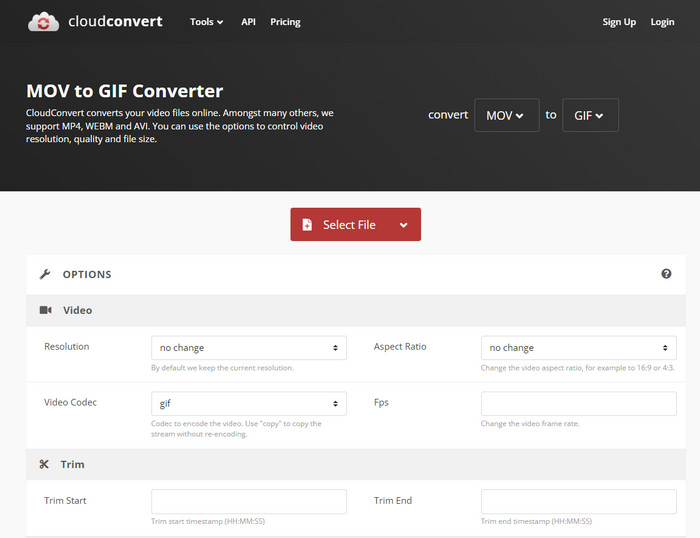
Step 3. Make sure GIF is selected as the output and click the wrench icon if you want to set resolution, aspect ratio, video codec, fps, starting time, and ending time. By default, it will keep the original resolution and aspect ratio.
Step 4. Click the red Convert button to begin converting MOV to gif.
Method 2. Convert MOV to GIF with FFmpeg
If you have FFmpeg installed on your computer, you can also use this tool to create a gif from your MOV file. Now, let me show you how to do this.
Step 1. Move your MOV video files to the folder where you keep the ffmpeg.exe file.
Step 2. Hold the Shift key, and right-click inside that folder. Select Open command or PowerShell window here from the pop-up.
Step 3. Enter the following command to convert .mov to gif.
- For OpenCommand: ffmpeg -i input.mov output.gif
- For PowerShell: .\ffmpeg -i input.mov output.gif
You just need to use the name of your .mov file to replace input.mov and use a desired output name to replace output.gif.
Method 3. Convert MOV to GIF with Adobe Photoshop
Besides editing images, Adobe Photoshop has a hidden feature you may not know. That is making gif from video. But it is a little bit complicated. Let's take a look at how we do this.
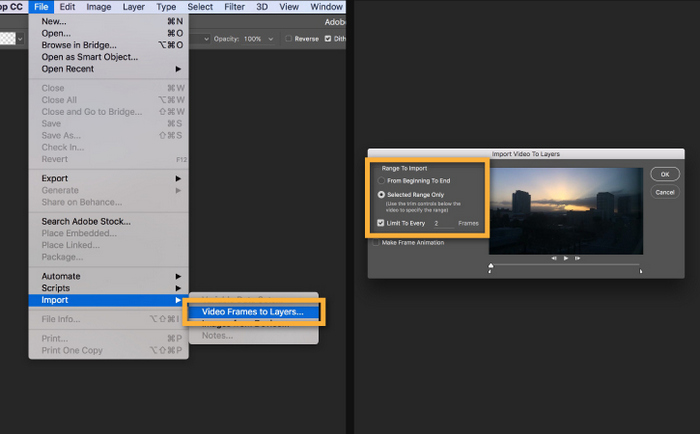
Step 1. First of all, you need to convert the frames of the video into individual layers. To do this, open Adobe Photoshop, go to File, scroll down to Import, and choose Video Frames to Layers. Now, browse and open the .mov file you want to convert to gif. Then, you will see a small window named Import Video To Layers. Here you should specify the range to import and click OK after finish settings.
Tips: Photoshop may not be able to fully import a video that is too long. If your source video is too long to import, try cutting it in advance.
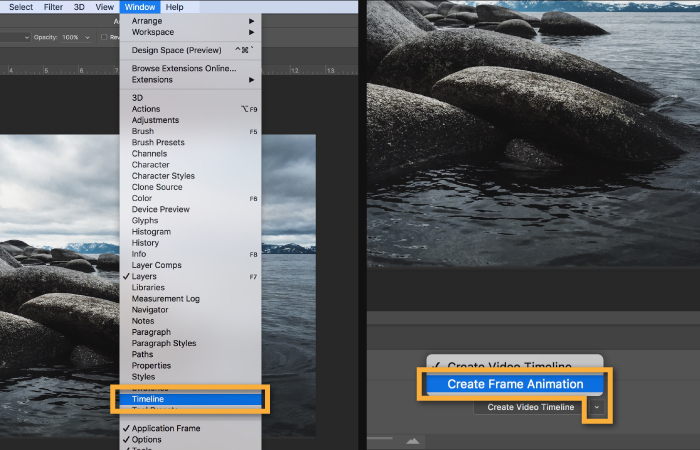
Step 2. Go to Window and scroll down to choose Timeline. Then, click the arrow on the button in the middle of the Timeline panel and choose Create Frame Animation. Then click the button to create a new frame animation.
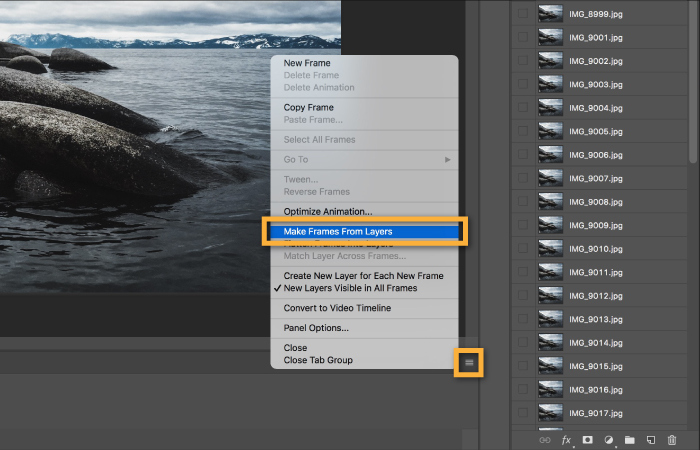
Step 3. Click the menu icon from the upper right corner of the Timeline panel. Click Make Frames From Layers. This will convert all the layers in the Layers panel into individual frames in your animation.
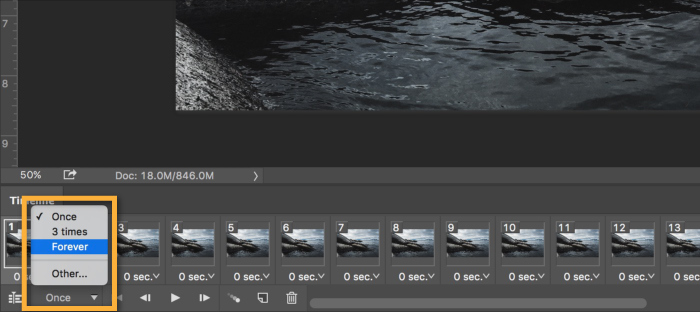
Step 4. Click the repeat menu from the bottom of the Timeline panel and specify how many times you want the resulting gif repeat, once, 3 times, or forever.
To preview the gif, simply click the Play button from the bottom of the Timeline panel.
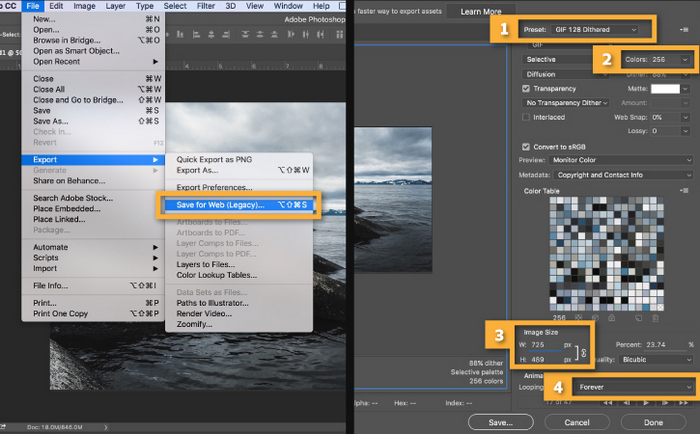
Step 5. Go to File, scroll down to select Export, and choose Save for Web (Legacy)...
- From the Preset menu, select GIF 128 Dithered .
- From the Colors menu, select 256 .
- Change the Image Size is necessary.
- Click Save... and select a destination for your animated GIF file.
So, above are the methods we want to introduce to you to convert MOV QuickTime movie to gif.


