


How to Improve Video Quality in Premiere Pro
 Mike Rule
Updated on
I've noticed that many users wonder how to enhance video quality in Premiere Pro, especially those who are new to video editing or who are working with footage that is less than perfect. Premiere Pro, a powerful video editing software, offers a variety of tools and techniques that can help you improve the quality of your videos and make them look their best. In this article, we'll guide you through the process, step-by-step.
Pre-production Considerations
While Premiere Pro excels at enhancing video quality, the foundation for a great final product starts even before you open the editing software – the quality of your source footage. This is a crucial factor in determining the final quality of your edited video. Using high-resolution, high-bitrate footage in a lossless format gives you the most flexibility for editing and ensures the best possible final quality. However, keep in mind that working with such files can require powerful hardware and more storage space.
The good news is, Premiere Pro can handle a wide range of footage types. By understanding these pre-production considerations, you can make informed decisions when choosing your source material to achieve the optimal balance between quality and workflow efficiency for your project.
While these pre-production considerations can significantly impact your final product, they might not be applicable to every situation. If you're working with existing footage, the focus will shift to optimizing it within Premiere Pro using the techniques we'll explore in the next section.
Premiere Pro Tools to Enhance Video Quality
Premiere Pro offers a variety of tools and techniques to elevate the quality of your videos, including:
- Sharpening: Blurry or soft footage can be revitalized with the Sharpen effect. This effect enhances edge definition, making details appear crisper. However, overuse can create unwanted artifacts, so adjust the amount subtly.
- Upscaling: Breathe new life into low-resolution footage by upscaling it to a higher resolution. Note that this can introduce artifacts, so use it judiciously.
- Stabilization: Fix shaky footage and create smoother videos with the Warp Stabilizer effect.
- Noise Reduction: Grainy or noisy footage can be cleaned up with the Reduce Noise effect. This effect analyzes the video and selectively removes noise while preserving detail.
- Color Correction: Achieve a polished look and enhance the mood of your video with color correction. Premiere Pro's Lumetri Color panel offers a vast array of tools for adjusting white balance, color grading, and more.
Now, let's start learning how to use these tools to improve video quality.
Improve Video Quality by Sharpening Video in Premiere Pro
This step-by-step guide will walk you through the process of sharpening videos in Premiere Pro, using the Unsharp Mask effect.
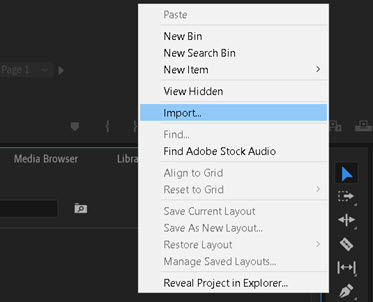
Step 1. Import your source video.
Open Premiere Pro and import your video by going to File > Import. Next, drag the video file onto the timeline to add it to your project.
Step 2. Adjust sequence settings.
To ensure optimal sharpening results, consider adjusting the sequence settings to match your video's resolution. Go to Sequence > Settings and choose the appropriate resolution from the Frame Size dropdown menu.
Step 3. Create an adjustment layer.
An adjustment layer allows you to apply effects without altering the original video footage. Click the Adjustment Layer icon in the timeline panel and drag it onto the timeline above your video clip.
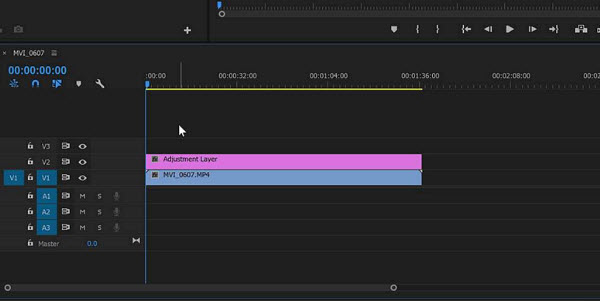
Step 4. Cut adjustment layer (optional).
If you want to sharpen only a specific portion of the video, use the Razor tool (shortcut: C key) to cut the adjustment layer. This allows you to apply sharpening to the desired section.
Step 5. Apply Unsharp Mask effect.
The Unsharp Mask effect is a versatile tool for sharpening videos. Locate the Effects panel (usually on the left side) and search for "Unsharp Mask." Drag and drop this effect onto the adjustment layer in the timeline.
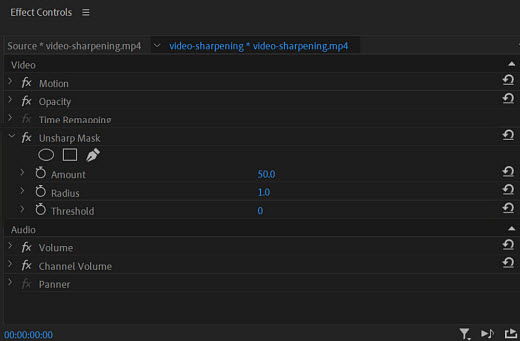
Step 6. Fine-tune Unsharp Mask parameters.
The Unsharp Mask effect offers three main parameters to control the sharpening:
- Amount: Adjusts the intensity of sharpening. Start with a low value and gradually increase until details become crisp without introducing artifacts (unwanted noise).
- Radius: Defines the area affected by sharpening. Higher values sharpen a wider area around edges.
- Threshold: Sets the minimum difference in brightness for sharpening to occur. This helps avoid sharpening noise.
Experiment with the Unsharp Mask settings to find the optimal values for your specific video. Sharpening can sometimes introduce artifacts, so be cautious not to oversharpen.
Step 7. Selective sharpening (optional).
If you want to selectively sharpen specific areas of your video, click the mask icon next to the Unsharp Mask effect in the Effects Controls panel. Use the provided tools (e.g., brush) to selectively apply sharpening to the desired regions.
Step 8. Preview and adjust.
Regularly preview your sharpened video to ensure you're achieving the desired effect. Adjust the Unsharp Mask parameters and mask if necessary until you're satisfied with the results.
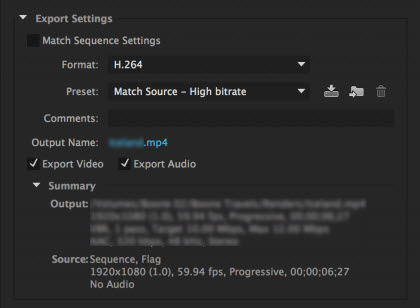
Step 9. Export your sharpened video.
Once you're happy with the sharpening, go to File > Export and choose your desired format and settings. Higher bitrates and resolutions generally result in better quality, but also larger file sizes. Find the balance that suits your needs. Click Export to render and save your sharpened video.
By following these steps and tips, you can effectively sharpen your videos in Premiere Pro and significantly improve their overall quality.
Enhance Video Quality by Upscaling Video in Premiere Pro
When it comes to upscaling video footage, Premiere Pro requires the assistance of its sibling software, After Effects. Here's a step-by-step guide to effectively upscale videos using Premiere Pro and After Effects.
Step 1. Prepare your Premiere Pro project.
If you're starting fresh, create a new project in Premiere Pro and set the desired resolution for your final output (e.g., 1080p for upscaling from standard definition). If you have existing footage, open the project containing the video you want to upscale.
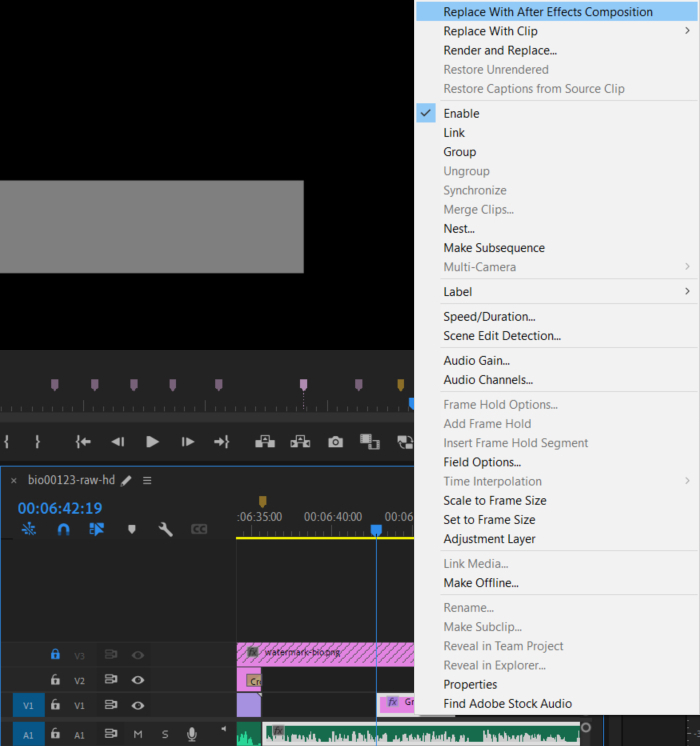
Step 2. Leverage After Effects for upscaling.
Locate the video clip in your Premiere Pro timeline that you want to upscale. Right-click on the clip and choose "Replace With After Effects Composition." This sends the clip to After Effects for processing.
Step 3. Apply upscaling effect in After Effects.
Within the After Effects workspace, navigate to the Effects & Presets panel. Search for the "Detail-preserving Upscale" effect. Double-click it to apply it to your clip.

Step 4. Adjust Upscale Settings.
Look for the Effect Controls panel. Here, you can choose the upscaling method:
- Fit to Comp Width: Click this option to automatically upscale the footage to match the width of your After Effects composition.
- Scale Amount: This allows you to fine-tune the scaling percentage if you want to upscale beyond the composition width.
- Refine Detail (Optional): Experiment with the "Detail" slider within the effect controls. Increasing the value beyond the default (50%) can help preserve details during upscaling. It's a balancing act, so adjust it until you're happy with the visual quality.
Step 5. Return the upscaled clip to Premiere Pro.
Once you're satisfied with the upscaled video in After Effects, save the project. Then, switch back to your Premiere Pro project. The clip you replaced will now be automatically updated with the upscaled version from After Effects.
Note: Upscaling can introduce artifacts and reduce overall video quality. It's recommended to use this technique for low-resolution footage that needs a modest increase in resolution.
Improve Video Quality by Reducing Shakiness in Premiere Pro
Premiere Pro offers a powerful tool called Warp Stabilizer to effectively reduce shakiness and smooth out your videos. This step-by-step guide will show you how to utilize Warp Stabilizer to enhance the stability of your video footage.
Step 1. Import your clip.
Click File -> Import to load the shaky video you want to stabilize.
Step 2. Split clip for better performance.
Identify shaky parts and split the clip to isolate them. Splitting the clip into smaller sections, especially focusing on the shaky parts, allows the stabilizer to work faster and reduces strain on your computer.
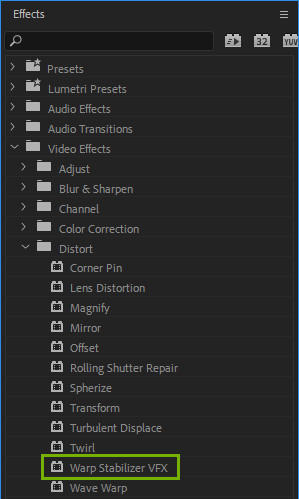
Step 3. Apply Warp Stabilizer only to those shortened clips.
Select the clip and go to Effects > Distort > Warp Stabilizer. Then, the analysis will happen in the background.
Step 4. Adjust stabilization.
Check the stabilized video and adjust settings if needed. Use "Stabilize Only" under Framing to see how much cropping occurs. Reduce Smoothness or Crop Less Smooth More for finer adjustments.
Fine-tuning stabilization:
- Adjust Smoothness for desired shakiness (lower for more camera movement).
- Choose between Smooth Motion (default, retains some movement) or No Motion (tripod-like, may create artifacts).
- Select Method for different tracking complexities (Subspace Warp is default).
- Adjust Framing to control how edges appear (limited options).
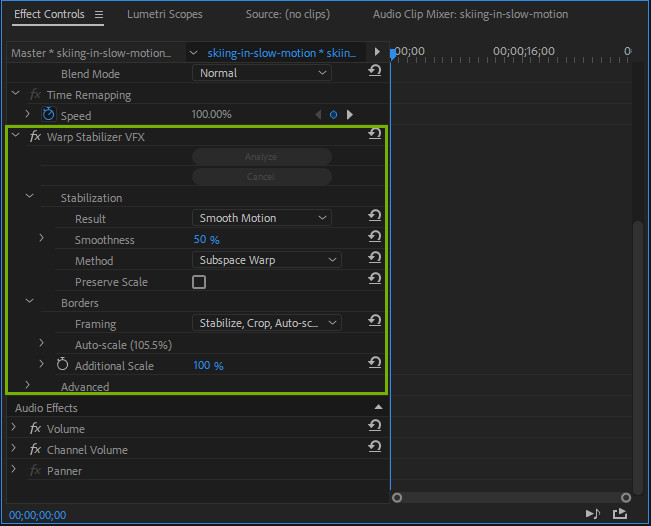
Warp Stabilizer helps you fix shaky footage while preserving some natural camera movement.
Enhance Video Quality by Reducing Video Noise in Premiere Pro
Grainy or noisy footage can be a common issue. But with Premiere Pro's Median effect, you can clean things up.
Step 1. Locate the Median effect.
Navigate to the Effects Panel (usually on the left side) and expand the Video Effects section. Under Noise & Grain, find the Median effect.
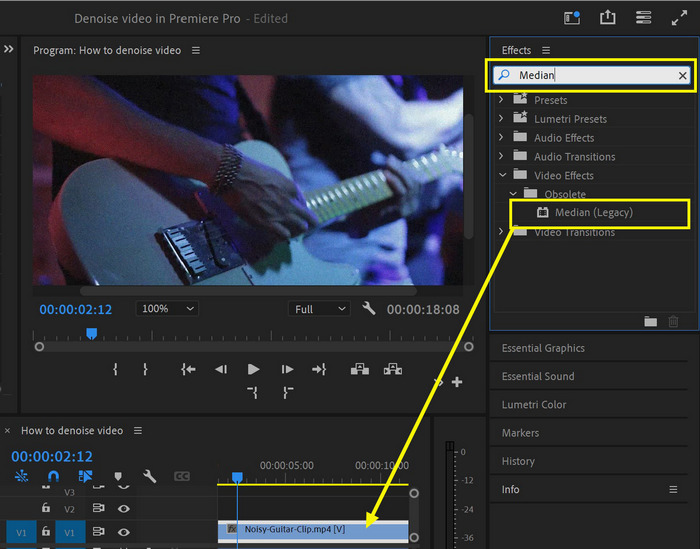
Step 2. Apply Median to your clip.
Drag and drop the Median effect onto your noisy video clip in the timeline. This adds the effect, but won't immediately change the video's appearance.
Step 3. Fine-tune noise reduction.
Open the Effects Controls panel (usually on the right side). Look for the Radius slider under the Median effect settings. Drag this slider to adjust the intensity of noise reduction. You'll see a live preview of the effect as you adjust.
Tips: If you only want to reduce noise in specific areas, create masks. Click the Mask icon next to the Median effect in the Effects Controls panel. Use the provided tools (brush, pen) to draw masks around the noisy areas. Now, adjustments you make to the Radius slider will only affect the masked regions. Remember to feather the mask edges for a smoother transition.
Step 4. Preview and refine.
Regularly preview your video to assess the noise reduction. Adjust the Radius value and refine your masks (if used) until you achieve a good balance between noise reduction and detail preservation.
So that's how to enhance video quality in Premiere Pro by reducing noise and grain.
Enhance Video Color in Premiere Pro
Premiere Pro offers a robust set of color correction tools, including the Lumetri Color panel, to elevate the visual aesthetics of your videos. This guide will explore various methods for enhancing video color in Premiere Pro.
Step 1. Upload your video clips to Premiere Pro and trim them as needed.
Step 2. Apply Lumetri Color presets.
Select your video clip in the timeline, open the Lumetri Color panel, and choose a preset under the Look drop-down menu. Options like cinematic, monochrome, and filmstocks can quickly enhance color highlights or mimic black-and-white film. Adjust the intensity of the preset using the slider below the preset thumbnail.

Step 3. Customize color settings.
For custom color edits, use the sliders in the Lumetri Color panel. Basic adjustments include exposure, contrast, vibrance, and saturation, while advanced features include faded film, sharpening, and vignette. Experiment with these settings to achieve the desired look.
Tips: You can save your custom slider settings as a preset by selecting Create Preset in the Lumetri Presets tab. This allows you to apply the same adjustments to multiple clips in your project easily.
For quick corrections, utilize Premiere Pro's smart auto-color features. These allow you to automatically adjust exposure, contrast, white balance, and other basic settings, leveraging AI to fine-tune your video.
So above are how to enhance video color in Premiere Pro.
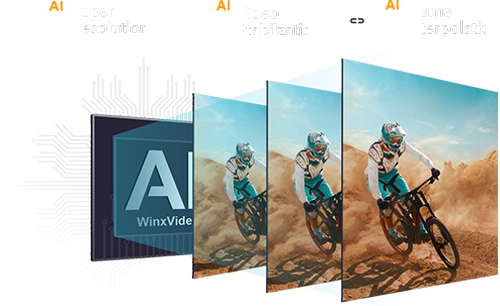
Best Premiere Pro Alternative to Enhance Video Quality
If you find Premiere to be overly complex, especially for beginners or users who are unwilling to invest significant time in learning a complex software, Winxvideo AI is more appealing. It offers a comprehensive suite of AI-powered tools to enhance video quality without the complexities of professional editing software.
Key Features of Winxvideo AI for Video Enhancement:
- AI-powered Upscaling: Effectively upscale low-resolution videos to higher resolutions (up to 4K) without compromising sharpness or introducing artifacts.
- AI-powered Frame Interpolation: Increase the frame rate of your videos (from 24fps to 60fps or even higher) by creating smooth, intermediate frames using AI technology. This results in a more fluid and natural viewing experience, especially for fast-action scenes.
- AI-powered Stabilization: Smooth out shaky footage caused by camera movement or poor stabilization, ensuring a more polished and professional look.
- Noise Reduction: Auto eliminate noise, grain, and other imperfections from your videos, resulting in cleaner and crisper visuals.
- Video De-blur: Auto sharpen blurry or out-of-focus videos, restoring clarity and detail to your footage.
- Deinterlace: Convert interlaced footage to progressive, removing the scanlines and jagged edges that can make older videos appear dated.
How to Enhance Video Quality with Winxvideo AI
Step 1. Download and install Winxvideo AI.
Download the software from the official website and follow the installation instructions.
 Free Download
  Free Download
Note: AI tools for Mac are currently unavailable, but they're coming soon. Stay tuned.
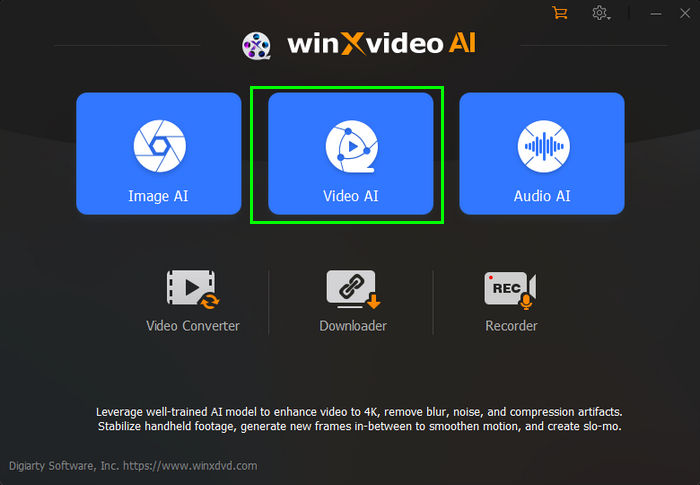
Step 2. Access video enhancer tool.
Launch Winxvideo AI and select Video AI.
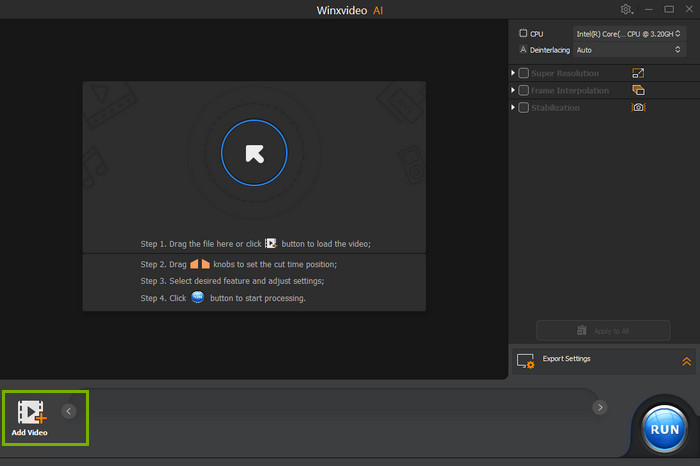
Step 3. Import source video and select desired enhancing feature.
Click the "Add Video" button and select the video files you want to enhance. You can also drag and drop videos directly onto the interface.
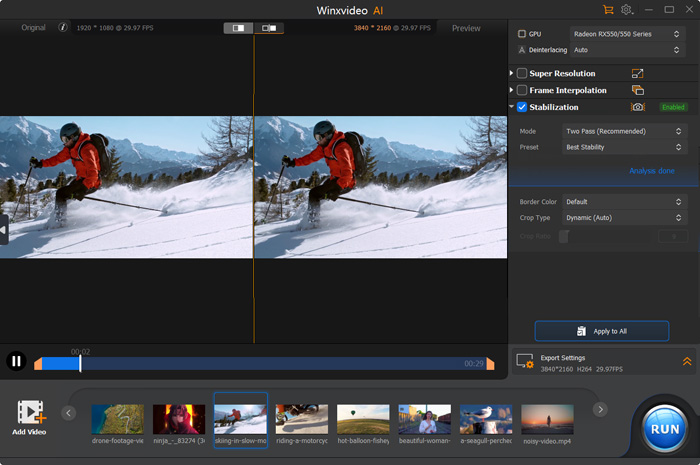
Then, choose the desired enhancement feature from the main interface. Options include "Super Resolution", "Frame Interpolation", and "Stabilization". The "Super Resolution" incorporates auto-deblurring and auto-denoising to improve image clarity.
Step 4. Set output settings.
If desired, adjust the output settings, such as file format.
Step 5. Apply AI enhancement.
Click the "RUN" button to start the AI-powered enhancement process.
Winxvideo AI provides a user-friendly interface and straightforward process for enhancing video quality, making it an accessible and effective alternative to Premiere Pro for those seeking a simpler approach. With its AI-powered tools, you can quickly and easily upscale, deblur, denoise, deinterlace, and stabilize your videos, significantly improving their overall visual quality.


