


How to Sharpen Blurry Videos in Premiere Pro
 Mike Rule
Updated on
Summary: Want razor-sharp videos without the harsh edges? This guide reveals Premiere Pro’s top sharpening tools to sharpen videos and plus smart tips to avoid over-sharpening and a pocket-friendly alternative for stunning clarity.
Do your videos lack that crisp, detailed look? Perhaps they were shot in low light, out of focus, or suffered some compression during sharing or editing. In this case, you can sharpen videos in Adobe Premiere Pro.
In this article, we'll explore the various video sharpening methods available in Premiere Pro, from basic sharpening tools to advanced techniques using the Unsharp Mask effect and selective sharpening with masks. We'll also discuss how to avoid the pitfalls of over-sharpening and achieve that perfect balance between clarity and a natural look. So, whether you're a seasoned editor or just starting out, this guide will equip you with the knowledge and skills to sharpen your videos to perfection in Premiere Pro.
How to Sharpen Video in Premiere Pro
Premiere Pro provides a range of sharpening tools tailored to your needs. Now, let's explore these methods in detail.
Method 1. Sharpen Video With Sharpen Effect
For a quick and easy sharpening boost, the "Sharpen" effect is a great starting point. Here's how to use it.
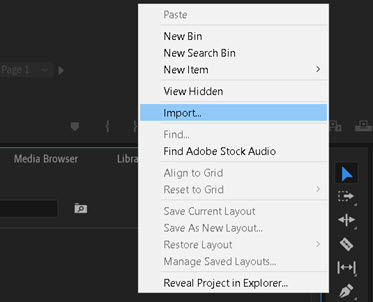
Step 1. Import the video you want to sharpen into Premiere Pro and drag it onto your timeline.
Step 2. Look for the "Effects Panel" and either search for "sharpen" or navigate to "Video Effects" > "Blur & Sharpen". Then, drag the "Sharpen" effect onto your video clip.
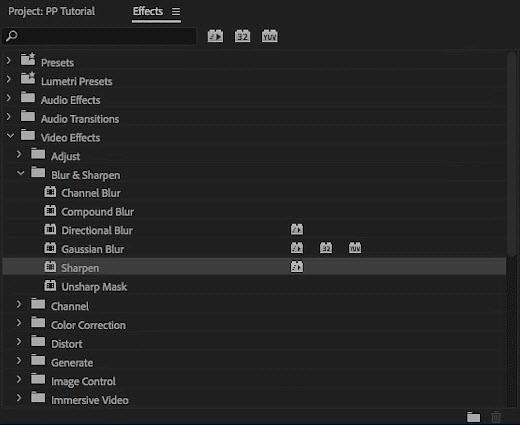
Step 3. Adjust the slider under Sharpen Amount. Start with a low value between 10 and 25 for a subtle sharpening. Too much sharpening can make your video look worse.
Tips: Be particularly cautious with sharpening low-light footage, as it can amplify existing noise. Focus on sharpening areas with good detail and avoid boosting noise in darker regions.
Method 2. Sharpen Within the Lumetri Color Panel
This method lets you sharpen your video alongside making other color adjustments. Here's how it's done.
Step 1. Search for "Lumetri Color" in the Effects panel. Then, drag it onto your video clip.
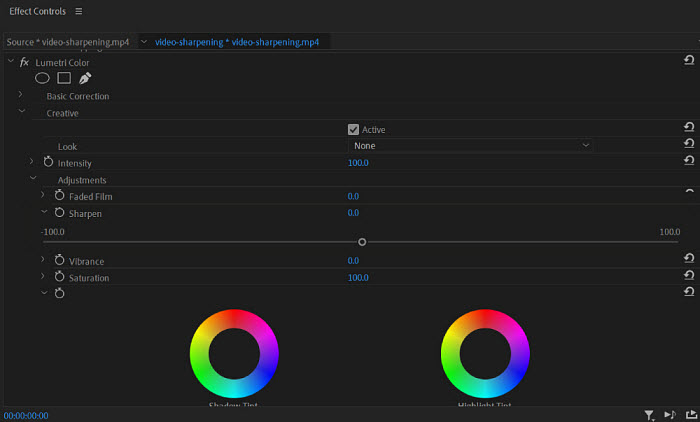
Step 2. Within the Lumetri Color panel, switch to the "Creative" tab. Then, you'll find a slider labeled "Sharpen". For a sharper look, slide the "Sharpen" value right. To avoid over-sharpening, start with a subtle adjustment between 20 and 40.
Method 3. Sharpen Video Using Unsharp Mask
This method gives you more control over how your video sharpens. Here's how to use it.
Step 1. Search for "Unsharp Mask" in the Effects Panel and drag it onto your video clip.
Step 2. Adjust sharpening strength.
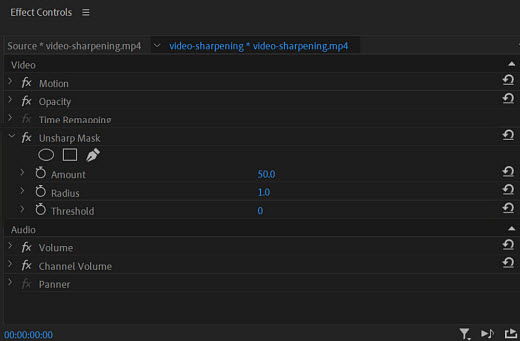
- Use the "Amount" slider (between 30-70) to control how strong the sharpening is. Higher values make things sharper, but be careful not to overdo it.
- The "Radius" slider (between 1-2) lets you choose how big or small the sharpened details are. Smaller values focus on sharper edges, while larger values affect broader areas.
- The "Threshold" slider (usually at 0) controls which parts get sharpened. A higher threshold tells Premiere Pro to focus on areas with more contrast already.
If the effect is subtle, you can duplicate the Unsharp Mask effect for a stronger impact.
Selective Sharpening: Sharpening Specific Areas
Sometimes, you might only want to sharpen specific details in your video, like faces, eyes, or objects in the foreground. Here's how to achieve selective sharpening with masks:
Step 1. After applying the Unsharp Mask effect, choose the appropriate mask creation tool from the available options:
- Rectangle Mask Tool: Creates a rectangular mask.
- Ellipse Mask Tool: Creates an elliptical mask.
- Pen Tool: Allows for precise freehand mask drawing.
Step 2. Use the selected mask tool to draw a precise outline around the area you want to sharpen. You can create multiple masks for different areas if needed.
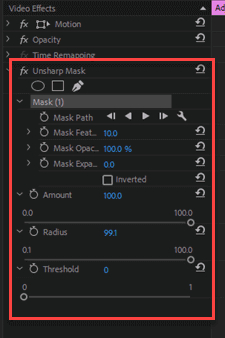
Step 3. Refine the mask through Mask Feather, Mast Opacity, and Mask Expansion.
Mask Feather: Mask Feather controls the softness of the edges of a mask. A higher Feather value will create a smoother transition between the masked area and the surrounding unmasked area, resulting in a less defined edge. This is particularly useful when you want to avoid harsh or abrupt transitions, especially around objects with soft or irregular edges.
Mask Opacity: Mask Opacity determines the transparency of the masked area. A value of 0% makes the masked area completely transparent, essentially hiding it from view. Conversely, a value of 100% makes the masked area fully opaque, revealing it entirely. Intermediate values allow for partial transparency, creating a blending effect between the masked area and the underlying footage.
Mask Expansion: Mask Expansion controls the size of the masked area relative to its original shape. A positive value expands the mask, making the masked area larger. A negative value contracts the mask, making the masked area smaller. This is useful for fine-tuning the mask's fit around your subject, especially if you want to precisely include or exclude certain details.
These three mask properties, along with the mask shape itself, provide powerful tools for selectively revealing or concealing portions of your video footage. By adjusting these properties, you can achieve precise control over the composition and visual emphasis within your video.
Additionally, there is a term named Inverted. If you check this option, Premiere Pro will sharpen everything outside the mask and leaving the masked area unsharpened.
Step 4. Adjust the "Amount," "Radius," and "Threshold" sliders as described previously, but these adjustments will only affect the masked area.
Step 5. Preview your video to see the selective sharpening effect and make further refinements as needed.
By combining Unsharp Mask with masks, you gain precise control over which areas of your video receive sharpening, allowing for a more nuanced and professional-looking result.
How to Avoid Over-Sharpening
Premiere Pro is a good tool to Sharpen videos. However, over-sharpening may happen. Here’re some tips for you to avoid this.
1. Over-sharpening introduces unwanted artifacts, like pixelation or halos around edges. Increased noise, especially in low-light footage, is another telltale sign. Keep an eye on your preview window to catch these issues.
2. Adjust the sharpening amount based on your video quality. Grainy footage needs a lighter touch compared to crisp recordings. Start with subtle adjustments and gradually increase them until details pop without introducing artifacts.
3. Constantly compare the sharpened version with the original to ensure you're enhancing details without creating unwanted effects.
By following these guidelines, you'll be able to sharpen your videos effectively while maintaining a natural and polished look.
Affordable and User-Friendly Alternative Way to Sharpen Video
While Adobe Premiere Pro offers a range of sharpening tools, sometimes you need a more affordable, user-friendly, and AI-powered solution. That's where Winxvideo AI steps in. This AI-powered video enhancement software provides an unparalleled level of sharpening capabilities, taking your videos to the next level of clarity and detail, all at a fraction of the cost of traditional video editing software.
The upgraded Winxvideo AI 4.0 delivers 40-80% faster processing and introduces two specialized AI models: Gen Detail V3 for refining intricate textures (skin/hair), and Real Smooth V3 for optimizing simpler content (animations/line art). A new DPI setting further extends functionality for high-quality print optimization.
Winxvideo AI's pricing is incredibly affordable, making it accessible to everyone from casual video enthusiasts to professional videographers. With options for both 1-year and lifetime licenses, you can choose the plan that best suits your needs.
- 1 year/3 PCs: Sharpen your videos on up to 3 devices for just $25.95 per year.
- Lifetime/1 PC: Enjoy lifetime access to Winxvideo AI's sharpening capabilities on one device for a one-time payment of $54.95.
Using Winxvideo AI's AI sharpening feature is incredibly simple and straightforward. Even if you're a complete beginner, you can easily sharpen your videos with stunning results. Here's how to get started.
Step 1. Download and install Winxvideo AI on your computer.
WinxVideo AI is incredibly lightweight and doesn't require high-end hardware to run smoothly. This makes it an ideal choice for users with older computers or those who want to avoid resource-intensive software.
 Free Download
  Free Download
Winxvideo AI is for PC, while Macxvideo AI (from our MacXDVD brand) is for macOS.
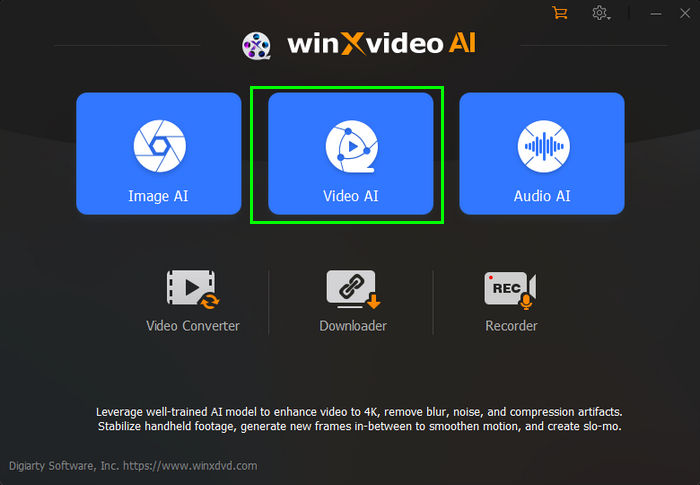
Step 2. Launch Winxvideo AI and select the "Video AI" tab.
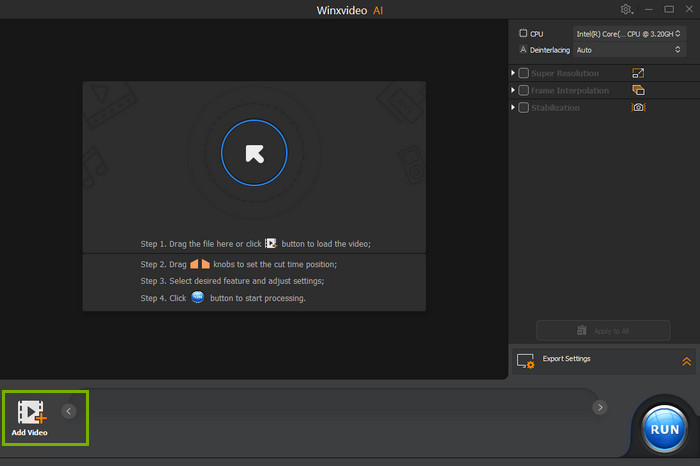
Step 3. Click the "Add Video" button and browse to select the video you want to sharpen. You can also drag and drop the video file directly onto the interface.
Step 4. Check "Super Resolution", select AI model, and specify model settings. If you don’t want to increase video resolution, simply check "Enhance Video (1x)". Winxvideo AI automatically detects the need for sharpening. No complex settings are required.
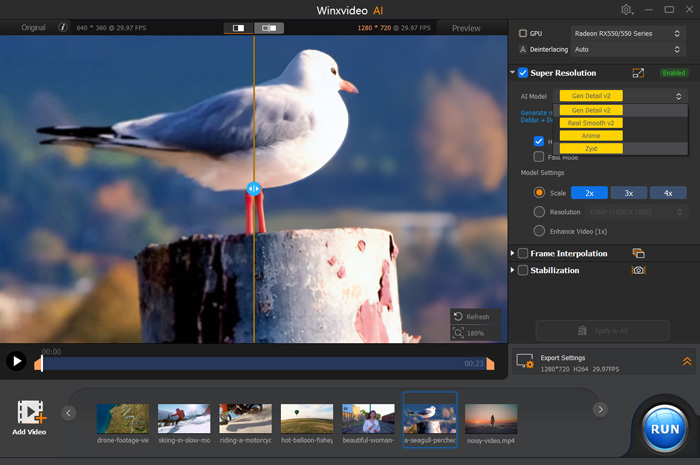
Step 5. Preview the sharpening effect in the preview window. Once you're satisfied with the results, click the "RUN" button to export your sharpened video.
Winxvideo AI goes beyond basic sharpening. It's a comprehensive video enhancement suite, offering features like upscaling, frame rate boosting, stabilization, conversion, compression, and even video editing and recording capabilities.
By combining user-friendly design with powerful AI technology, Winxvideo AI empowers anyone to achieve professional-looking video results, all at an affordable price.
Final Words
Adobe Premiere Pro is a powerful video editing tool that offers a variety of sharpening methods to suit different needs. Whether you want to sharpen the entire video frame or just specific areas, Premiere Pro has you covered. However, Premiere Pro may not be the best choice for everyone. If you're looking for a simpler, more user-friendly, and more affordable video sharpening tool, consider Winxvideo AI.
 FAQs
FAQs
Yes! Apply Unsharp Mask via an adjustment layer, then create an ellipse or pen mask > track the subject if it moves > isolate sharpening to specific regions (e.g., eyes).
Third-party plugins for Premiere Pro like Samurai Sharpen and Fixel EdgeHancer offer enhanced algorithms. AI tools like Winxvideo AI and Topaz Video AI can upscale and de-blur clips more effectively—often recommended as a preprocessing step.


