How to Improve YouTube Video Quality?
 Mike Rule
Updated on
YouTube has become the go-to platform for sharing video content, whether you're a content uploader or an audience. However, one of the common issues that both viewers and content creators face is poor video quality. A blurry or pixelated video can ruin the viewer's experience and negatively impact your channel's reputation. Understanding why this happens and learning how to improve YouTube video quality is crucial for anyone looking for high-quality visuals.
In this article, we'll delve into the reasons behind poor video quality on YouTube and provide actionable steps to increase video quality on YouTube, ensuring your videos are as clear and sharp as possible.

Part 1. Why is My YouTube Video Low-quality?
Poor video quality on YouTube can be frustrating, especially when you've invested time and effort into YouTube content. There are several reasons why your videos might appear blurry or pixelated, ranging from issues with the video file itself to playback settings on the viewer's device. Let’s explore these reasons in detail.
Reason 1. The quality of the original uploaded video is low.
The most common reason for blurry videos on YouTube is that the original file uploaded was of low quality. If the resolution, bitrate, or encoding settings of your video are subpar, YouTube will compress it further, resulting in a video that looks even worse. Always aim to upscale images to 4K (Ultra HD) or 1080p (Full HD) and upload videos in the highest quality possible to mitigate this issue.
Reason 2. The video player/screen size affects the quality.
When a video is uploaded in a low resolution (e.g., 360p or 480p) and viewed on a larger screen, it will appear blurry. This is because the pixels are being stretched to fit the larger display, reducing the overall sharpness and clarity. On the contrary, higher-quality videos generally play better on larger screens.
Reason 3. The browser doesn’t support high quality options.
Not all browsers handle video playback equally. Some older browsers or those that are not optimized for multimedia content may struggle with high-quality video playback, leading to a degraded viewing experience. This can cause videos to look blurry or stutter during playback.
Reason 4. The internet speed is poor.
YouTube automatically adjusts the video quality based on your internet connection. If your internet speed is slow or unstable, YouTube may lower the video resolution to avoid buffering, leading to a blurry or pixelated video. This adjustment is done in real time, so the video quality may fluctuate during playback.
Reason 5. The playback setting on YouTube is wrong.
By default, YouTube may not always select the highest quality playback option, especially if it detects a slower internet connection. If the video quality is set to a lower resolution (e.g., 360p or 480p), the video will appear blurry even if the original upload was in high definition. Adjusting these settings manually can often resolve this issue.
Part 2. How to Improve YouTube Video Quality?
Now that you know what causes the poor quality of YouTube, let’s find solutions to make high-quality videos on YouTube for a better viewing experience.
Solution 1. Upscale & Enhance Videos before Uploading to YouTube
Winxvideo AI possesses the capability to enhance low-quality videos that exhibit issues such as low resolution, blurriness, shakiness, interlacing artifacts, and noise. It can elevate low-resolution footage to high-definition or even 4K quality, resulting in clearer visuals and more defined details. Additionally, it effectively eliminates noise, blur, and other visual artifacts. The software also stabilizes shaky videos sourced from devices like GoPro, DJI, mobile phones, and YouTube, while increasing frame rates to provide a smoother viewing experience. Furthermore, users have the option to refine color settings, adjust brightness and contrast, and extract intricate details for a more polished appearance.
Winxvideo AI can help improve YouTube video quality by:
- Increasing video resolution to HD 1080p or 4K.
- Increasing video frame rates to 30fps or 60fps to eliminate choppiness in 4K footage.
- Addressing issues of blur, including soft blur, motion blur, and out-of-focus effects.
- Removing grain or noise from videos captured in low-light conditions or at high ISO levels.
- Stabilizing action and sports footage recorded with unstable smartphones, GoPro, DJI, drones, and similar devices.
- Revitalizing old, vintage, and faded videos to recover lost details.
 Free Download
 Free Download
Note: AI tools for Mac are currently unavailable, but they're coming soon. Stay tuned.
How to Improve YouTube Video Quality with Winxvideo AI?
Step 1. Download Winxvideo AI, install and launch it on your computer.
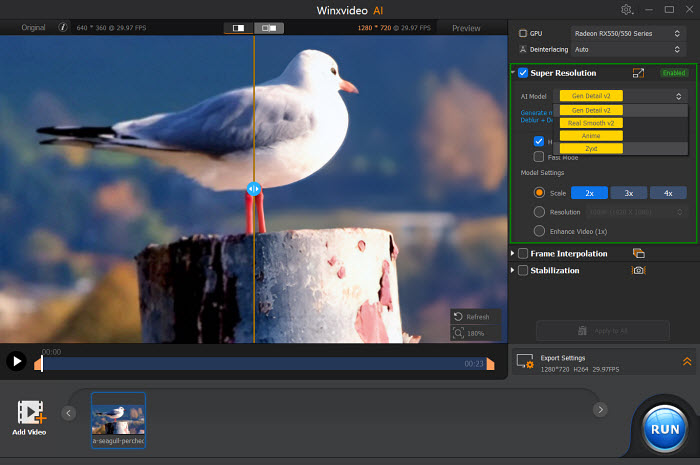
Step 2. Click on "Video AI", then choose "Add Video" or drag and drop your low-quality YouTube videos.

Step 3. Improve your YouTube video quality based on different conditions
- To increase video resolution to get better clarity and more details, you can activate the "Super Resolution" feature on the right panel and select the "Gen Detail v2" AI model. Also, choose "High Quality Mode" and a video resolution you need.
- If you want to convert YouTube videos to higher FPS, you can activate "Frame Interpolation" and specify the FPS setting.
- If your YouTube video contains motion blur, you can use Winxvideo AI's "Stabilization" feature to reduce camera shake and improve image stability.

Step 4. Specify the "Export settings", and then click the "RUN" button to start improving YouTube video quality.
Solution 2. Choose a Better Screen to Display YouTube Videos
Choosing a better screen is essential for maximizing YouTube video quality, ensuring smooth playback, and enhancing the overall viewing experience. High-end screens match the resolution of high-resolution videos, provide accurate colors, and support advanced technologies like HDR, making the content more immersive. For professionals, a better screen is crucial for precise content creation and analysis, making it a valuable investment for both entertainment and professional use.
Solution 3. Update Your Browser
As mentioned, some browsers don’t support newer video formats or quality options, you are suggested to change your browser.
The following combinations of browsers and operating systems are compatible with YouTube's high-quality video formats:
- Google Chrome (all operating systems)
- MS Edge
- Safari on Mac OS X 10.10 or newer
- Firefox on Windows 7 or newer and on Mac OS X 10.10 or newer
Solution 4. Increase the Internet Speed
Internet speed directly affects YouTube video quality because it determines how quickly data can be streamed to your device. Higher video resolutions, such as 1080p or 4K, require more data to be transmitted per second. If your internet connection is slow, YouTube may automatically lower the video quality to ensure smooth playback without buffering. A faster internet connection allows for higher-resolution streaming without interruptions, ensuring that the video plays at its best possible quality.
Solution 5. Change the Playback Settings After Video Uploading
You can manually change the video quality of any video on YouTube you're watching on a computer, TV, or mobile device.
Change YouTube video quality on TV:
- In the video player, select Settings
- Select Quality.
- Select the high video quality.
Change YouTube video quality on computer:
- In the video player, select Settings
- Select Quality.
- Select the high video quality.
Change YouTube video quality on Android:
- In the video player, select Settings
- Tap Quality.
- Select the high picture quality.
Change YouTube video quality on iPhone/iPad:
- In the video player, select Settings
- Tap Quality.
- Select the high picture quality.
 FAQs
FAQs
The quality of your YouTube videos can be affected by various factors such as low-resolution source videos, incorrect upload settings, and slow internet connections.
To create high-quality YouTube content, focus on using high-resolution cameras, proper lighting, and effective video editing techniques. Additionally, optimize your videos for upload and choose the right playback settings.
Ensure your video file is in 1080p resolution and select the appropriate resolution during the upload process.
While there is no way to set YouTube video quality permanently across all devices, you can adjust the playback settings on your specific device to your preferred resolution.
You can change the default quality for all the videos that you watch on Android, iPhone, and iPad.
- Tap your profile picture.
- Tap Settings.
- Tap Video quality preferences.
- Select your preferred video quality for mobile networks and on Wi-Fi.
To change YouTube video quality to 1080p, access the video settings and select the "1080p" option from the available resolutions.


