


How to Use Premiere Pro Optical Flow?
 Mike Rule
Updated on
In the world of video editing, achieving smooth slow-motion or speeding up footage without jarring transitions is crucial. Adobe Premiere Pro offers a powerful tool called Optical Flow to address these challenges. This article will delve into what Premiere Pro Optical Flow is, how to effectively use it in Premiere Pro, and how to troubleshoot common issues that may arise.
Part 1. What is Premiere Pro Optical Flow?
Optical Flow, Frame Sampling, ad Frame Blending are the three Premiere Pro Time Interpolation modes for video frame interpolation when slowing down or speeding up videos. Optical Flow stands out as a sophisticated algorithm that analyzes neighboring frames to synthesize new frames, creating smooth transitions between adjacent frames. While it can produce the smoothest results, it may demand substantial computational resources compared to the other two methods.
Occasionally, the outcomes may appear less polished and authentic. Optical Flow is most suitable for handling videos featuring uncomplicated movements, like skiing videos without any spinning, leaping, or twisting. Additionally, it is important to remember to render the video following the application of the Optical Flow function in order to achieve a more natural effect.
- Best for videos with simple motion.
- Outputs the smoothest results compared to Frame Sampling and Frame Blending.
- Causes distortion, artifacts, or warping.
- Requires significant computational resources.
Part 2. How to Use Optical Flow in Premiere Pro?
Now that you know what Optical Flow in Premiere Pro is, let’s make a video slow-motion with this function.
Step 1. Create a New Project in Premiere Pro.
Launch your Adobe Premiere Pro, and click "New Project" on the interface to create a new project.
Step 2. Import your video.
Usually, you can right-click the empty area at the bottom left corner and choose "Import" from the list of options. Then, select your file and import it.
Step 3. Create a sequence.
Simply drag the video you just imported onto the Timeline of Premiere Pro.
Step 4. Apply Optical Flow to your video.
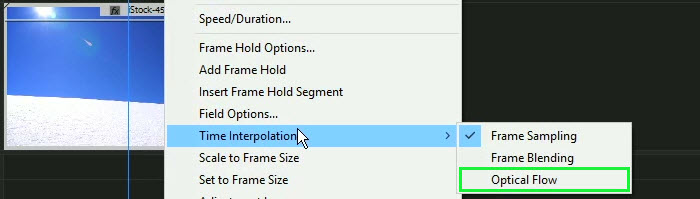
1. Right-click on the footage in the Timeline.
2. From the drop-down menu, choose "Speed/Duration".
3. Choose "Optical Flow" from the drop-down menu of "Time Interpolation".
4. In the "Speed" category, input a value, e.g. 50%. Then, press the "OK" button at the bottom.
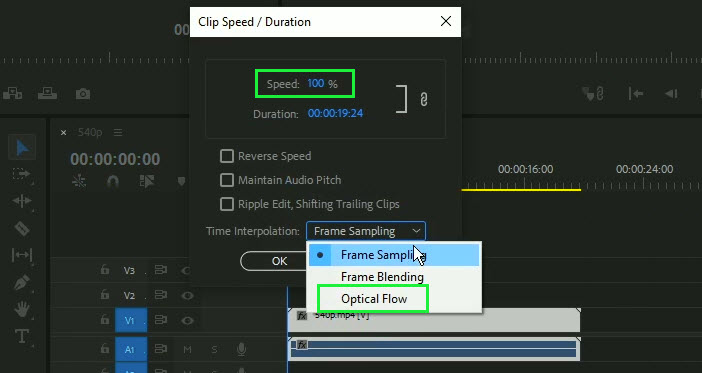
Now, you will see that your video in its video track is longer. The reason for this is that the video is currently in slow motion, which means it requires more time to fully play back. Additionally, you might observe that the outcome appears slightly choppy, but this is due to the fact that we have not yet applied the rendering effect.
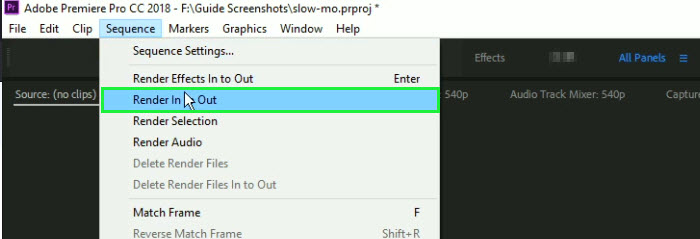
Step 5. Render the effect.
Now, go to "Sequence" at the top bar and choose "Render In to Out" to render the effect and make the final video smooth.
Step 6. Have more control with Time Remapping.
If you desire greater control over your video, time remapping is the ideal solution. It provides you with the ability to manipulate time as if you were using a remote control, allowing you to fast-forward, rewind, and pause specific segments of your video.
1. Right-click on your footage in the Timeline.
2. Hover over "Show Clip Keyframes" > "Time Remapping", and then choose "Speed".
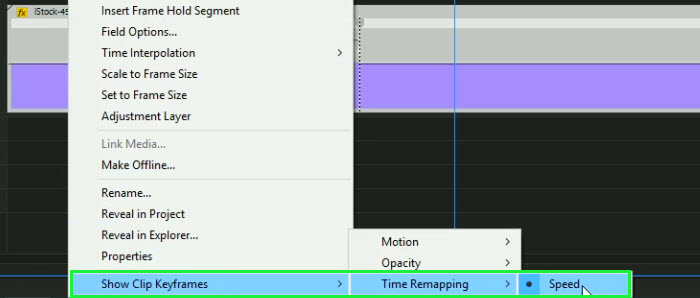
3. You'll now see a line across your footage on the Timeline. This is the speed line. By adding keyframes on this line, you can adjust the speed of different sections of your clip.
4. Go to "Effect Controls" panel, you can add a keyframe to where you want the change to start and end.
5. After setting your keyframes, adjust the speed by dragging the line up (speed up) or down (slow down).
6. To guarantee seamless transitions, simply right-click on your footage, go to "Time Interpolation", and once more choose "Optical Flow".
Part 3. How to Solve Premiere Pro Optical Flow Issues?
"I'm new to Premiere. How do I fix this warping/choppiness when I use optical flow?" – from Reddit user
Despite its usefulness, Optical Flow is not without its flaws. Since Premiere Pro Optical Flow generates entirely new frames, issues like warping, choppiness, and artifacts can arise. The more intricate and dynamic the footage for Premiere Pro to process, the greater the likelihood of errors. To ensure the best results, it is advisable to shoot against a simple, static background.
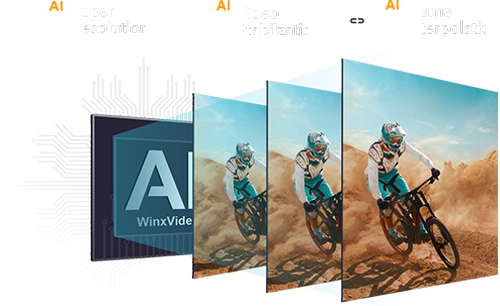
Alternatively, try Winxvideo AI if you want to create a slow motion video. The "Video AI" feature within Winxvideo AI is a powerful toolkit driven by artificial intelligence, enabling users to enhance video quality, increase video FPS, and stabilize shaky footage. You can utilize the AI Frame Interpolation capability to elevate video FPS for creating slow-motion videos at frame rates like 60fps, 120fps, and 240fps.
AI-powered. GPU-accelerated. 47X faster. High-quality.
- Make slow motion videos @60fps/120fps/240fps/480fps.
- Boost FPS from 25/30fps to 60, 120, 240, and even 480fps.
- Smooth animation & fast-moving videos, and restore old movies.
- One-stop AI toolkit with video upscaler, stabilizer & frame interpolator.
 Free Download
 Free Download
Use Winxvideo AI to Make a Video Slow-motion
Step 1. Free download Winxvideo AI, install and launch it.
Step 2. On the main UI, click on the "Video AI" button to navigate to the AI frame interpolation window.
Step 3. Add a video you want to make it slow-motion. BTW, Winxvideo AI lets you process more than one video at the same time.
Step 4. On the right part, check the box "Frame Interpolation", and then tick "Slow Motion". Then, you can slow down your video by choosing 2X, 3X, 4X, or 5X.
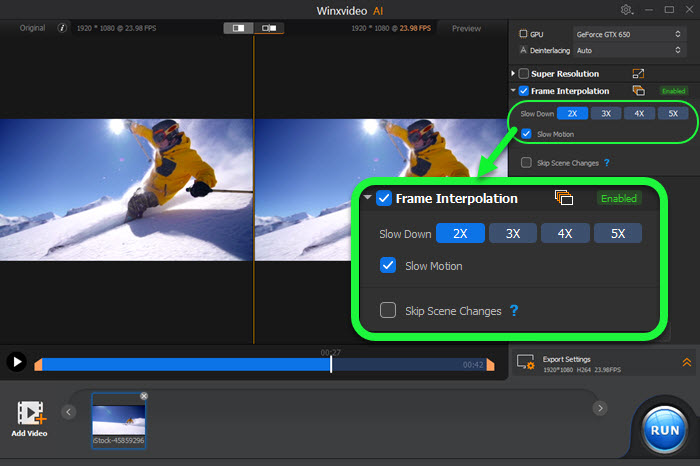
Step 5. Click on "Export Settings" to specify the output video/audio codec, quality, and GOP; and choose a destination folder.
Step 6. When everything is OK, hit the "RUN" button.
In conclusion:
Adobe Premiere Pro's Optical Flow feature is a powerful tool for speeding up or slowing down videos with smooth transitions between frames. By understanding its capabilities and applying it correctly, editors can significantly improve the visual appeal of their projects. Mastering Optical Flow empowers editors to achieve professional-level results in managing video speed and motion within their timelines.
If there is any issue with Premiere Pro Optical Flow when creating slow motion videos, fret not, Winxvideo AI is here to help you.


