Make Your Pictures Look Amazing: A Simple Guide to Upscaling Image to 4K
 Mike Rule
Updated on
Have you ever looked at a favorite photo and wished it was sharper and clearer? Perhaps you want to print a small image into a large poster without sacrificing quality. The solution lies in upscaling your image to 4K resolution.
Upscaling involves increasing an image's size without compromising its details. While it was once a complex process requiring specialized software, today's technology offers user-friendly methods, many of which are completely free. In this guide, we'll explore various techniques and tools to help you upscale your low-resolution images into 4K without watermark.
Upscale your photos to 4K, 8K, or even 10K resolution. Add unparalleled detail and clarity in every image. Batch processing and GPU acceleration supported.
Waifu2x is one of the most popular, free, open-source tools specializing in image upscaling and enhancement, particularly for anime and cartoons.
Pixelcut offers a convenient online platform for basic image upscaling, suitable for casual users and smaller image enhancements..
How to Upscale Images to 4K without Watermark [5 Ways]
Get the best methods to upscale images and photos to 4K without compromising quality or dealing with annoying watermarks, ranging from new leading Winxvideo AI to Photoshop, and online tools.
#1. Upcale Images to 4K/8K/10K with Winxvideo AI
Winxvideo AI is a powerful AI-driven tool that empowers you to enhance and revitalize your photos and videos. Its image upscaling capabilities are particularly impressive, allowing you to upscale images to 4K, 8K, or even 10K masterpieces. This puts it in a class of its own, surpassing many AI image upscalers that max out at 4K.
Winxvideo AI goes beyond mere upscaling by providing a suite of AI-powered features to enhance your images. The AI image upscaler can automatically remove scratches, stains, and other imperfections, bringing your old or damaged photos back to life. Additionally, it offers real and anime enhancement modes to cater to different artistic styles, while three noise reduction levels ensure you achieve the perfect balance of clarity and detail.
Winxvideo AI streamlines your workflow with batch processing capabilities, powered by GPU acceleration for blazing-fast speeds. Whether you're working with a large collection of photos or videos, Winxvideo AI can handle the task efficiently.
 Free Download
 Free Download
Winxvideo AI is for PC, while Macxvideo AI (from our MacXDVD brand) is for macOS.
- Upscale low-res images to 4K, 8K, or 10K.
- Automatically remove imperfections, enhance real and anime images, and reduce noise with precision.
- Batch processing with gpu acceleration.
- Currently exclusive to Windows users.
- Lack the ability to generate entirely new images from scratch.
How to Upscale Images to 4K without Watermark on PC
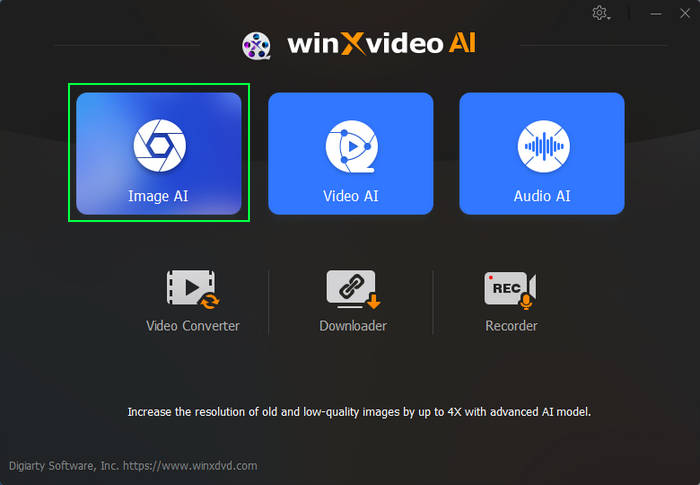
Step 1. Launch Winxvideo AI. Open the Winxvideo AI software and navigate to the "Image AI" module. This is where you'll perform image enhancement and upscaling tasks.
Step 2. Import your image. Click the "Add Image" button to import the low-resolution image you want to upscale. Winxvideo AI supports batch processing, allowing you to add multiple images simultaneously for efficient processing.
Step 3. Select Upscaling Settings. Choose the appropriate image type (Reality or Anime) based on your image content. Then, select the desired upscaling factor:
- 2x: Doubles the image resolution.
- 3x: Triples the image resolution.
- 4x: Quadruples the image resolution.
For maintaining the original image size while applying enhancements, choose "Enhance Image (1x)".
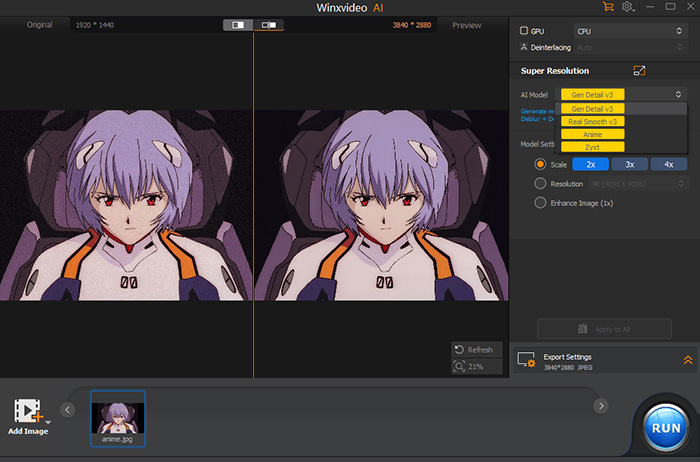
Step 4. Preview and export. A preview window will display the expected results based on your selected settings. Once satisfied, specify the output format and location for the upscaled image. Click "Run" to initiate the upscaling process.
Read more: Top 8 Best Old Photo Restoration App for iPhone and Android.
#2. Upscale Image to 4K Free with Waifu2x
Waifu2x is a popular, free, and open-source tool that utilizes advanced AI algorithms to enhance image resolution. It's particularly renowned for its ability to improve the quality of anime and cartoon images, effectively reducing noise and sharpening details while preserving the original art style. While it has limitations, its ease of use, impressive results, and open-source nature make it a popular choice to upscale images to 4K free without watermark.
Beyond upscaling images to 4K, the software also includes features to increase image quality. Auto noise reduction helps eliminate unwanted graininess, while image sharpening enhances focus and detail. For those looking to fine-tune the image's look, color adjustment tools provide basic control over tone and saturation.
Waifu2x has a 2.8 megapixel file limit (approximately 5MB). Images exceeding this will be resized or compressed. To achieve 4K resolution, you may need to perform multiple upscales (e.g., 2x, then 2x again). This can introduce some quality degradation.
- Excellent results for anime and cartoons.
- Simple and intuitive interface suitable for users of all skill levels.
- Available for free and allows for customization and further development.
- Lack advanced customization options for experienced users.
- May introduce artifacts in certain images, especially with aggressive upscaling.
- Performance may vary for other image types.
- 2.8 megapixel file limit.
How to Upscale Anime Images to 4K with Waifu2x
Step 1. Access the Waifu2x Website: Navigate to https://waifu2x.jp/ and get ready to upscale image to 4K.
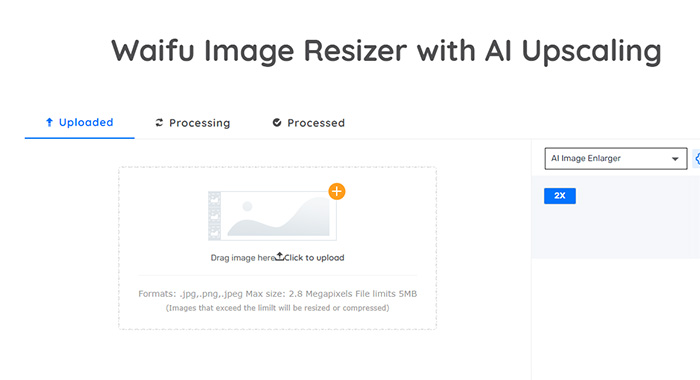
Step 2. Click "Choose File" and select the image you want to enhance. Batch image upscaling is supported.
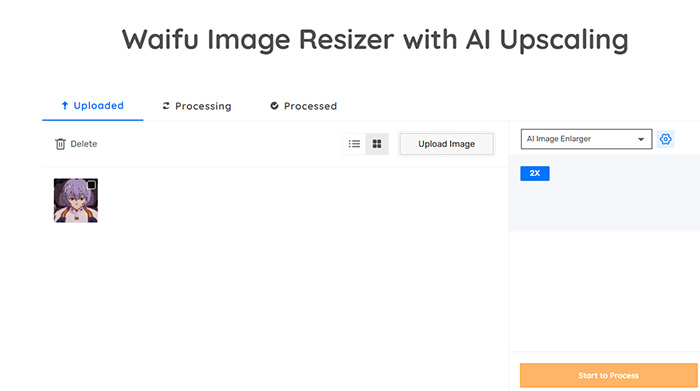
Step 3. Click "Start to Process" and watch Waifu2x upscaling. The processing time may vary depending on your image size and chosen settings. Generally, upscaling an image only takes a few seconds.
Step 4. Once complete, save the enhanced image to your device.
#3. Upscale Images to 4K with Topaz Labs Gigapixel AI
In the world of image editing, Topaz Labs Gigapixel AI stands as a revolutionary tool, harnessing the power of artificial intelligence to upscale low-resolution images into 4K masterpieces. This remarkable software boasts the ability to upscale images by up to 600%, making it an invaluable asset for photographers, artists, and graphic designers alike.
Beyond its exceptional upscaling capabilities, Gigapixel AI also excels in noise reduction and sharpening. It effectively tackles image noise and artifacts, resulting in cleaner and crisper visuals. This feature is particularly beneficial for enhancing old, low-resolution photographs or upscaling images from low-quality sources.
While Gigapixel AI offers unparalleled upscaling capabilities, it's important to consider its cost and potential limitations. The software is a paid product, and its licensing fees may be prohibitive for some users. Additionally, effective utilization of the software may require some practice and exploration of its settings. Lastly, aggressive upscaling can, in rare instances, introduce artifacts, especially in areas with low contrast or fine details.
- Good upscaling quality.
- Effectively tackle noise and blurriness.
- Batch processing.
- High cost.
- Aggressive upscaling can introduce artifacts.
- Currently, it supports a limited range of image file formats.
Steps to Upscale Photos to 4K with Gigapixel AI
Here's a step-by-step guide on how to upscale images to 4K using Topaz Labs Gigapixel AI.
Step 1. Launch Gigapixel ai and import your image. Open Gigapixel AI and click "Open" to browse your computer and select the low-resolution image you want to upscale.
Step 2. Choose your upscaling model (optional). Gigapixel AI offers various AI models optimized for different image types. Here's a breakdown (refer to the official documentation for detailed descriptions).
- Standard: Ideal for general upscaling of most image types.
- High Fidelity: Preserves intricate details, suitable for high-quality photos and artwork.
- Low Resolution: Prioritizes overall quality over fine details, best for heavily compressed images.
- Graphics: Specifically designed for upscaling illustrations and cartoons.
If you're unsure, start with the "Standard" model. You can experiment with other models later to see which one produces the best results for your image.
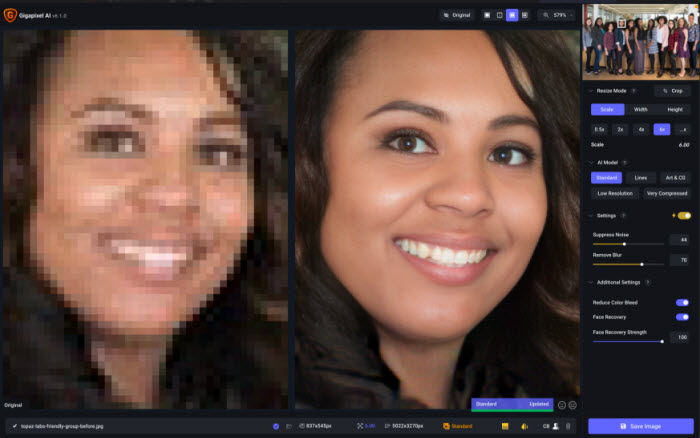
Step 3. Set your upscaling factor. Look for the "Scale" setting. Here, choose the desired upscaling factor, like 2x or 4x, to achieve your target 4K resolution.
Step 4. Adjust additional settings (optional). Gigapixel AI offers additional settings you can explore to refine your upscaling outcome. While these are optional, they can further enhance the results.
- Suppress Noise: Reduces image noise and artifacts.
- Remove Blur: Attempts to deblur slightly blurry images.
- Sharpen: Improves image sharpness and clarity.
Step 5. Once you've chosen your settings, click the "Start" button. Gigapixel AI will start processing your image. The processing time can vary depending on your image size, chosen settings, and computer specifications.
Step 6. Upon completion, Gigapixel AI will display the upscaled image. You can use the zoom tool to compare the original and upscaled versions. If satisfied, click "Save" to export your new high-resolution image.
#4. Upscale Images to 4K without Watermark with Photoshop
Photoshop offers a suite of tools for image manipulation, including upscaling. However, its core strength lies in its flexibility rather than specialized upscaling algorithms. While it can produce satisfactory results for minor enlargements, significant upscaling can be challenging.
Photoshop's primary upscaling method involves resizing the image using interpolation algorithms. Options like Bicubic, Bicubic Smoother, and Bicubic Sharper are available. Bicubic is generally the preferred choice, offering a balance between detail preservation and smoothness. However, these algorithms have limitations, particularly when dealing with significant upscaling factors. Artifacts, blurring, and loss of detail can become noticeable.
To mitigate some of these issues, Photoshop users often combine upscaling with other techniques. Sharpening filters like Unsharp Mask or Smart Sharpen can enhance perceived detail, but they can also introduce noise or halos. Layers and masking can be used to selectively apply sharpening or other adjustments to specific areas of the image.
- Control and flexibility.
- Image editing integration.
- Non-destructive editing with different upscaling methods.
- May produce less impressive results.
- Achieving optimal results often requires experimentation with different settings and techniques.
- Steeper learning curve.
Steps to Upscale an Image to 4K in Photoshop
Step 1. Open your image in photoshop. Launch Photoshop and open the image you want to upscale.
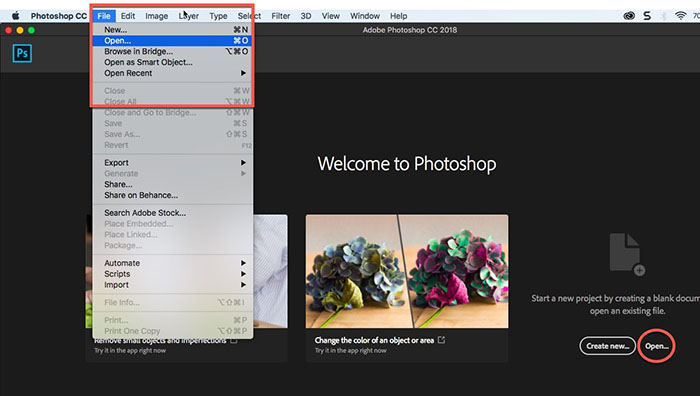
Step 2. Access the image size dialog box. Go to the "Image" menu at the top of the screen and select "Image Size."
Step 3. Change image dimensions. In the Image Size dialog box, enter the desired width and height for your 4K image (3840 pixels by 2160 pixels for standard 4K). Ensure the "Resample Image" box is checked.
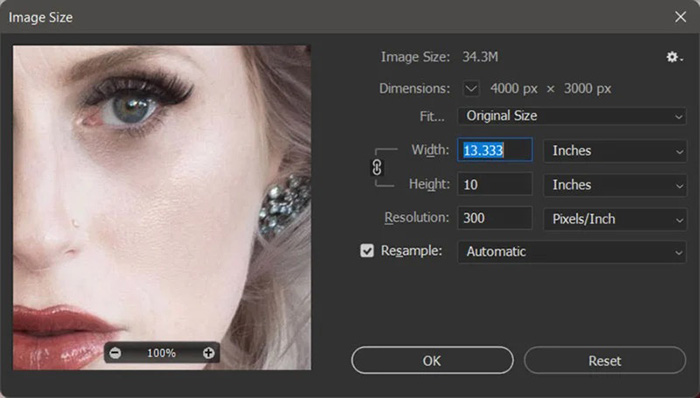
Step 4. Choose a resampling method. Select a resampling method from the dropdown menu. Bicubic is often the default choice. However, be aware that these methods have limitations for significant upscaling.
Read more: Photoshop Upscaling: Bicubic Smoother vs Preserve Details vs Preserve Details 2.0
#5. Upscale Images to 4K Free Online with Pixelcut
Pixelcut's online image upscaler is a convenient tool for those looking for a quick and easy way to slightly upscale their images. It's ideal for casual users or for upscaling smaller images where maintaining the highest quality isn't critical. However, for professional or critical work, dedicated upscaling software or AI-powered tools might offer more control and potentially better results with larger images.
Free users can only upscale images by 2x. To achieve a 4x upscaling factor, a Pro subscription is required. Pixelcut's free tier provides only the basic upscaled image. Paid plans offer additional features like watermark removal and batch processing.
Upscaling can introduce artifacts and blurriness, and Pixelcut's free tier might not always produce the best results, especially for significant enlargements. Aggressive upscaling (4x) might introduce more artifacts compared to 2x.
- Simple and easy to use, no software installation.
- 2X upscaling feature is available for free.
- Provide two upscaling factors: 2x and 4x.
- Less control over the upscaling process.
- Upscaling can introduce artifacts and blurriness.
- Pixelcut's free tier provides only the basic upscaled image.
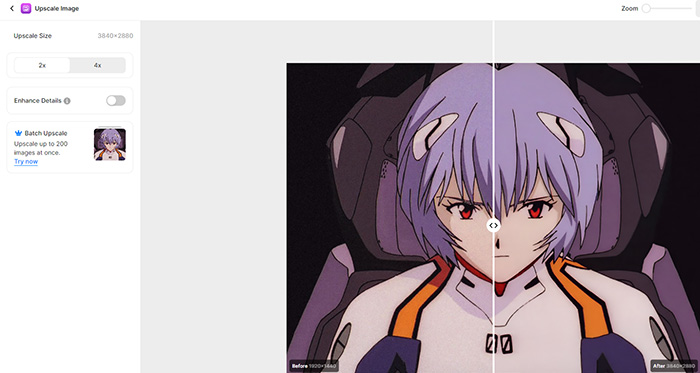
Here's how to upscale an image to 4K with Pixelcut
Step 1. Go to https://create.pixelcut.ai/upscaler.
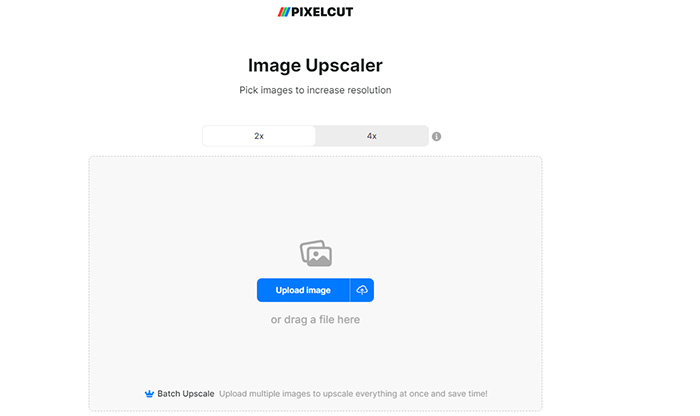
Step 2. Click "Choose File" and select the image you want to upscale.
Step 3. Choose your upscaling factor: 2x or 4x. Free users are limited to the 2x optio
Step 4. Click "Start" to initiate the process. Once processed, download the upscaled image.
Curious how resolution impacts your AI art? Explore SDXL resolution best practices to get the most from your images.
 FAQs about How to Upscale Image to 4K
Modern upscaling techniques use advanced algorithms, often powered by artificial intelligence, to analyze an image and intelligently generate new pixel data. This differs from traditional methods that simply interpolate pixel values, which often results in lower image quality.
While any image can technically be upscaled, the quality of the result depends on the original image's resolution and detail. High-resolution images with ample information are more likely to produce better results than low-resolution or heavily compressed images.
While Photoshop can resize images, its upscaling capabilities are limited compared to dedicated upscaling tools. For significant image enlargements, using specialized software is often recommended.
Yes, some online tools offer free image upscaling services, but they often have limitations in terms of image size, output quality, and available features. For professional-grade results, paid options might be necessary.
Several online tools and software applications offer image upscaling capabilities. AI-powered options like Pixelcut, Winxvideo AI, Topaz Gigapixel AI, and Let's Enhance are often recommended for their ability to produce high-quality results. It's essential to compare different tools based on factors like pricing, features, and user reviews.


