


How to Remove Artifacts from Video: Top 5 Tools for High-Quality Restoration
 Mike Rule
Updated on
With the rise of short-form content and high-resolution streaming, video quality is now paramount for audience engagement. However, excessive compression often leads to visible artifacts, reducing visual clarity and professionalism. According to discussions on Reddit[1], many users struggle with compression artifacts caused by YouTube, TikTok, and other platforms' aggressive encoding.
This article introduces five powerful tools to remove compression artifacts from video, along with practical techniques to enhance video quality and restore lost details.
Part 1. What Are Video Compression Artifacts?
Video compression artifacts[2] are visual distortions that occur due to data loss during the video encoding process. These imperfections result from aggressive compression techniques that remove details to reduce file size, leading to noticeable quality degradation.
Artifacts are first categorized by whether they’re time/sequence-based (temporal) or location-based (spatial). If you can see the artifact when the video is paused, then it’s probably a spatial artifact. If it’s much more visible while the video plays, then it’s likely temporal.

Here're Common Types of Video Compression Artifacts[3]:
- Blocking (Blocky Noise): Square-shaped pixelation caused by low-bitrate compression.
- Color Banding: Visible color transitions that appear as unnatural bands instead of smooth gradients.
- Blurring: Loss of sharpness and fine details due to over-compression.
- Mosquito Noise: Flickering or buzzing effects around edges and high-contrast areas.
- Ringing (Echoing/Ghosting): stationary halos/bands near sharp edges from decompression data issues.
- Staircase Noise: jagged edges from insufficient compression or low resolution.

Low bitrate compression, lossy formats like H.264/H.265, and multiple transcoding steps are primary causes of video compression artifacts, all contributing to data loss and reduced visual fidelity. Eliminating these artifacts is essential as it guarantees professional-quality footage, revitalizes the clarity of older video content, and optimizes the viewing experience on modern 4K and HDR screens by preventing unwanted distortions.
Part 2. 5 Best Tools to Remove Compression Artifacts from Video
FYI (Based on Controlled Testing):
The following insights are based on rigorous testing conducted on various video compression artifact removal software under identical conditions to ensure a fair comparison.
Testing Environment:
- Source Video: A 1080p H.264 encoded video with noticeable compression artifacts.
- Operating System: Windows 10 64bit
- CPU: Intel(R) Core(TM) i5-4430 CPU @ 3.00GHz
- GPU: GeForce GTX 650
- RAM: 8GB
The observed performance and effectiveness of each software solution should be considered within the context of these specific hardware limitations and the chosen test video.
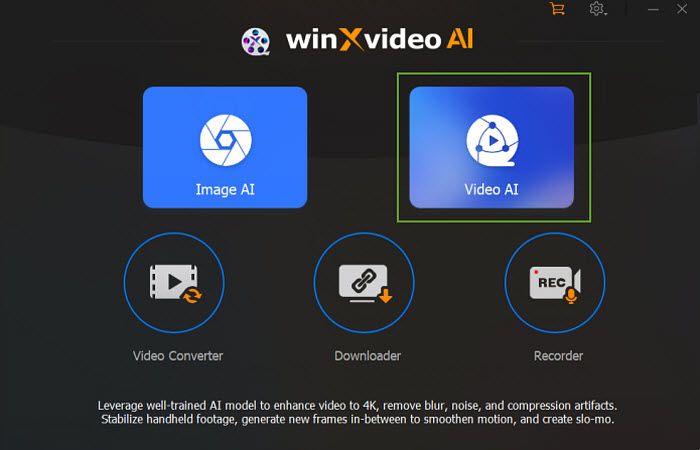
1. Winxvideo AI
Winxvideo AI is an advanced AI-powered video enhancement tool designed to remove video compression artifacts, reduce noise, and upscale low-quality videos to higher resolutions such as 4K and 8K. By utilizing deep learning AI algorithms, it intelligently restores lost details, smoothens blocky artifacts, and enhances the overall sharpness of videos.
Unlike traditional noise reduction methods that may blur important details, Winxvideo AI applies AI-driven restoration techniques to reconstruct the original texture of compressed videos while preserving clarity. This makes it an excellent choice for content creators, filmmakers, and casual users who want to improve the visual quality of their footage effortlessly.
 Free Download
 Free Download
Winxvideo AI is for PC, while Macxvideo AI (from our MacXDVD brand) is for macOS.
- Employs advanced AI algorithms for effective artifact removal and intelligent video denoising.
- Supports upscaling of lower-resolution videos to higher resolutions like 4K and even 8K.
- Designed for user-friendliness with largely automated processing workflows.
- Performance heavily relies on a dedicated, high-performance GPU.
- The trial version imposes limitations, including a 5-minute maximum video length and a visible watermark on processed videos, alongside restrictions on advanced functionalities.
How to Remove Artifacts from Video in Winxvideo AI?
Step 1. Download Winxvideo AI on your computer. Run it and click Video AI. Next, drag and drop the video you want to remove video compression artifacts from into the software. You can add as many videos as you want for batch processing.
Step 2. To remove video compression artifacts, enable the Super Resolution box on the left panel. First, in the Type section, select Reality if the video suffering from video compression artifacts is an old or low-quality family video, movie, or recording. Choose Anime if you want to fix an animated video with video compression artifacts.
Step 3. Next, under Model Settings, you can choose to upscale the video by 2x, 3x, and 4x. You can also enhance the video quality without increasing the resolution as you need. The upscaling will remove compression artifacts like pixelation, noise, and blur during the process. Adjust settings and experiment with each option for optimal results.

Step 4. Click Export Settings and adjust the output codec, quality, and folder. Then click RUN to remove video compression artifacts instantly.
2. Adobe Premiere Pro
Adobe Premiere Pro is one of the industry-leading video editing software solutions, widely used by professionals for editing, color grading, and post-production tasks. While it is primarily known for its editing capabilities, Premiere Pro also offers built-in tools for noise reduction and artifact removal, helping users restore compressed video files.
Through features like Lumetri Color, users can address color banding issues, while third-party plugins such as Neat Video provide advanced noise reduction for fixing compression artifacts. While it offers excellent customization and control over video restoration, it requires some level of experience to achieve optimal results, making it ideal for professional video editors rather than beginners.
Read More: How to Improve Video Quality in Premiere Pro >>
- Integrates seamlessly with powerful built-in and third-party noise/artifact reduction plugins like Neat Video.
- Offers non-destructive editing via adjustment layers for flexible artifact removal experimentation.
- Comprehensive color correction tools can complement artifact reduction by refining visual quality.
- Precise masking and tracking allow targeted artifact reduction in specific video areas.
- Lacks dedicated, advanced AI-powered artifact removal tools found in specialized software.
- Applying multiple effects for artifact reduction can strain system resources and slow down workflow.
- Effective artifact removal requires deeper knowledge of various effects and manual adjustments.
- Relies on general effects, not specific compression artifact removal tools.
- Achieving optimal results often involves time-consuming manual parameter adjustments.
How to Remove Compression Artifacts in Premiere Pro Using Neat Video Plugin?
Step 1. Open Premiere Pro, then drag and drop your video clip onto your timeline.
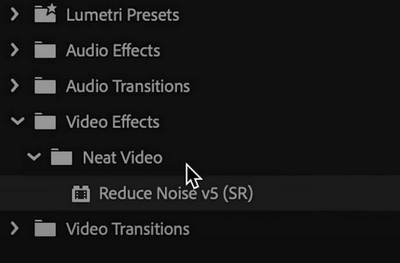
Step 2. Go to the Effects panel (Window > Effects), search for "Neat Video". If you can't find it, navigate to Neat Video purchase page to buy and install it to your Premiere Pro. Drag and drop the Reduce Noise v5 effect onto the video clip on your timeline. You can also apply it to an adjustment layer above your clip for non-destructive editing
Step 3. Select the clip (or the adjustment layer) in your timeline. Go to the Effect Controls panel (Window > Effect Controls). You should see the Neat Video settings. Click the "Prepare..." button to open the Neat Video plug-in window.
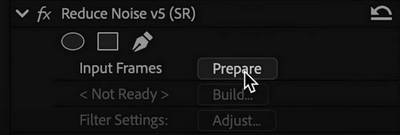
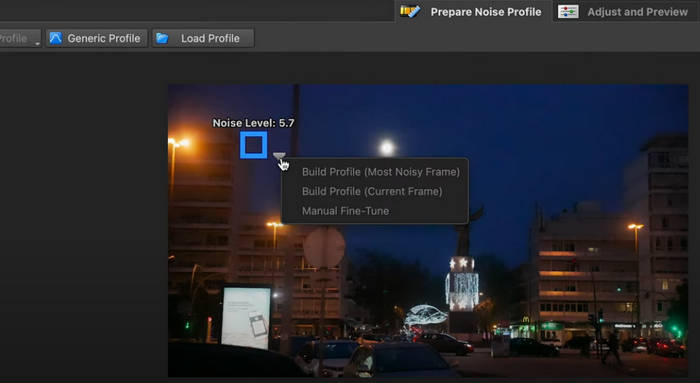
Step 4. Click "Build" to build a noise profile. This is the most crucial step for effective artifact removal. Neat Video needs to learn what constitutes noise and artifacts in your specific clip.
- Find a clean area: Locate a large, uniform frame section with visible artifacts/noise but no fine details (e.g., clear sky, plain wall).
- Select the area: Draw a sufficiently large rectangle around this clean area using the selection tool.
- Click "Auto Profile": Neat Video analyzes the selection and automatically creates a noise profile.
- (Optional) Manually adjust: If needed, refine the auto profile by adding/adjusting the selection area and using provided tools.
- Click "Build Profile": Once satisfied, click to finalize the noise profile.
Step 5. After building the profile, Neat Video will apply its default noise and artifact reduction. You can fine-tune the settings for optimal results:
- Noise Level: Control noise reduction strength (Luminance/Chrominance). Avoid over-smoothing for a natural look.
- Spatial Filter: Adjust noise reduction across pixels. Experiment with settings and the "Radius" slider.
- Temporal Filter: Reduce noise/flicker over time (analyzing frames). Higher "Temporal Radius" can improve results but risk motion artifacts.
- Artifact Removal: Often part of noise reduction; check advanced settings for specific controls/presets.
- Sharpness: Recover fine details potentially softened by noise reduction.
- Preview: Compare before/after results in the preview window while adjusting.
Step 6. Once you're happy with the preview, click the "Apply" button in the Neat Video window. This will apply the effect to your clip in Premiere Pro.
Step 7. Play back your timeline to review the results. If you're satisfied, render your sequence to export the final video with the compression artifacts reduced.
3. Topaz Video AI
Topaz Video AI is a professional-grade AI-driven video enhancement tool known for its powerful upscaling capabilities and artifact removal features. Using machine learning models trained on thousands of high-resolution videos, it can effectively restore compressed footage, reduce blurring, and refine details lost due to aggressive video compression.
One of the key strengths of Topaz Video AI is its ability to increase the resolution of a video without introducing unnatural artifacts. It’s particularly favored by videographers and filmmakers who need to upscale old or low-resolution videos while maintaining cinematic quality. However, due to its high processing demands, it is best suited for users with high-end GPUs.
- Advanced AI intelligently reduces pixelation, noise, and blur, significantly improving video quality.
- AI algorithms recover lost details and sharpen edges, creating a clearer, more defined image.
- Upscaling with AI also minimizes compression artifacts for better viewing on larger displays.
- Offers user-adjustable parameters within some AI models for optimal artifact reduction and detail.
- Tailored AI models for different video types ensure more effective artifact correction.
- The professional-level software has a high purchase cost, a significant investment for many users.
- AI processing demands substantial computing power, often resulting in lengthy processing durations.
- Over-aggressive AI settings can lead to unwanted over-smoothing and an artificial-looking video.
- Optimal performance necessitates a dedicated high-end GPU and sufficient RAM.
How to Fix Video Compression Artifacts in Topaz Video AI?
Step 1. Click the interface or Browse to add the videos with compression artifacts.
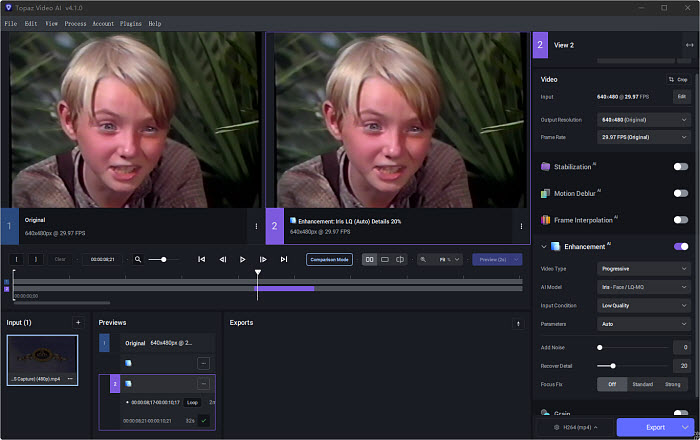
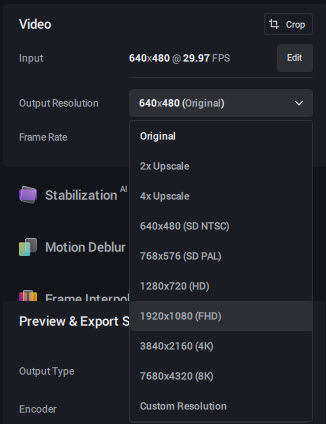
Step 2. On the right panel, open the drop-down menu for Output Resolution. You can choose to upscale your video by 2x or 4X, or select a specific resolution to remove video compression artifacts and enhance your video quality, making it less pixelated.
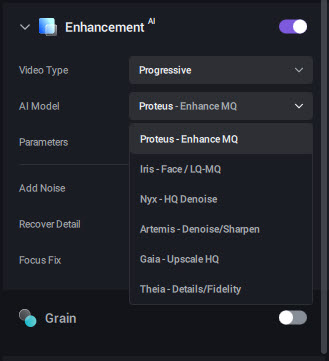
Step 3. Next, click the Enhancement option. Under Enhancement > AI Model, there are various different models trained for different videos. To remove compression artifacts from video, you can try AI models such as Nyx, Artemis, and Proteus. If the video has compression artifacts due to pixelation and interlacing, you can also choose Interlaced Progressive in the Video Type option to help remove these video compression artifacts.
Step 4. After the above settings, click Export and it will start to upscale the video, effectively removing compression artifacts.
4. Handbrake
HandBrake is a free, open-source video transcoder that allows users to optimize video compression settings and reduce artifacts through advanced encoding options. Although it does not have AI-powered artifact removal like other software, it provides a range of tools for adjusting encoding settings, applying denoise filters, and reducing compression-induced visual flaws.
HandBrake is particularly useful for users looking to re-encode heavily compressed videos into better formats, such as H.265, which offers superior compression efficiency with minimal quality loss. While it lacks the automation and AI-driven restoration found in premium software, it remains a solid choice for budget-conscious users who need basic compression artifact reduction.
- Free and open-source, accessible for basic artifact reduction.
- Offers Deblock and Denoise filters to minimize blocky artifacts and noise.
- Can remove interlacing and telecine artifacts common in older content.
- Adjustable encoding settings can help minimize the visibility of existing artifacts upon re-encoding.
- Supports batch processing for handling multiple videos with compression issues.
- Lacks advanced AI tools for comprehensive and intelligent artifact removal.
- Basic filters can blur fine details with aggressive settings.
- Indirectly addresses artifacts through re-encoding and general noise reduction.
- Incorrect settings can introduce new artifacts or worsen existing ones.
- Basic upscaling may not effectively reduce artifacts during resolution increase.
How to Remove Video Compression Artifacts in Handbrake
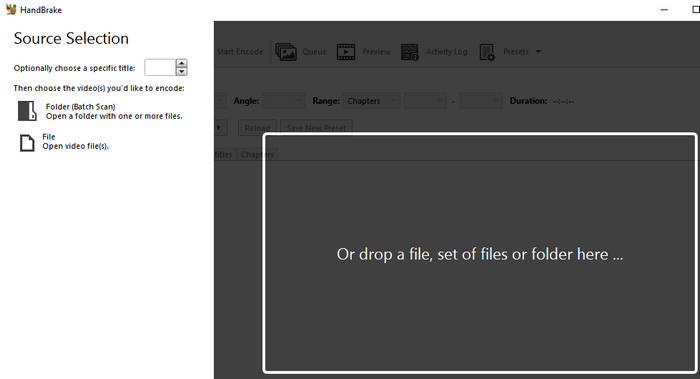
Step 1. Open Handbrake. Click either "File" (for a single video) or "Folder" (for multiple videos) to import your source video with compression artifacts.
Step 2. Once your video is loaded, go to the "Filters" tab in the Handbrake interface.
Step 3. In the "Deblock" section, select an option from the dropdown menu other than "Off." Deblock is designed to reduce blocky artifacts that are common in heavily compressed video. Experiment with the different strength presets (e.g., Medium, Strong) to see what works best for your video. Be cautious with higher settings as they can sometimes soften the image too much.
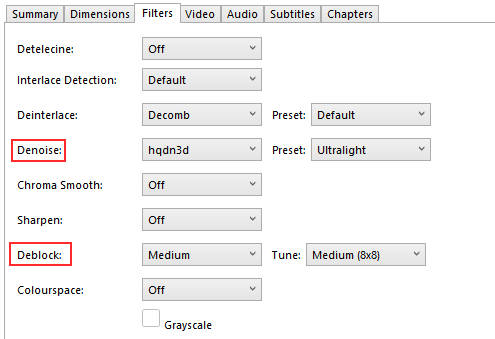
Step 4. In the "Denoise" section, select a filter from the dropdown menu other than "Off." Handbrake offers two main denoise filters[4]:
- HQDN3D: A faster, adaptive low-pass filter. Try the "Weak," "Medium," or "Strong" presets.
- NLMeans: A higher-quality but slower denoise filter. It often has presets like "Ultra Fast," "Very Fast," "Fast," "Medium," "Slow," and "Very Slow." NLMeans can be more effective at removing various types of noise, including some compression artifacts, while potentially preserving more detail than HQDN3D at similar strengths.
Experiment with the different presets for each filter to find a balance between noise reduction and detail preservation. You might need to try different filters to see which yields the best results for your specific artifacts.
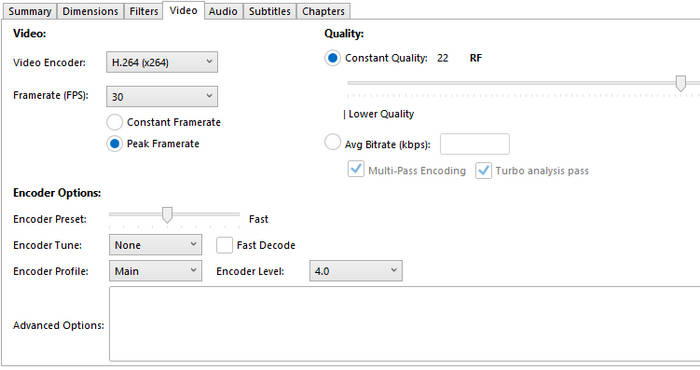
Step 5. Go to the "Video" tab to adjust encoding settings:
- Codec: Use modern codecs like H.264 or H.265 for subtle visual quality improvements during re-encoding.
- Rate Control: Consider "Constant Quality (RF)"; lower RF (higher bitrate) preserves more detail, reducing artifact visibility, but increases file size.
- Framerate: Keep the same as the source unless a specific change is needed.
- Resolution: Avoid unnecessary upscaling, as it won't fix artifacts and might emphasize them; filters may offer slight help if upscaling.
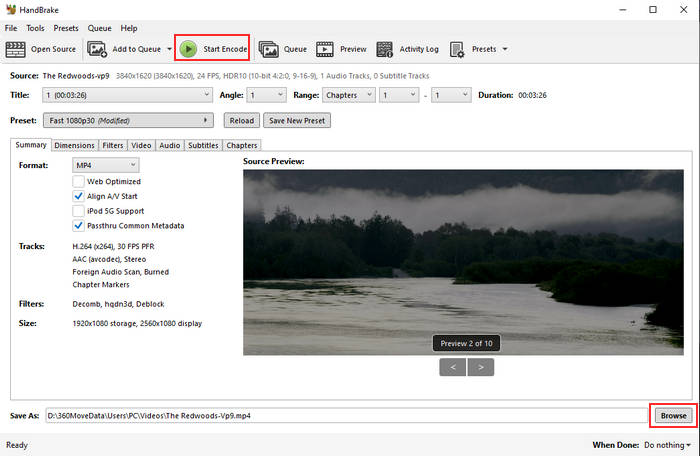
Step 6. Choose a destination for your output file by clicking "Browse", then click the "Start Encode" button.
5. Davinci Resolve
DaVinci Resolve is a professional-grade video editing and color correction software widely used in the film and television industry. It offers high-quality noise reduction and artifact removal features, making it an excellent choice for fixing compression-related issues in videos.
The software’s Temporal and Spatial Noise Reduction tools allow users to intelligently smooth out blocky artifacts and restore detail while preserving sharpness. Combined with its advanced color grading capabilities, DaVinci Resolve is an ideal solution for filmmakers and professional editors who require precise control over their video restoration process. However, users may need to upgrade to the Studio version to access the full range of noise reduction tools.
Related Search: How to Use Davinci Resolve Denoise Tools & Plugins >>
- Powerful built-in Spatial/Temporal NR offers granular control over Luma and Chroma for artifact reduction.
- Advanced temporal NR in Motion Effects smooths moving compression artifacts and flicker effectively.
- Integrates with professional plugins like Neat Video for specialized artifact removal.
- Comprehensive color tools allow subtle adjustments to minimize the visual impact of remaining artifacts.
- Flexible node-based workflow enables targeted application of noise reduction and sharpening techniques.
- Truly advanced removal may require the Studio version for full feature access and optimal performance.
- Effective use of tools for artifact removal has a steeper learning curve.
- Significant noise reduction can be resource-intensive, slowing playback and rendering.
- Over-reliance on noise reduction can lead to loss of detail and a waxy appearance.
- Aggressive sharpening can sometimes accentuate existing artifacts if not carefully applied.
How to Remove Artifacts in Davinci Resolve?
Step 1. Launch DaVinci Resolve and either create a new project or open an existing one containing the video you want to work on. Go to the "Media" page and import the video clip that exhibits compression artifacts into your project's media pool.
Step 2. Drag the video clip from the media pool onto your timeline in the "Edit" page.
Step 3. Click on the "Color" tab at the bottom of the DaVinci Resolve interface. This will take you to Resolve's powerful color correction workspace. Ensure the specific clip you want to denoise and reduce artifacts on is selected in the timeline on the Color page. The node graph for that clip will appear.

Step 4. On the right side of the Color page, locate the "Noise Reduction" palette. It might be grouped with other palettes like "Blur" or "Sharpen." Click on its tab to bring it to the front.
Step 5. In the "Noise Reduction" palette, click the "Spatial NR" tab.
- Luma Threshold: Gradually increase to reduce brightness pixelation/blockiness; avoid over-softening.
- Chroma Threshold: Increase to address color artifacts/blotchiness; prevent color bleeding/loss.
- Radius: Adjust pixel analysis area; larger radius smooths more but can blur details.
- Motion Estimation (Optional): Enable for moving artifacts, but high settings may cause motion artifacts/smoothing.
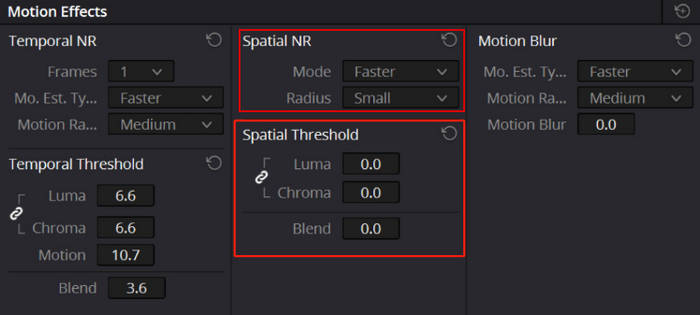
Step 6. Click the "Temporal NR" tab in the "Noise Reduction" palette.
- Luma/Chroma Threshold: Similar to Spatial NR, adjust to smooth flickering or moving noise across frames.
- Motion Range: Controls analyzed frames; higher values improve smoothness but risk ghosting with fast motion. Start low.
- Mode: Experiment with "Faster," "Better," "Best" quality; higher modes are more demanding and take longer to render.
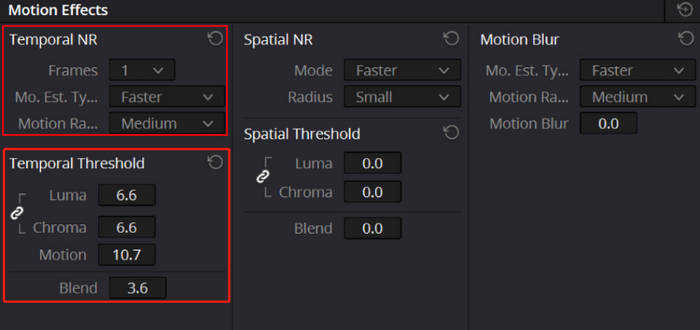
Step 7. Use "Mid Detail," "Hi Detail," and "Low Detail" sliders in Spatial/Temporal NR to retain softened image details. Adjust subtly for balance.
Step 8. Carefully watch the video, zooming in to check for remaining artifacts and any unwanted blurring or detail loss. Refine settings as needed. Once satisfied on the Color page, go to the "Deliver" page, configure export settings, and render the final video.
Part 3. General Tips to Fix Video Compression Artifacts
Compression artifacts can degrade video quality, making footage appear blocky, blurry, or distorted. While preventing artifacts at the recording stage is ideal, existing videos can still be improved using the right techniques. This section covers essential methods to minimize and repair compression artifacts, including prevention strategies, restoration settings, and optimal export formats.
1. Prevention Methods
- Record at high bitrates: Use a bitrate of at least 50Mbps to preserve more visual details and reduce compression artifacts.
- Avoid excessive compression: Minimize unnecessary encoding to prevent cumulative quality loss.
- Use high-quality source files: Always edit from the original or highest-quality version to retain clarity and sharpness.
2. Restoration Settings
- Adjust noise reduction intensity: Apply just enough noise reduction to smooth out artifacts while maintaining fine details.
- Use sharpening tools: Enhance edge clarity to counteract blurring caused by compression.
- Apply color correction: Reduce color banding and restore natural gradients for a more polished look.
3. Format Selection
- Export in high-quality formats: Use ProRes or DNxHR to avoid further compression losses.
- Avoid lossy codecs for editing: Formats like H.264 and H.265 may introduce additional artifacts when re-encoded.
- Use lossless formats for archival: If storage allows, consider exporting in lossless formats to maintain maximum quality.
Conclusion
Video compression artifacts (blockiness, pixelation, banding) degrade visual quality, especially with short-form and high-res streaming expectations. However, these imperfections are often fixable. The above mentioned tools offer effective ways to restore clarity and improve the visual fidelity of compressed video.
- Winxvideo AI: Best for easy, quick AI-powered basic artifact removal and upscaling for general home video use.
- Topaz Video AI: Ideal for high-quality AI artifact removal and detail recovery, especially for upscaling low-res to high-res with significant improvement.
- Adobe Premiere Pro: Best for professional editors needing flexible, non-destructive artifact removal within their existing workflow using plugins.
- DaVinci Resolve: Strong for professional color correction and advanced built-in noise reduction for detailed artifact control in complex projects.
- Handbrake: Best for free, basic artifact reduction (deblocking/denoising) during re-encoding for general use.
For best results, experiment with different software and settings to find the optimal restoration method. If you're seeking for a way to remove compression artifacts from video easily, fast and without complex adjustments, try Winxvideo AI today!
Free Download
Free Download
Winxvideo AI is for PC, while Macxvideo AI (from our MacXDVD brand) is for macOS.
 FAQs
FAQs
AI tools like Winxvideo AI, HitPaw Video Enhancer and Topaz Video AI can intelligently reconstruct details, outperforming traditional filters.
Yes, but it requires adjusting multiple settings like noise reduction, sharpening, and color correction.
HandBrake and DaVinci Resolve (free version) can reduce some artifacts, but AI tools offer superior results.
If the original video has severe compression loss, even AI tools cannot fully restore missing details
Proper adjustments ensure a natural look. Overuse of AI enhancements may result in unrealistic smoothing.
External sources:
- "How to get rid of YouTube compression artifacts in 4K video" from r/davinciresolve Reddit.com
- "Compression artifact" from Wikipedia
- "Recognizing Video Artifacts" Fansubbing Guide hosted on Github
- "Summary of Filters" from HandBrake Documentation


