


How to Record Discord Audio on PC, Mac, PS5, Xbox, Mobile
 Mike Rule
Discord has become the central hub for countless online communities, gaming sessions, and casual conversations. Whether you want to preserve cherished memories from voice chats with friends, capture insightful discussions for later review, or create engaging content featuring Discord audio, the ability to record these interactions is invaluable.
This comprehensive guide will walk you through various methods to record Discord audio across your favorite devices and using popular software. We'll cover everything from built-in features on your PC, iPhone, Mac, PlayStation 5, and Xbox, to leveraging powerful tools like OBS Studio, Audacity, and NVIDIA GeForce Experience. Let's explore the guide on how to record Discord audio.
How to Record Discord Audio on PC
Need to save those epic gaming moments or important discussions on your PC's Discord? You're in the right place. This section zeroes in on the best ways to record Discord audio directly on your Windows or Mac machine. We'll cover both built-in options and powerful software solutions to help you capture exactly what you need, effortlessly.
Winxvideo AI
Winxvideo AI allows for seamless extended gameplay recording, with no time restrictions. It offers three modes: screen recording, picture-in-picture, and webcam recording. Additionally, you can apply chroma keying, adjust video settings, and enhance footage using AI. Save your recordings in various formats, with support for 4K 60fps videos, perfect for sharing on platforms like YouTube or Twitch.
 Free Download
 Free Download
Note: Mac AI tools are currently unavailable, but an update is coming soon.
[Tutorial] How to Record Discord Audio on PC with Winxvideo AI
Step 1. Download and install the screen recorder on your PC. Launch both the software and your Switch game.
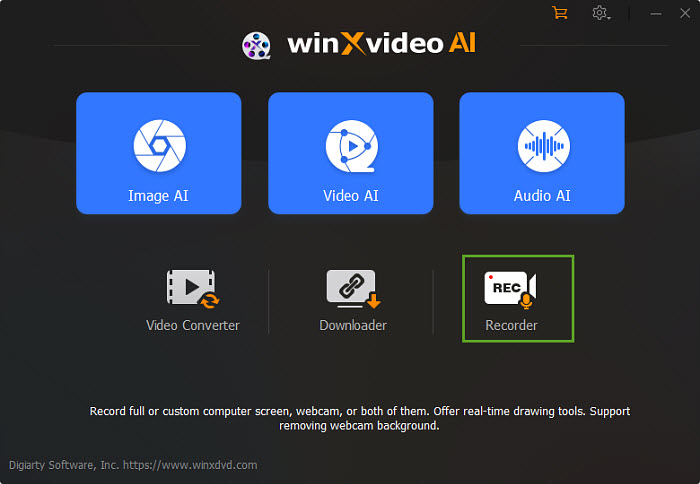
Step 2. On the main interface, select the "Audio Recorder" option.
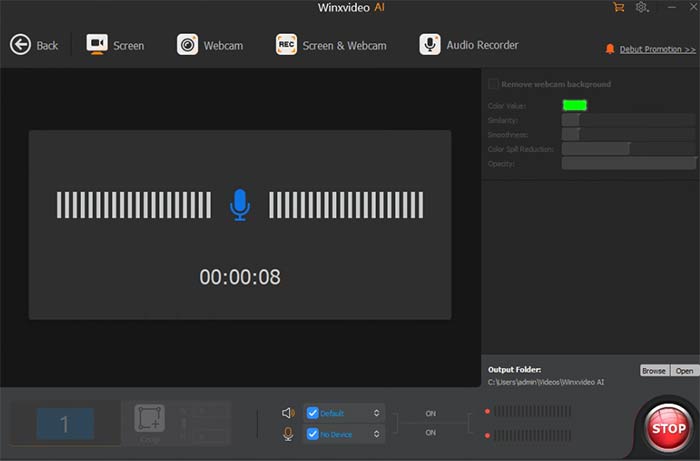
Step 3. You can enable the default audio or microphone input for voiceovers. Select your output folder by clicking "Browse".
Step 4. Press the "REC" button to start recording your Discord audio on PC.
Read More: How to Screen Record Discord Calls/Audio on Phone/PC
Xbox Game Bar
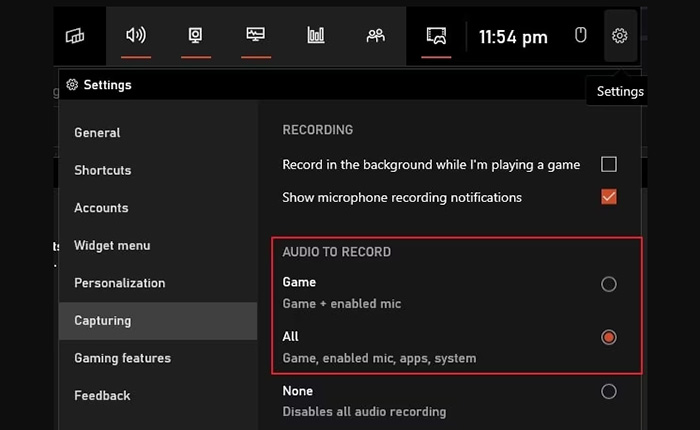
The Xbox Game Bar is a built-in feature in Windows 10/11, offering an easy way to record app audio and gameplay. It’s a great option for users who want a simple, no-cost tool for basic recording needs. The Game Bar provides an intuitive interface with minimal setup required, allowing you to capture both system audio and microphone input. It also gives you control over the audio balance, enabling you to fine-tune the recording levels for a more customized experience.
However, there are some limitations to consider. Game Bar is primarily designed for use with apps and games that are specifically supported, so it may not work with all programs. Additionally, recording can put a strain on system performance, especially on lower-end hardware, which may lead to frame drops or lag. While it’s a solid tool for basic recordings, it lacks advanced features such as video editing or effects, which are available in more specialized recording software.
Here’s a step-by-step guide to access and use the Xbox Game Bar for recording:
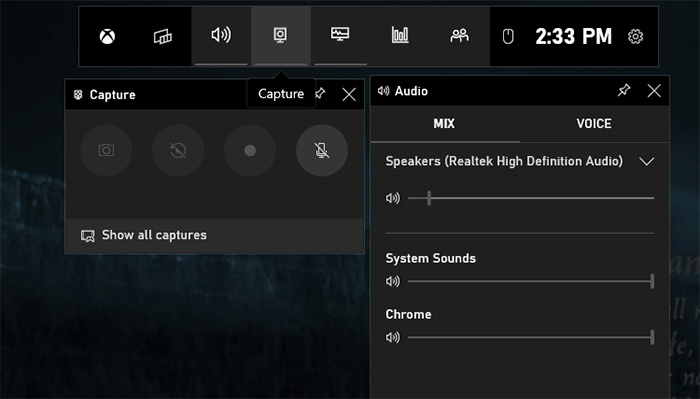
Step 1. Press Windows key + G to open the Game Bar.
Step 2. In the Game Bar overlay, click on the Audio widget (usually found in the top right corner). You can toggle between recording system audio, microphone input, or both. Adjust the sliders to balance your audio levels.
Step 3. To start recording, press Windows key + Alt + R. This will capture both video and audio from the app you’re currently using. Press the same key combination to stop recording.
Step 4. Your recording will automatically be saved to the following directory:
How to Record Discord Audio with OBS Studio
OBS Studio (Open Broadcaster Software) is a powerful, open-source tool used for recording and streaming, offering flexibility and customization. It’s an excellent option for recording Discord audio, as it supports both system sound and microphone input. OBS allows you to capture audio from different sources and adjust levels with precision, providing you full control over your recordings. Whether you’re recording a podcast, gameplay session, or a Discord conversation, OBS Studio gives you the necessary tools for high-quality audio capture.
While OBS is feature-rich and suitable for a range of recording tasks, it may require some configuration to get the best results. Users should ensure they have the right settings for audio capture, and the learning curve can be steep for beginners. However, once set up, OBS is one of the most reliable options for Discord audio recording with minimal resource usage compared to other complex software.
Here’s a step-by-step guide to record Discord audio using OBS Studio:
Step 1. Download and install OBS Studio from the official website.
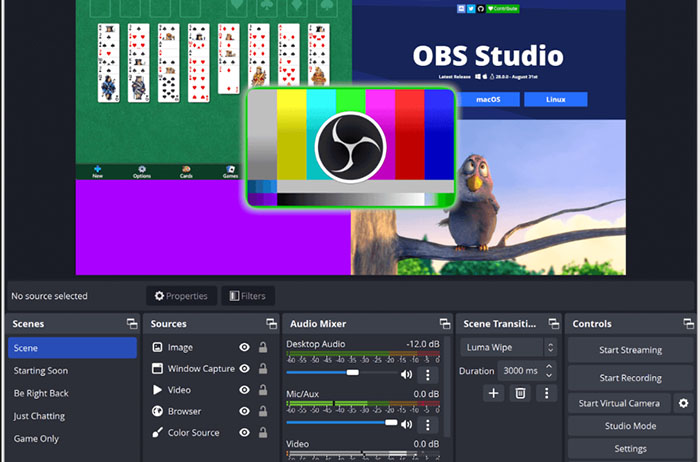
Step 2. Open OBS Studio and create a new scene by clicking on the "+" icon under the "Scenes" section. Name your scene (e.g., “Discord Recording”).
Step 3. Add audio sources by clicking the "+" button under "Sources." To capture Discord audio, select "Audio Output Capture" for system sounds (Discord voice chat) and "Audio Input Capture" for your microphone. Configure the source settings to match the correct devices for your system.
Step 4. Adjust the audio mixer settings to ensure the balance between your microphone and Discord sounds. You can drag the sliders to fine-tune the levels to avoid distortion or low-volume issues.
Step 5. To start recording, click the "Start Recording" button in the lower-right corner of OBS. Your recording will include both the system and microphone audio from Discord.
Step 6. When you’re done, click "Stop Recording." Your recording will be saved to the directory specified in your OBS settings (default is C:\Users\YourUserName\Videos).
Tips:
- Ensure your Discord and OBS audio settings do not conflict. You may need to adjust Discord’s audio settings under "Voice & Video" to output to the correct device (such as "Speakers" or "Default").
- If you want to record only Discord audio, disable or remove other unnecessary audio sources in OBS.
- Use OBS filters such as noise suppression and gain to improve your microphone quality.
How to Record Discord Audio on Mac with QuickTime Player
QuickTime Player, a built-in application on macOS, offers an easy and reliable method for recording Discord audio on your Mac. This feature is perfect for users who want a straightforward, no-cost solution without the need for third-party apps. QuickTime allows you to record both system audio and microphone input, making it an ideal choice for capturing conversations during Discord voice chats or streaming sessions.
However, there are some limitations to be aware of. QuickTime Player does not natively support recording system audio (such as game or app sounds) without an additional tool. While it’s great for basic recording needs, you may need to install third-party software like Soundflower or Loopback to capture Discord audio along with the microphone input for a seamless experience. Additionally, QuickTime Player lacks features like video editing or advanced audio control, which may be needed for more professional recordings.
Here’s a step-by-step guide to use QuickTime Player for recording Discord audio on your Mac:
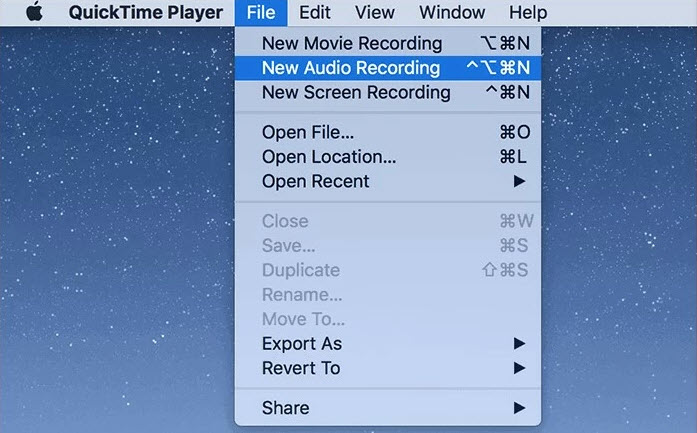
Step 1. Open QuickTime Player from your Applications folder.
Step 2. In the QuickTime Player menu, click File > New Audio Recording to start a new recording.
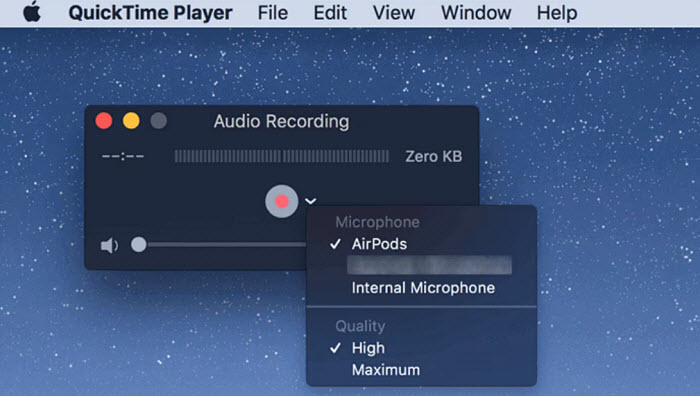
Step 3. Click the dropdown arrow next to the record button to select your audio source. If you’re using a third-party tool like Soundflower or Loopback, select it as your input device to capture Discord audio along with your microphone input.
Step 4. Click the Record button to start capturing audio. Engage in your Discord chat or voice call as usual.
Step 5. When you’re done, click the Stop button. Your recording will automatically appear in QuickTime Player.
Step 6. To save the recording, go to File > Save, and choose your desired location on your Mac.
How to Record Discord Audio on PlayStation 5
The PlayStation 5 (PS5) offers a built-in Share feature, allowing users to easily capture and share gameplay and audio directly from the console. This feature is particularly useful for gamers who want to record their Discord audio while gaming without the need for additional software or equipment. With the PS5’s built-in capabilities, you can record both game audio and your microphone input, making it a convenient and free option for capturing content in real-time.
While the Share feature is great for basic audio recording, there are some limitations. The PS5’s Share feature does not allow direct integration with Discord for audio capture, so you will need to rely on a workaround to capture your voice chat. Additionally, the quality of the recording may vary depending on your audio setup and whether you are using a headset or external microphone. For advanced editing or specific customization of your recordings, you might need third-party tools.
Here’s a step-by-step guide to using the PS5's built-in Share feature for recording Discord audio:
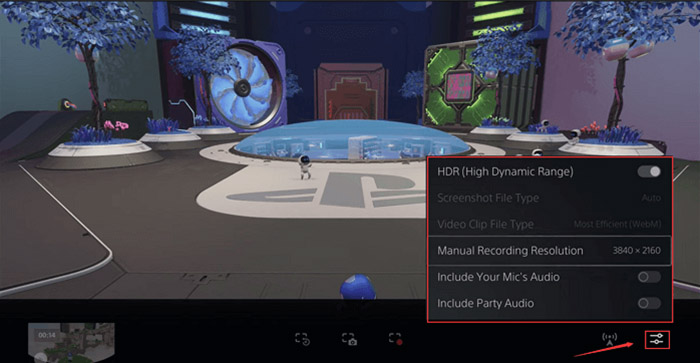
Step 1. While in a Discord voice channel on your PS5, press the Create button (located on the left side of the DualSense controller).
Step 2. In the Create menu, select Start New Recording. This will begin recording your gameplay, including game audio and microphone input (your voice). However, to record Discord audio specifically, ensure that your headset or microphone is properly set up to pick up your voice during the recording.
Step 3. To stop the recording, press the Create button again and select Stop Recording. The captured footage will be saved in the Media Gallery section of your PS5.
Step 4. To access your recorded video, go to the Media Gallery on your PS5, where you can view or share the recorded file as needed. You can also transfer the video to an external storage device for further editing or sharing.
How to Record Discord Audio on Xbox
Recording Discord audio on Xbox can be a bit tricky, as there isn't a direct method to capture chat audio while using the console. However, you can use workarounds that involve external tools and settings to achieve your goal. This guide explains how to record Discord audio effectively on Xbox using available options.
Using the Xbox's Built-in Recording Feature
While Xbox doesn't have a built-in option for directly recording Discord audio, you can use the console’s recording feature to capture game audio, and then separately use your mobile or PC to record Discord chat. Here's how to use the Xbox recording feature:
Step 1. On your Xbox, press the Xbox button to open the guide. Navigate to the Capture & Share section.
Step 2. Under the Capture tab, select Start Recording to begin capturing the gameplay and system audio. You can capture game audio and other sounds played through the Xbox, but it won't capture Discord audio directly.
Step 3. To record Discord audio, you need to use a secondary device (like your smartphone or PC) where Discord is running. Connect your headset or microphone to that device to capture the voice chat and then manually sync it with your Xbox video in post-production.
Step 4. After finishing the session, press the Xbox button again, and choose Stop Recording to save the clip. The recording will be saved to your Xbox’s internal storage.
Step 5. To access your recording, go to My Games & Apps, then navigate to Captures in the Videos folder.
Although this method is a bit manual, it’s one way to record your gaming session and Discord audio simultaneously if you’re using external devices.
How to Record Discord Audio on iPhone/Android
Both iOS and Android offer built-in screen recording features that allow you to capture Discord audio on your iPhone. This method records both the system audio and microphone input, ensuring that you can capture everything happening during a voice chat or video call on Discord. It’s an easy-to-use, free option that doesn’t require third-party apps or complicated setups. However, there are a few things to keep in mind for the best experience.
How to Record Discord Audio on iPhone
Before starting the recording, ensure that your microphone is properly set up in your iPhone settings and that Discord has the required permissions for audio input. This will allow you to capture your voice as well as the audio from the Discord call or server you're in.
Here’s how you can use iOS screen recording to capture Discord audio:
Step 1. Open the Settings app on your iPhone, go to Control Center, and ensure Screen Recording is included in the list of enabled controls.
Step 2. Swipe down from the top-right corner to access the Control Center. Long press on the Screen Recording icon to enable microphone audio. This ensures that both Discord audio and your voice will be recorded.
Step 3. Open the Discord app and join a voice channel or start a call.
Step 4. Go back to the Control Center and tap the Screen Recording icon to start recording. A 3-second countdown will begin, and then your screen and audio will be recorded.
Step 5. When you’re done, open the Control Center again and tap the red recording icon to stop. Your recording will be saved to your Photos app.

While this method is simple and effective, it’s worth noting that iOS doesn’t offer built-in editing features for your recordings. If you need to trim or refine the audio, you may want to use a third-party editing app after the recording is saved.
How to Record Discord Audio on Android
Android devices also come with built-in screen recording tools that allow you to capture both system audio and microphone input. Recording Discord audio on Android is a straightforward process, and the native screen recording feature provides a no-cost solution for users who need to record their Discord calls or conversations on the go.
To ensure the best results, make sure you enable microphone access in the screen recording settings and check that Discord is allowed to use the microphone. Depending on your Android version, the process may vary slightly, but the overall steps remain the same.
Here’s how to use Android’s screen recording feature to capture Discord audio:
Step 1. Swipe down from the top of the screen to open the quick settings menu and look for the Screen Recorder icon. If it’s not visible, you may need to add it by editing your quick settings menu.
Step 2. Tap and hold the Screen Recorder icon to open the settings menu. Ensure that the Microphone option is turned on. This allows you to record both the system audio from Discord and your voice.
Step 3. Open the Discord app and join a voice channel or start a call.
Step 4. Return to the quick settings menu and tap the Screen Recorder icon to begin recording. A countdown will appear, and once it’s finished, your screen and audio will be recorded.
Step 5. To stop recording, swipe down again and tap the Stop button on the screen recorder notification. Your recording will be saved in your phone’s gallery or file manager.
Although Android’s screen recording tool is convenient, it may not offer advanced editing features. For further editing or improvements to the audio quality, consider using third-party apps for trimming or enhancing your recordings.
Conclusion
Recording Discord audio across multiple platforms can be done with various tools and methods depending on your device. Whether you're on PC, Mac, iPhone, PS5, or Xbox, there’s an effective way to capture your conversations. For PC and Mac users, software like OBS and Winxvideo AI offer powerful features to capture both system and microphone audio, while on iPhone and mobile platforms, third-party apps provide simple and straightforward solutions. For console gamers, using features built into PS5 and Xbox, like the built-in capture tools or external recording devices, ensures you can capture Discord audio for your streams or personal archives.


