DaVinci Resolve MKV: Import, Export & Issues Solved
MKV files are often high quality Blu-ray files, OBS captured footages and downloaded MKV videos online with H.264 codec. As not all versions of DaVinci Resolve supports MKV files, you may encounter "MKV video never loads up in DaVinci Resolve", "MKV file not adding audio in the timeline" or some other error messages about DaVinci Resolve MKV. To help you grasp this topic much more easily, we write this article to show how to import MKV to DaVinci Resolve, how to export DaVinci Resolve to MKV and how to solve MKV not supported in DaVinci Resolve issue.
Can’t Import MKV to DaVinci Resolve? Convert It to DaVinci Resolve-supported Formats
Only DaVinci Resolve 17.2 and newer versions (inclu. version 18) can import MKV files. Also, not all MKV files are supported by DaVinci Resolve 17.2 and 18 as MKV is a container format which can contain codecs that DaVinci Resolve doesn’t recognize. To solve the importing error, you should first convert MKV to DaVinci Resolve supported file formats with Winxvideo AI.
Table of Contents
Part 1. Does DaVinci Resolve Support MKV?
Yes and no. The latest versions of DaVinci Resolve including version 17.2 and 18 support MKV files natively. However, older versions earlier than 17.2 including DaVinci Resolve 17.1, 17, 15, 14 and 12.5 don’t support MKV files processing.
To import MKV videos to DaVinci Resolve, upgrading older version to the latest version like DaVinci Resolve 18 is a way. But this doesn’t mean you can import all types of MKV files to DaVinci Resolve. MKV is a container format that can contain multiple subtitles, audio tracks, video tracks, etc., while DaVinci Resolve can only support specific video and audio codecs in MKV files. So, no matter older versions of DaVinci Resolve or newer versions, it is suggested to convert MKV files to DaVinci Resolve supported file formats first when there is not importing issue.
Part 2. How to Import MKV Files to DaVinci Resolve for Editing?
Now that you have assured that your MKV files are supported by DaVinci Resolve, you can start importing them to DaVinci Resolve for editing.

Step 1. Launch DaVinci Resolve (version 18 or 17.2 is suggested) on your computer and create a new project.
Step 2. Click the Media tab at the bottom to import the MKV video or videos to start editing.
Step 3. Click the Edit tab at the bottom and you can add visual effects and more.
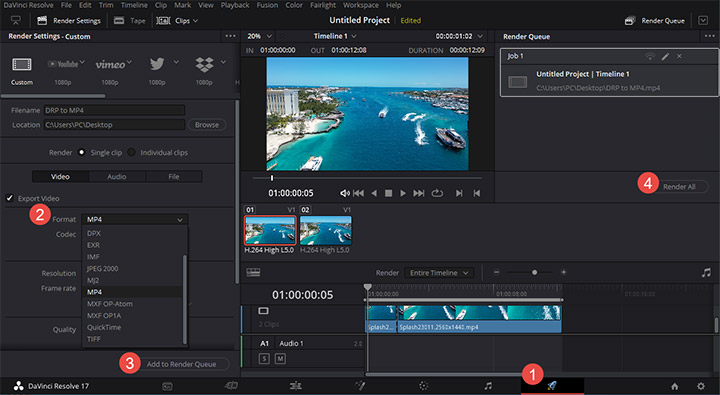
Step 4. Click the Deliver tab at the bottom, and the settings window will pop up.
Step 5. Check the box next to Export Video from the Custom setting in the upper left corner.
Step 6. Choose a format from the drop-down menu next to Format.
Step 7. Click on Add to render queue.
Step 8. Under Render Queue, click on Render All to start exporting DaVinci Resolve video.
Part 3. How to Solve MKV not Importing to DaVinci Resolve Issue?
"File format not supported", "MKV file not adding audio" or "DaVinci Resolve only shows the audio in the MKV file" are common error pop-ups when importing incompatible MKV files to DaVinci Resolve. As explained above, older versions earlier than version 17.2 don’t support MKV files natively and some MKV files encoded with certain codecs can’t be recognized by DaVinci Resolve 17.2 and newer versions.
Therefore, the best way is to convert MKV files to best video format for DaVinci Resolve first before importing. No matter the choppy playback caused by H.264 or H.265 codec, or no video/audio issue caused by variable frame rates instead of a constant frame rate, you can solve them with Winxvideo AI.
Winxvideo AI is a MKV to MP4 video converter which can convert MKV files to MP4 (H.264) which is one of the best video formats compatible with DaVinci Resolve. You can convert any HD and 4K MKV file with 47x faster speed thanks to the Intel/NVIDIA/AMD hardware acceleration technologies. Besides format conversion, you can also compress, cut, crop, change resolution, etc. of your videos for smoother editing in DaVinci Resolve.

How to convert MKV to DaVinci Resolve with Winxvideo AI?
Step 1. Download Winxvideo AI, install and launch it on your computer.
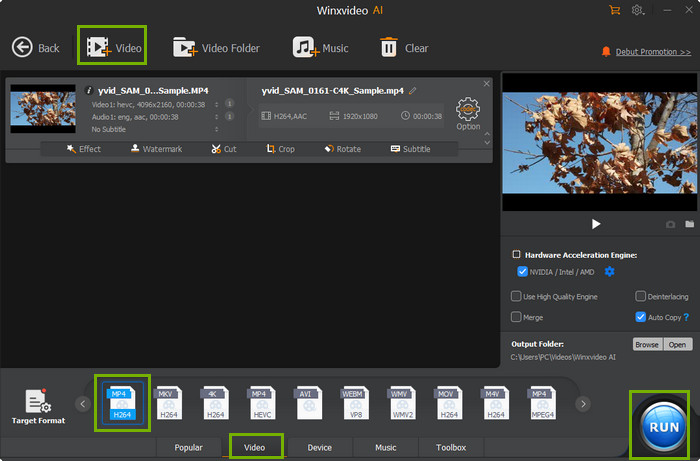
Step 2. Choose Video Converter on the main interface, then click the + Video button on the top bar to add your MKV file.
Step 3. Once the Output Profile pops up, navigate to General Profile and choose MP4 Video (h264+aac) as the output format as it has been proved to be the best video format for DaVinci Resolve to process.
Step 4. Optionally, you can click the Edit button to trim/crop your video or add subtitles, and click the Settings button to adjust video frame rate, aspect ratio, resolution, etc.
Step 5. When everything is done, click the Browse button to select a destination folder and then hit the RUN button to start converting MKV file to DaVinci Resolve supported file format MP4.
Part 4. How to Export DaVinci Resolve to MKV?
Actually, DaVinci Resolve doesn’t have the option to export projects to MKV format. So, if you really need MKV export after editing videos with DaVinci Resolve, you are suggested to export DaVinci Resolve to MP4 first and then convert the MP4 file to MKV with a video format converter.


