How to Enhance Video Quality to HD/4K
 Mike Rule
Updated on
I have a video recorded by a drone in 1080p 60 fps with a 5MP camera. How can I improve the video quality (I export in 1080p)? Does there exist an effect that can transform a grainy video into something good to see? - from Reddit
Sometimes, the videos we record don't come out in high quality due to different reasons, such as not enough light, high ISO settings, an unstable environment, or compression artifacts. We also have some old and precious videos that don’t look good today. Whether it's for personal use, professional purposes, or entertainment, the desire to enhance video quality is a common goal. In this article, we will explore various techniques and tools that can be employed to enhance and improve video quality, allowing you to create visually stunning and engaging videos.
One Click to Enhance Videos to HD/4K with AI
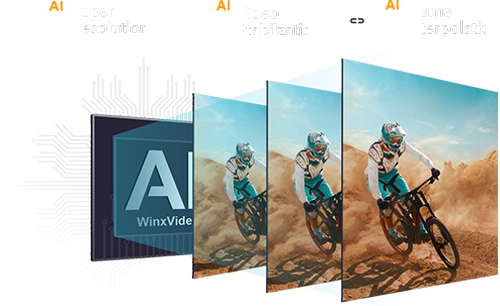
Winxvideo AI – Enhance video quality by up to 400% to 4K with AI super resolution, increase frame rates to 60/120/240FPS, remove shakiness from shaky videos, improve low-quality, old, noisy, compressed videos to HD/4K, remove noise, deinterlace, adjust color effects, adjust parameters, and more. Get 4K-quality videos in minutes.
 Free Download
 Free Download
Note: AI tools for Mac are currently unavailable, but they're coming soon. Stay tuned.
To enhance video quality, there are several tips you can follow.
1. Increase the video sharpness
The most common way is to upscale the resolution from low resolution to HD, 4K, or higher. You can also increase the video's clarity by applying sharpening filters or using software that enhances the edge details of the video.
2. Reduce the video noise
Video noise refers to the random variations in brightness and color that can be seen in low-light conditions or high ISO settings. This noise can greatly reduce the stability and quality of the video. To remove noise, you can use various software or plugins that are specifically designed for noise reduction.
3. Fix shaky or stuttering videos
Sports videos recorded with GoPro, DJI, and other sports cameras can be shaky due to fast movements. Also, increasing the frame rates can generate smoother motion, and reduce jitters in the videos, and thus make the video quality look better.
4. Choose the correct compression settings
It is important to optimize the compression settings to strike a balance between file size and video quality. Choosing the right file format is also crucial. Different file formats have different levels of compression, which affect the final video quality. You should choose a format that suits your specific needs.
5. Fine-tune the brightness and contrast of the video
This can help improve the overall visibility and clarity of the footage. Additionally, adjusting the color saturation can make the colors more vibrant and appealing.
6. Adjust the birrate, resolution, and frame rate
Birrate refers to the amount of data used to represent a video, while resolution determines the number of pixels in the video. Frame rate refers to the number of individual frames displayed per second. By adjusting these settings, you can optimize the video quality based on your requirements.
How to Enhance Video Quality with Winxvideo AI?
Winxvideo AI is an AI video enhancer that can improve low-quality and old videos easily. It features:
- An AI upscaler to increase video resolutions by up to 400% to HD and 4K with stunning visual quality.
- An AI stabilizer to remove shakiness from videos recorded by GoPro, drones, sports cameras, DSLRs, etc.
- An AI frame rates converter to increase the frame rates by up to 500% to create smooth 60/120/240fps videos.
- Remove video noise/grains, fix video fisheye effects, fix audio/video out of sync, deinterlace videos, adjust video color, customize video settings, cut, trim, split, merge, crop, and more.
- Convert videos among 420+ formats, compress videos to 90% smaller without quality loss, record videos, download videos, etc.
How to Enhance Video Quality Step-by-Step with Pictures?
Step 1. Download Winxvideo AI on your computer. Open the AI video enhancer and click the Video AI button.
Step 2. Then click Add Video or the big arrow button to add the videos you want to improve. You can import your video by dragging and dropping. It allows you to add multiple videos to enhance a batch.
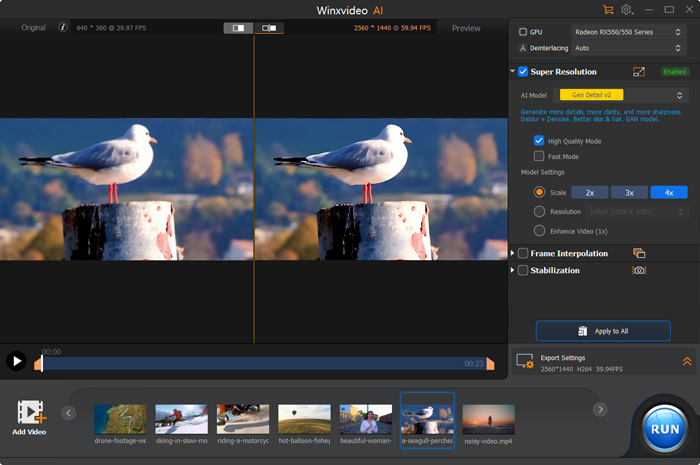
Step 3. Next, on the right panel, there are 3 AI options to help improve your video quality:
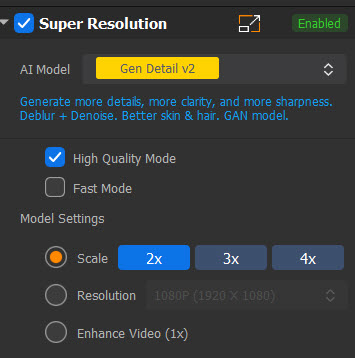
- Super Resolution – When your video is in low resolution and you’d like to increase the video resolution to HD or 4K, check the Super Resolution box. Choose Anime or Reality based on your video. Then choose 2x, 3x, or 4x scaling option. You can also choose to enhance the video quality without enlarging the resolution by choosing Enhance Video (1x).
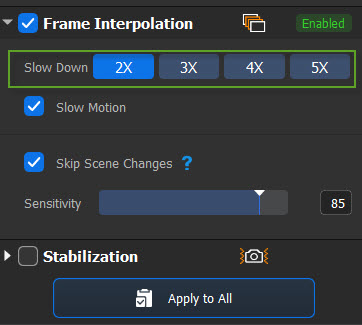
- Frame Interpolation – If your video is very old and recorded at a low frame rate, it will play with stutters on modern displays. Check the Frame Interpolation box and choose to increase the frame rates by 2x, 3x, 4x, or 5x. This will make your video better quality without stutters.
- Stabilization – If your video is recorded with camera motions and turns out to be shaky, check Stabilization. Choose the Mode and Preset based on your needs (if you don’t have a specific preference for the speed or quality, just leave the settings as default). Click Analyze, and then set the Border Color and Crop Type if necessary.
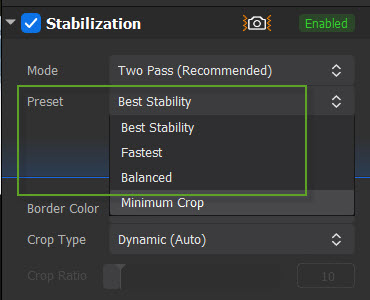
Step 4. After the above settings, click on Export Settings. Choose a video codec and where you’d like to store the enhanced video. Then click Run and wait.
Optional:
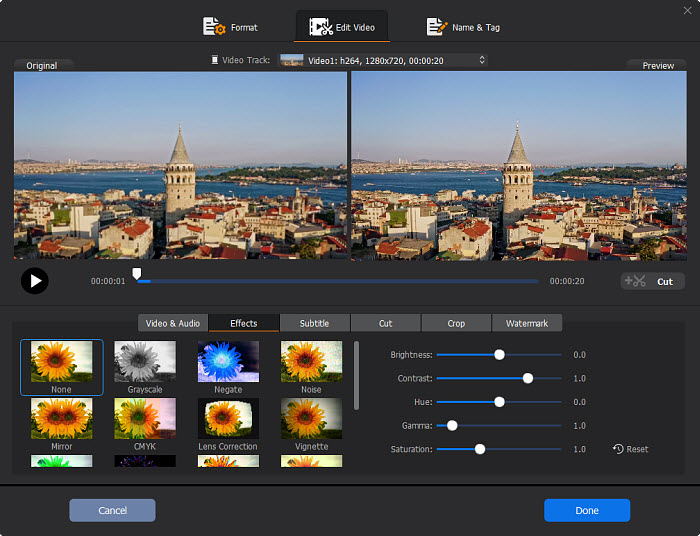
In addition to the above AI tools to upgrade the video quality, you can further edit the video. Click Video Converter on the main interface and load your video. You can click on the Effects button below the video information to improve the video quality by adjusting the colors, cropping, cutting, fixing A/V sync, etc. In the Toolbox, there are also options to denoise, fix fisheye effects, compress, and more.
Other Tools to Enhance Video Quality
1. Improve Video Quality with Topaz Video AI
Topaz Video AI is a dedicated AI-powered tool to make low-quality videos look better. It will also increase video frame rates, create smooth slow-motion effects, and stabilize shaky videos. Compared to other video enhancer tools, Topaz Video AI offers various AI modes that are designed to fix different quality issues, such as old DVD videos, low-resolution videos, animations, etc. It will also remove noise, interlaced effects, motion blurs, grains, etc. easily. Topaz Video AI retails for $299 and is available for Windows and Mac. Main features of Topaz Video AI:
How to Enhance Video Quality with Topaz Video AI?
Step 1. Download Topaz Video AI on your Windows or Mac computer. Topaz requires at least 8GB of system memory. To ensure the best video enhancement performance, you’d better get 16GB for it.
Step 2. Click the center of the interface to choose and load the source video. You can also drag and drop them into the enhancer. Once the video is loaded, you can see 5 options on the right panel to make video quality better: Stabilization, Motion Deblur, Frame Interpolation, Enhancement, and Grain.
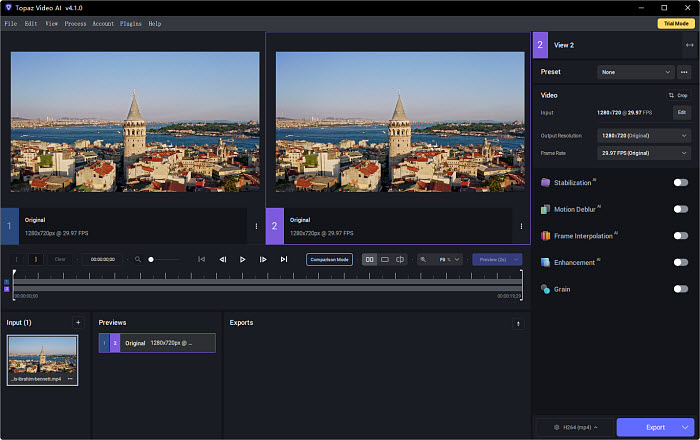
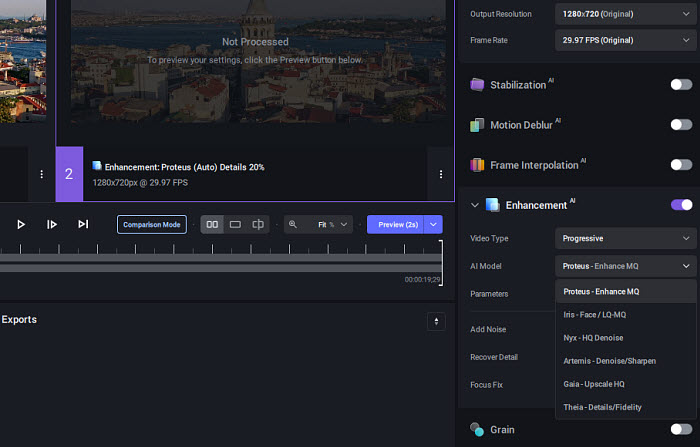
Step 3. To improve the video quality, enable the Enhancement box. Choose the Video Type, AI Model, and adjust the Parameters and settings according to your video.
For example, if your video is interlaced, choose Interlaced in the Video Type. And there are different AI models for interlaced and progressive videos. For example, the Proteus model is used to upgrade the quality of videos with noise, and the Gaia model can enhance high-quality videos and CG files.
Step 4. You can also stabilize the video and increase the frame rates if necessary. Once you finish all the settings, click on the output settings next to the Export button. Then you can choose the video codec, quality, bitrate, etc.
Step 5. Before you proceed with the final output, you can generate a 30-frame rendered preview of your video. This allows you to check the enhancements before processing the entire video. Then click Export and wait.
- Topaz provides various modes to improve video quality.
- It supports upscale videos to up to 8K quality.
- It's very expensive.
- It tends to take quite a long time to process a short clip.
2. Enhance Video Quality with Premiere Pro
Premiere Pro is a powerful video editor, but it is not specifically designed as a video enhancer. However, it does contain various features that help increase the clarity of videos, such as color correction, noise reduction, and sharpening. It also works with third-party plugins such as the Super Resolution from Infognition and the AI video upscaler ScaleUP to increase video quality to HD or 4K, the Neat Video noise reduction plug-in to remove grains from videos, etc.
How to Improve Video Quality with Premiere Pro?
Step 1. Import your video footage into Premiere Pro by clicking on "File" > "Import" and selecting the video file you want to enhance. Drag and drop the video file onto the timeline.
Step 2. Go to the "Effects" panel > "Video Effects" > "Blur & Sharpen" and find the "Sharpen" effect. Drag and drop this effect onto the video clip in the timeline. Increase the value to a range until you're satisfied with the upgraded video quality. You can also use the "Unsharp Mask" effect for stronger sharpening.
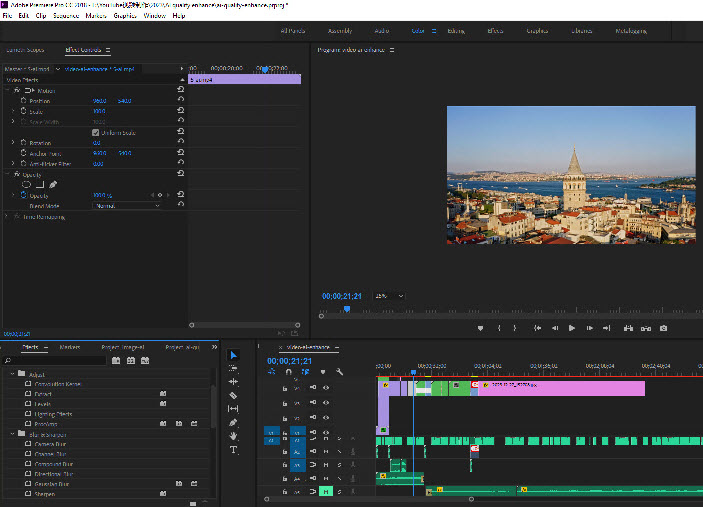
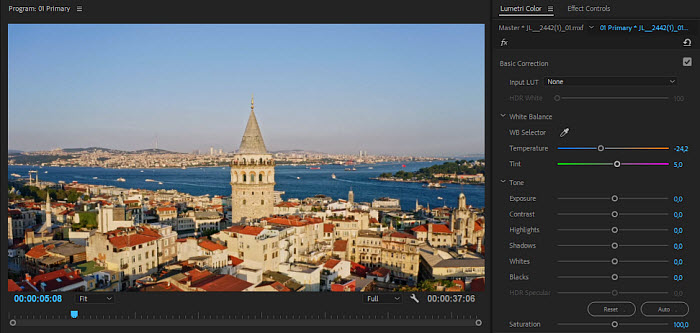
Step 3. Also find the "Lumetri Color" effect. Apply this effect to the video clip. In the Lumetri Color panel, you can adjust various settings to enhance the video quality. This includes adjusting the exposure, contrast, saturation, and other color correction settings to make the video look better.
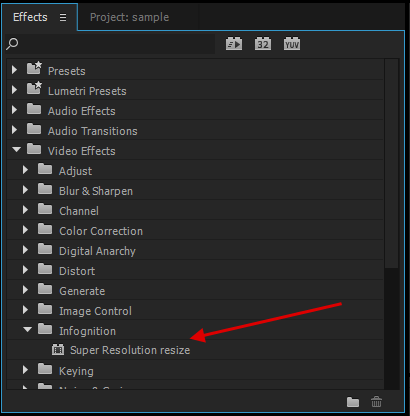
Step 3. If there are any third-party video enhancement plugins, such as the "Super Resolution Resize" effect, drag the effect to the video clip in the timeline. Then you can adjust the effect settings. For example, by default, it upscale the video resolution to 200%. You can improve an old video to HD quality by upscale it by 300%.
Step 4. Once you are satisfied with the changes, you can export the video by going to "File" > "Export" > "Media" and selecting the desired export settings.
Check a Detailed Guide on How to Enhance Video Quality in Premiere Pro >>
- It offers tons of editing features, filters, and tools that can help upgrade your video quality.
- It works with AI plug-ins to make video quality better.
- It needs a steep learning curve to get started.
- It's very resource-intensive, and you need a high-end GPU.
3. Improve Video Quality with Capcut
Capcut is a video editing app that allows users to edit and enhance their videos. It contains various filters and tools to customize your video. As for enhancing the video quality, it has a specific Enhance option that is specifically designed to enhance the quality of the face, body, and makeup. You can make the video quality better by adjusting the color, applying the Sharpen effect, stabilizing, etc. It also offers an online AI video enhancer, which provides a one-click AI solution to upgrade your low-resolution videos into stunning 4K quality without any loss of quality.
How to Make Video Quality Better with Capcut?
Step 1. Download Capcut on your computer and open it. Click Import and add the videos that you want to enhance.
Step 2. Drag the video to the timeline, and then you can see various settings on the right upper part of the interface. If you want to enhance a Safie video, click Enhance. Then you can adjust the parameters to make your Safie videos look better and prettier.
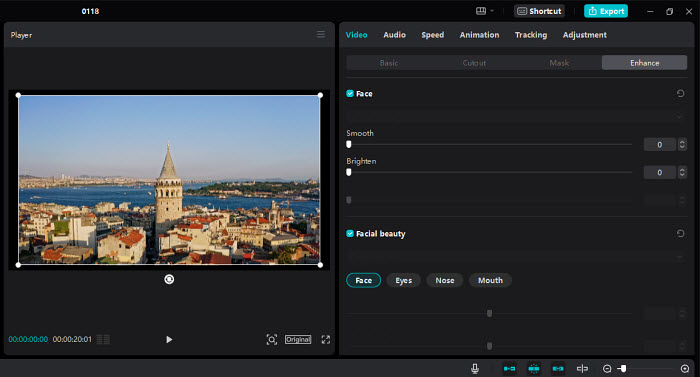
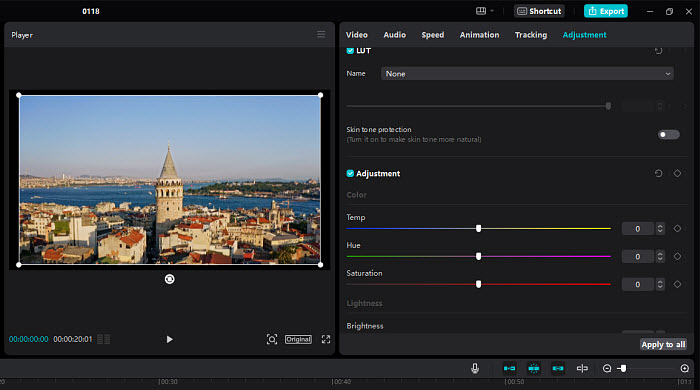
Step 3. Click Adjustments and use CapCut's tools to adjust brightness, contrast, saturation, color balance, etc. Enhancing these elements can make your video look more vibrant and engaging. You can also apply the Sharpen effect to the video. If your video has shaky footage, you can also find a Stablize option under the Video tab.
Step 4. After the above settings, click Export and choose the Resolution, Bit rate, codec, etc. Then click Export and wait. If you simply want to increase the video resolution to HD/4K, you can choose the online Capcut tool.
- Users can improve video quality on desktops, mobiles, and online using Capcut.
- It's easy to use.
- The free version of CapCut includes a watermark on the exported videos.
- While CapCut is suitable for basic editing and enhancement, it may not meet the needs of professional video editors who require more advanced features and precision.
4. Enhance Video Quality with Filmora
Filmora is a popular video editor. It's known for its user-friendly interface and a range of features suitable for both beginners and casual video editors. Though it's not a specific video quality enhancer app, the editor comes with a range of features to upgrade video quality, including background noise reduction, color correction, and stabilization. In addition, there are more than 300 filters and effects that can help make your video look better and more stylish.
How to Increase Video Quality with Filmora?
Step 1. Download Filmora on your computer and open it. Click Import and add the videos that you want to enhance.
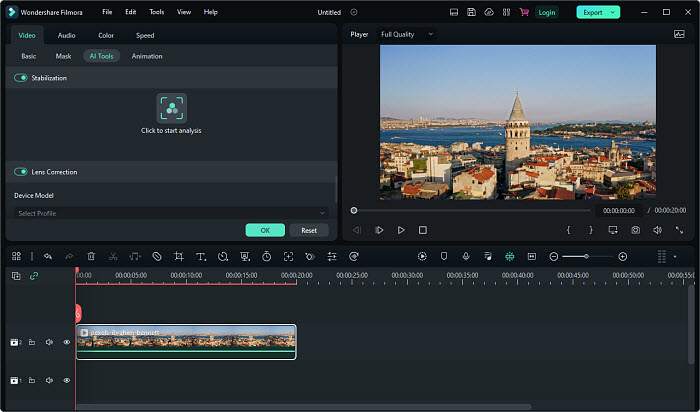
Step 2. Drag and drop the video to the timeline track. Then right-click on the media and select Edit. Under Video, there are some basic options to crop, speed, adjust, etc. Click on AI tools and find the features to improve the video quality, such as Stabilization and Lens Correction. Enable the option based on your video, and adjust the settings to your desired result.
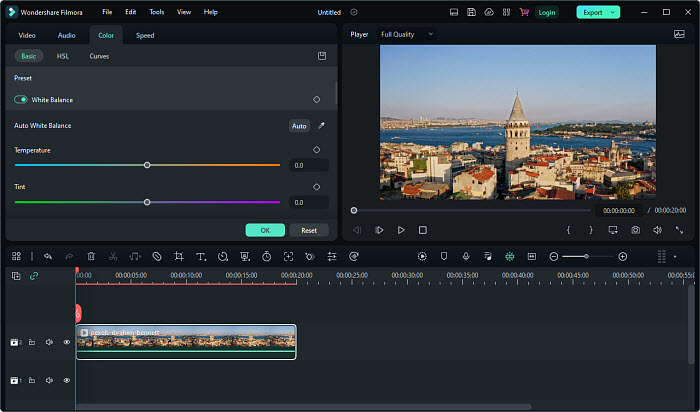
Step 3. Next, click the Color tab to adjust the white balance, tone, highlights, shadows, whites and blacks, and 3D LUT. You can also click Audio and adjust the output volume, fade in, fade out, and pitch, etc. to improve the overall video quality.
Step 4. Apply any filter, overlay, or effect if necessary. Then click Export and adjust the output settings like format, resolution, output folder, etc.
- It provides tons of filters and effects to optimize the output video quality.
- It's easier than more advanced editors, but it has various editing features.
- Filmora doesn't provide a one-click AI solution to improve video quality.
- It lacks advanced video enhancement features, such as the option to increase video resolution.
- The free version includes a watermark on exported videos.
How to Make Video Quality Better?
While using a video enhancer or editor during post-processing can improve the video quality to some extent, making high-quality video involves paying attention to various factors when recording, including camera equipment, lighting, stability, and audio. Here are some tips for each aspect:
1. A good camera: Use a camera with at least 1080p resolution, preferably 4K for higher detail. Different camera sensors have different capabilities. Choose a camera with a larger sensor for better low-light performance and depth of field. Higher-end cameras generally have better low-light performance and can produce higher-quality videos.
Adjust the ISO settings on your camera to reduce noise in low-light conditions. However, keep in mind that higher ISO settings can also introduce more noise. Adjust the frame rate based on the type of video you're shooting (24 fps for a cinematic look, 30 fps, or 60 fps for standard videos).
2. Lighting conditions: Low light conditions can cause video noise and reduced stability. Make sure to have sufficient lighting to enhance the overall quality of your video. Utilize natural light whenever possible, but control it to avoid harsh shadows. Invest in softbox lights or diffusers to create even, flattering light. Ensure a consistent color temperature across all light sources.
3. Invest in a tripod or stabilizer: Use a sturdy tripod to eliminate camera shake and make good-quality video. For dynamic shots, consider a gimbal or stabilizer to maintain smooth movements. It is especially important when recording videos in fast motion, such as using GoPro, drones, or other sports cameras.
4. Microphone: Audio is very important for improving overall video quality. You'd better use an external microphone for better audio quality. For example, a shotgun microphone is great for directional audio capture, and lavaliere (lapel) microphones work well for interviews or situations where a shotgun mic may not be suitable.
5. Compression artifacts: When videos are compressed, details may be lost, leading to a decrease in video quality. Choose a video compression format that minimizes these artifacts. Some raw formats will contain full details of the video but need a large hard drive.
Summary
This article delves into effective strategies for improving video quality, leveraging both AI tools and popular video editing software. By combining the power of AI-driven solutions like Winxvideo and Topaz Video AI with the comprehensive editing features of Premiere Pro, CapCut, and Filmora, users can follow a step-by-step guide to significantly enhance their video quality.
 Frequently Asked Questions
As mentioned above, increasing the quality of video involves resolution upscaling, stabilization, noise reduction, sharpening, color correction, etc. We have listed different tools that provide these features to help improve your video quality. You can choose a video enhancer that best suits your needs.
We have listed the factors that you should note when recording a video above. If you follow the tips, you should be able to make high-quality videos.
One example of AI technology that is used to enhance video quality is called "video upscaling" or "video super-resolution." This involves using artificial intelligence to increase the resolution and quality of a video beyond its original source.
For example, Winxvideo AI contains deep learning-based super-resolution models to increase video resolutions to 4K quality. Its core CineAI is based on AI techs such as CNN, DGF, Reccurent Decoder RNN, etc. Therefore, it can analyze the input video frame by frame, understanding patterns, textures, and structures, and then generate higher-resolution frames. This technology is particularly useful for upscaling older videos or content shot at lower resolutions to match modern display standards.
Several factors can contribute to poor video quality. For example, filming with an outdated camera or a camera that has a low resolution can result in videos with limited detail and clarity. Poor lighting conditions can lead to noisy or grainy footage. Handheld shooting without stabilization can result in shaky and jittery footage, reducing the overall video quality. Improper export settings, heavy compression, insufficient bitrate, environment, etc. can all affect the output quality. You can pay attention to these factors during the filming, editing, and exporting stages to help improve overall video quality.


