


How to Fix Blurry Videos Sent to Me on iPhone/Android
 Mike Rule
Updated on
Many users have reported receiving blurry videos from friends. This frustrating issue can occur across various combinations of devices, including iPhone-to-iPhone, iPhone-to-Android, Android-to-Android, and Android-to-iPhone transfers. Below is an example:
I just switched from iPhone to Android. I got an S22 Ultra. Its an awesome phone and I like it a lot, however, I've noticed that when I send videos I take to my friends, 98% of which have iPhones, the video comes through extremely blurry, almost unwatchable. I have RCS messaging on as well.
I have also read this causes the videos to become like this for everyone in the group message, even if they are the ones sending the videos. I tried some of the other options offered online, like Google Photos, but when I send them a link to the video or share it through google play, its still blurry.
In this article, we'll explore the common causes behind blurry video transmissions and provide practical solutions to fix blurry videos sent to you, along with tips for sharing clear and enjoyable videos.
Why Are Videos Sent to Me Blurry?
There are several reasons why videos sent to you might appear blurry.
1. Apple's Refusal to Adopt RCS
One of the primary reasons for blurry video transmissions between Apple and Android users is Apple's reluctance to adopt the RCS messaging system. This decision has led to a subpar experience for users of both platforms, as Apple continues to rely on standard SMS, which is often associated with lower video quality.
While most cell phone carriers have embraced RCS, enabling high-quality video sharing across different devices, Apple's insistence on maintaining its proprietary iMessage system has hindered interoperability. This has been a point of contention between iPhone and Android users, with many Android users expressing frustration over the limitations imposed by Apple's ecosystem.
2. Compression
When sending videos, especially larger ones, they are often compressed to reduce file size and transmission time. This can lead to a loss of quality, resulting in blurriness. Different messaging platforms have varying compression levels. Some platforms may compress videos more aggressively than others.
3. Network Issues
A slow or unstable internet connection can affect the quality of the video as it's being sent or received. Heavy network traffic can also contribute to blurry videos.
This could be the reason why iPhone to iPhone videos are blurry.
4. Low-Quality Recording
If the video was recorded on a device with a low-resolution camera or in poor lighting conditions, it might be inherently blurry.
5. Unsupported Format
If your iPhone uses HEVC (High Efficiency Video Coding) to record videos, it's important to note that this format may not be compatible with all devices. Some apps might encounter difficulties during the conversion process, leading to blurry playback.
To avoid this issue, you can select "More Compatible" in your iPhone's Settings > Camera. However, keep in mind that this will result in larger file sizes for your photos and videos, both on your device and in iCloud if you're using iCloud Photos.
6. "Low Quality Image Mode" is Enabled
If you receive blurry video via iMessage, this may be because the sender has enabled "Low Quality Image Mode" under the iMessage settings. This setting can reduce the quality of images and videos to reduce data usage.
7. Display Resolution
If your device has a lower display resolution than the original video, it might not be able to display the full detail.
How to Fix Blurry Videos Sent to Me?
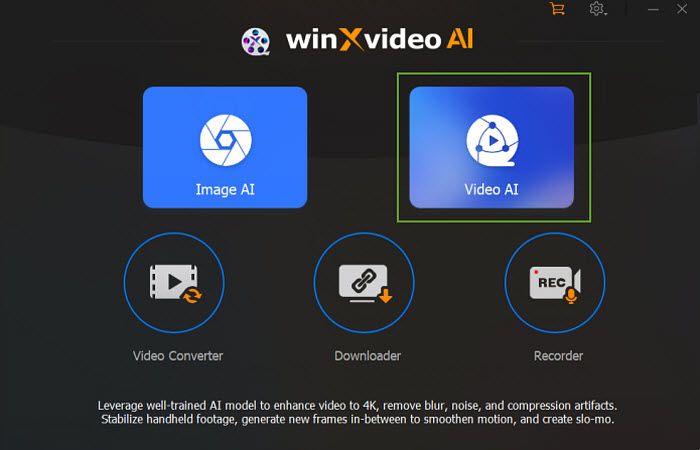
If you've received a blurry video, you can enhance its quality using a powerful video enhancer like Winxvideo AI. This tool leverages AI technology to deblur, denoise, and upscale videos, transforming them into crisp and sharp visuals. It's user-friendly and available for free download, so you can try it out with ease.
 Free Download
  Free Download
Winxvideo AI is for PC, while Macxvideo AI (from our MacXDVD brand) is for macOS.
Step 1: Open Winxvideo AI.
Launch the software and click on the "Video AI" button to access the video enhancer feature.
Step 2: Load the blurry video.
Click the "Add Video" button in the bottom left corner to upload the blurry video you received. If you have multiple videos to process, you can load them all at once and process them in a batch.
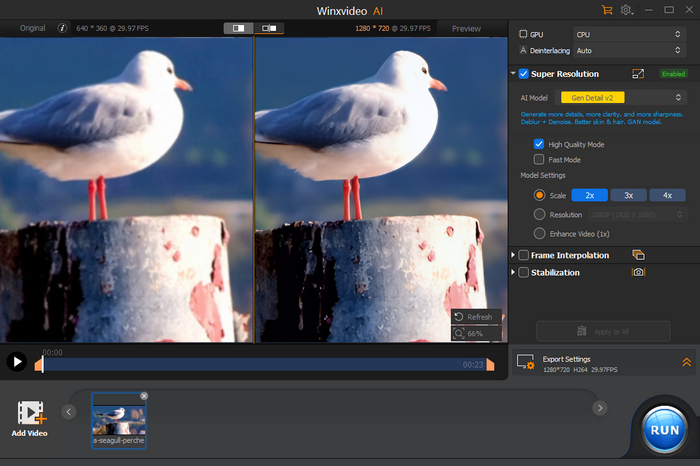
Step 3: Select and configure AI models.
Check "Super Resolution" and then choose an AI model and adjust the settings accordingly.
Winxvideo AI offers four AI models, including Gen Detail v2, Real Smooth v2, Anime, and Zyxt.
You can upscale your video to a specific resolution (480p, 720p, 1080p, 2k, 4k) or by 2x, 3x, or 4x. If you only want to enhance the quality without increasing the resolution, select the "Enhance Video (1x)" option.
After configuring the settings, preview the video to check if the blurriness has been resolved.
Step 4: Export the enhanced video.
Once you're satisfied with the preview, click the "RUN" button to export the unblurred video.
Watch the video tutorial to restore old video with Winxvideo AI
Tips: Winxvideo AI does more than just unblur and enhance videos. It can also boost video frame rate, stabilize shaky footage, upscale and enhance images, as well as convert, compress, edit, record, and download videos.
How to Avoid Sending Blurry Videos to Others
Sending videos that appear blurry can be frustrating for both you and the recipient. Fortunately, there are several steps you can take to ensure that the videos you share maintain their clarity and quality. By following these tips, you can significantly reduce the chances of sending blurry videos, regardless of the device or platform you're using.
1. Capture High-Quality Videos
- Set the highest resolution and bitrate: To ensure optimal video quality on your iPhone, adjust your camera settings to record at the highest available resolution and bitrate. This typically involves selecting options like 4K at 60 fps in Settings > Camera > Record Video.
- Prioritize well-lit environment: Recording videos in well-lit conditions helps prevent blurriness caused by low-light conditions.
- Maintain stability: Use a tripod or hold your device steady to minimize camera shake and ensure smoother footage.
2. Leverage a Stable Internet Connection
Reliable Wi-Fi or Cellular Data: When sharing videos through messaging apps or social media, a strong and stable internet connection is essential. Connect to a reliable Wi-Fi network or ensure you have a strong cellular signal before sending videos.
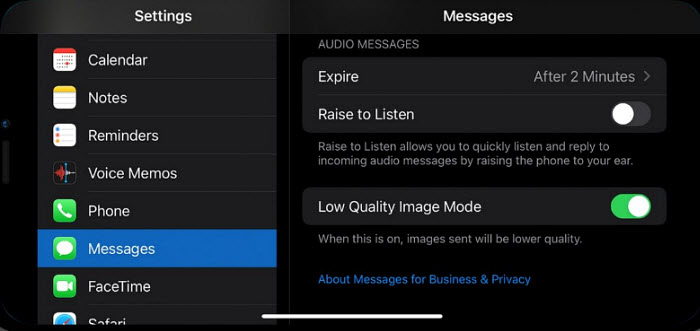
3. Turn off "Low Quality Image Mode" on iPhone
To ensure that the photos and videos you send from your iPhone are of the highest quality, it's essential to disable the "Low Quality Image Mode." This setting can reduce the resolution and clarity of your media.
To disable this feature, go to the Settings app on your iPhone, locate and tap on the "Messages" option, scroll down to the bottom of the Messages settings menu, and then disable "Low Quality Image Mode".
Also learn: how to fix a blurry video on iPhone
4. Avoid Sending Videos through SMS
SMS (Short Message Service), while a widely used communication method, is not optimized for transmitting high-quality videos. Due to its limited bandwidth and compression techniques, SMS often results in blurry or pixelated videos.
To ensure your videos are sent in the best possible quality, avoid using SMS for video sharing. Instead, opt for messaging apps or dedicated video sharing platforms that are designed to handle larger files and provide better video quality.
5. Use Messaging Apps with Higher-Quality Options
Some messaging apps, like Telegram and WhatsApp, offer options to send videos in higher quality or without compression. Check the settings within these apps to see if they have such features.
WhatsApp allows you to send up to 100 videos at once in a chat. However, the size and quality of the video depend on your internet connection. For faster connections, you can send videos up to 100 MB in size with a maximum resolution of 720p. For slower connections, the video size is limited to 64 MB, with a maximum resolution of 480p. Additionally, status videos have a maximum duration of 30 seconds. For documents, WhatsApp allows you to send files up to 2 GB in size.
6. Use Cloud Storage Services to Send Videos
You can consider using Google Drive, Dropbox, OneDrive, iCloud, to send videos. These platforms allow you to upload videos in their original quality without significant compression. You can then share the video link with your recipient. This ensures the video is delivered in its best possible state.
Before uploading video, ensure the video's file size doesn't exceed your storage limit. If the file is too large, you can use a video compression tool to reduce its size without compromising quality significantly. Additionally, you should adjust the privacy settings of the shared link to control who can access the video.
Google Drive: A free Google account comes with 15 GB of storage. This storage is shared across all Google services, including Gmail, Google Drive, Google Photos, and more. You can upload a video to your Google Drive account and then share it with someone. Once you've uploaded the video, you can generate a shareable link. This link can then be sent to the person you want to share the video with. They will be able to access and view the video directly from the link.
OneDrive: OneDrive also offers 5 GB of storage for free accounts. This storage is shared across all Microsoft services, including OneDrive, Outlook, and Word.
iCloud: iCloud also offers 5 GB of storage for free accounts. This storage is shared across all Apple devices and services, including iCloud Drive, Photos, and Mail.
Dropbox: Dropbox offers 2 GB of storage for free accounts. This storage can be used to store and share various types of files, including videos.
7. Use Dedicated Video Sharing Platforms
YouTube is popular choice for sharing videos due to their focus on video content and often higher-quality options. You can upload your videos in their original format and share the private link with your recipient.
Normally, you can upload videos that are up to 15 minutes long. If you've verified your YouTube account, you can upload videos that are longer. The biggest file you can upload is 256 GB or 12 hours, whichever is smaller. In the past, YouTube allowed longer videos, so you might see some old ones that are longer than 12 hours.
After you upload a video to YouTube in its original resolution, the people you share it with can watch it in that resolution. As long as their devices and internet connections can handle the quality, they should be able to enjoy the video in its highest possible definition.
However, it's important to note that YouTube's default playback quality may vary depending on factors like the viewer's internet speed and device capabilities. If the viewer has a slower connection or a lower-resolution device, YouTube may automatically adjust the video's resolution to ensure smooth playback.
8. Send Video as Email Attachment
For smaller videos, attaching them directly to an email is a simple option. However, keep in mind the limits set by email providers.
Gmail allows users to attach files up to 25 MB in size. If you have multiple attachments, their combined size cannot exceed 25 MB.
If your file is larger than 25 MB, Gmail will automatically insert a Google Drive link in the email instead of attaching the file. For more information on Google Drive sharing settings, click here.
9. Use Airdrop
AirDrop is a convenient feature on Apple devices that allows you to wirelessly transfer files, including videos, between nearby devices. One of its advantages is that it can help avoid blurry videos by transferring files directly without significant compression, ensuring a high-quality transfer.
Here's how to use AirDrop to send videos:
Step 1: Ensure AirDrop is enabled.
On both the sending and receiving devices, make sure AirDrop is enabled. You can find this setting in the Control Center (swipe down from the top-right corner of the screen).
Step 2: Bring devices closer.
Place the sending and receiving devices close together, ideally within a few feet of each other.
Step 3: Share video via AirDrop.
On the sending device, open the Photos app and select the video you want to send. Then, tap the Share button (the square with an arrow pointing upward) and select the receiving device from the AirDrop list.

Step 4: Accept on receiving device.
On the receiving device, accept the incoming transfer.
10. Leverage RCS for high-quality video sharing
Rich Communication Services (RCS) is a newer messaging standard designed to replace MMS, offering enhanced features like larger file sizes and richer content. Many carriers are adopting RCS, and Google Messages is at the forefront of this transition.
How to use RCS for video sharing.
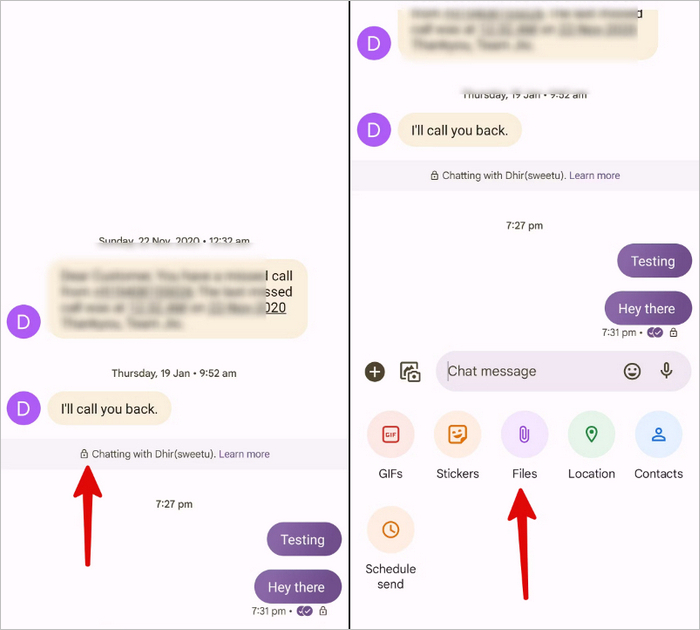
Step 1: Ensure that both you and the recipient have activated the Chat features in the default Messages app on your Android phones.
Step 2: Start a new conversation with the desired recipient. A small lock icon in your messages indicates that both parties are using RCS, ensuring end-to-end encryption and optimal video transmission.
Step 3: Tap the "+" icon in the lower-left corner and select "Files" to choose the video you want to share, and it will be sent via RCS.
11. Use Physical Media to Send Videos
If you prioritize absolute control over video quality and are willing to embrace a more traditional method, physical media like DVDs and USB drives can be a viable option. These formats allow for the distribution of large video files without the compression or quality degradation that can occur with digital transmissions.
While physical media offers the advantage of preserving video quality, it may not be as convenient as digital methods. You'll need to physically transfer the media to the recipient, which can be less efficient than sharing a link or sending a file through a messaging app. Additionally, there may be costs associated with creating and distributing physical media.
Conclusion
By understanding the common causes of blurry videos and implementing the strategies outlined in this guide, you can significantly improve the quality of the videos you send and receive. Whether you're using an iPhone or Android device, following these tips will help you avoid frustrating experiences and ensure that your shared videos are always clear, crisp, and enjoyable.


