How to Reduce Background Noise in Premiere Pro?
 Mike Rule
Updated on
Background noise can be a major hindrance in achieving professional-quality videos. Whether it’s the hum of air conditioning, rustle, street traffic, room reverb, wind sound or random chatter, such noise can detract from your content's clarity. Adobe Premiere Pro provides powerful tools to tackle this problem. This guide explores the steps to remove background noise in Premiere Pro and presents an AI-based alternative for those seeking simplicity and precision.

2 Ways to Remove Background Noise in Premiere Pro
Method 1. Removing Background Noise with DeNoise Effect
Step 1. Open Your Project.
If you didn’t create a project, you can create a new project in the first step and import your audio track. Then, drag the audio file to the audio track in Premiere Pro.
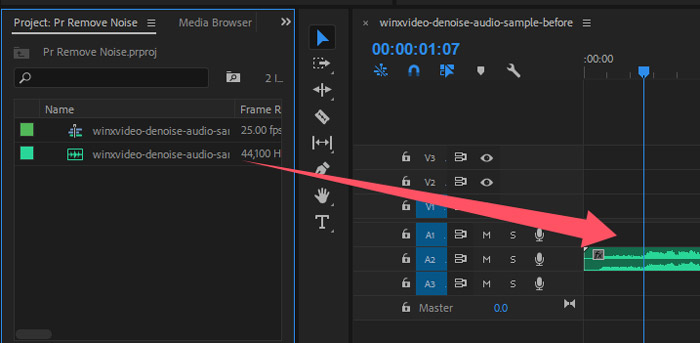
Step 2. Add Audio Effects.
Go to your sound effects window, or activate it on Window > Effects.
Search for "DeNoise" or follow the path Audio Effects > Noise Reduction/Restoration > DeNoise. Or click Obsolete Audio Effects and select DeNoiser (Obsolete). Here, the tool will ask permission from you whether or not you wish to use the latest version of the feature. Click NO and continue with the current DeNoiser (Obsolete) feature.
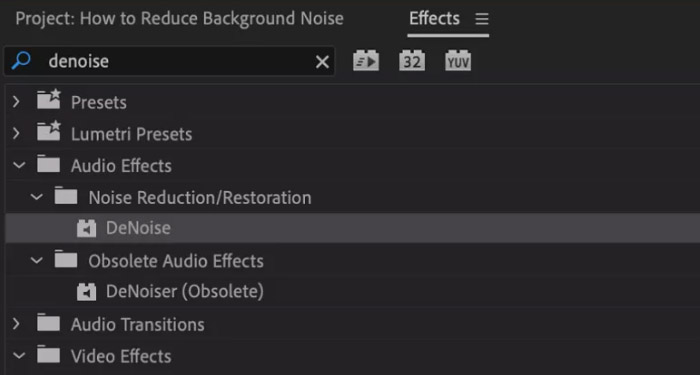
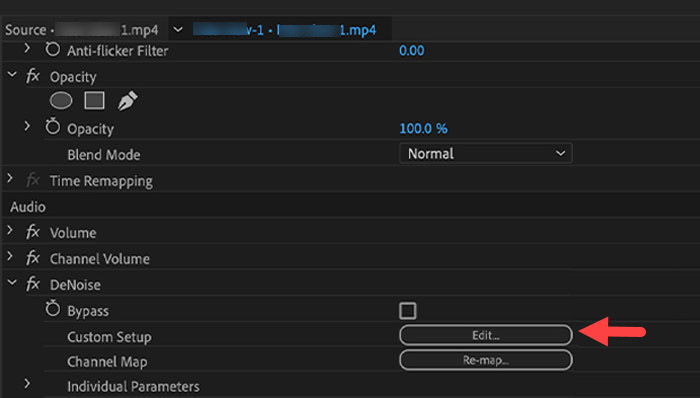
Choose DeNoise or DeNoiser (Obsolete) effect and then drag and drop it onto the audio you want to remove noise. Then, navigate to Effect Controls.
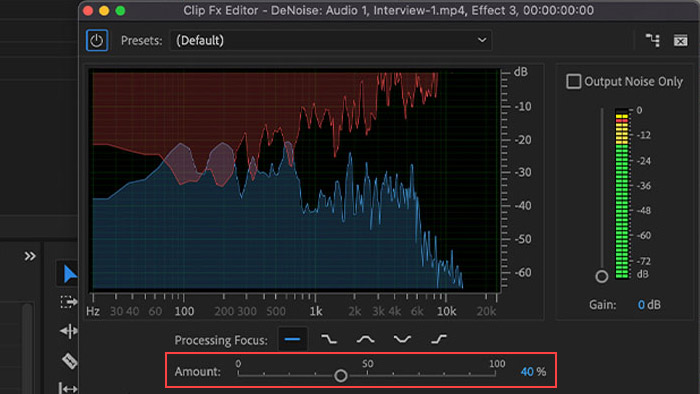
If you choose DeNoise effect, then click Edit. A new window will pop up for you to adjust audio frequencies.
In the new popup window, there is an Amount slider on the bottom, which specifies the extent of the noise reduction effect you wish to apply to your audio clip. It typically begins at the midpoint, allowing you to play your audio for listening and adjust the volume to reduce unwanted noise as necessary.
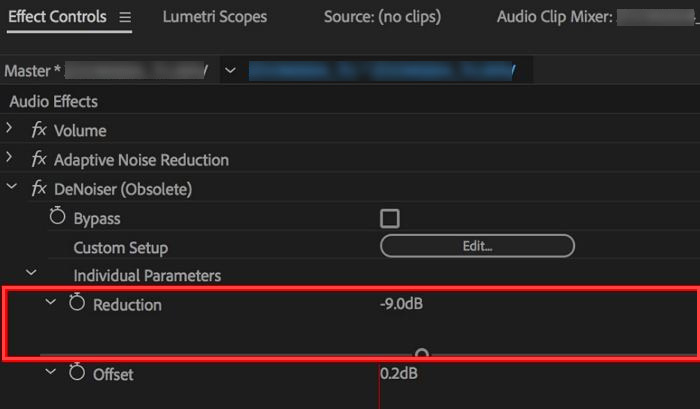
If you choose the DeNoiser (Obsolete) effect, use the Reduction slider to lower the noise. We find around -5 to -10 is usually the range you’ll be able to reduce to an unnoticeable level.
Method 2. Removing Background Noise with Essential Sound Panel
The alternative method for reducing background noise in Adobe Premiere Pro involves utilizing the Audio workspace alongside the Essential Sound panel. This panel offers supplementary tools that can greatly assist in standardizing loudness levels and eliminating low-frequency noises as well as background sounds.
Step 1. Open the Essential Sound Panel.
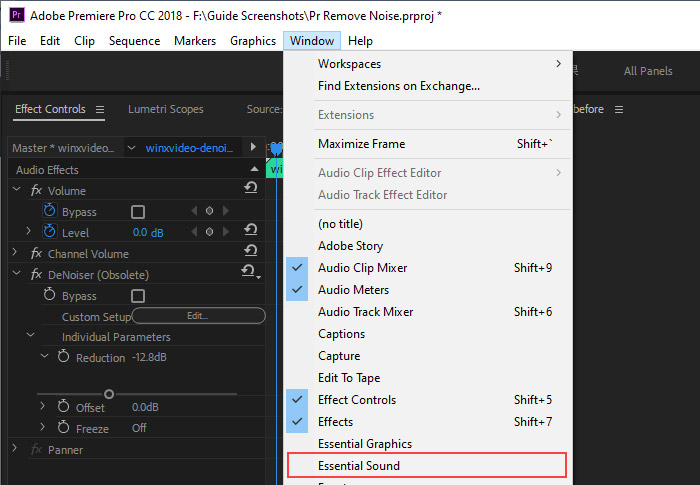
Go to Window on the top bar > Essential Sound and click on it. Then, the Essential Sound panel will appear; select your audio clip and choose the tag Dialogue.
Step 2. Start Noise Reduction in Premiere Pro
After clicking on Dialogue, you will find a few sliders and options to remove background noise. To adjust each slider, we check the box next to each option and then move the slider to increase value to reduce background noise.
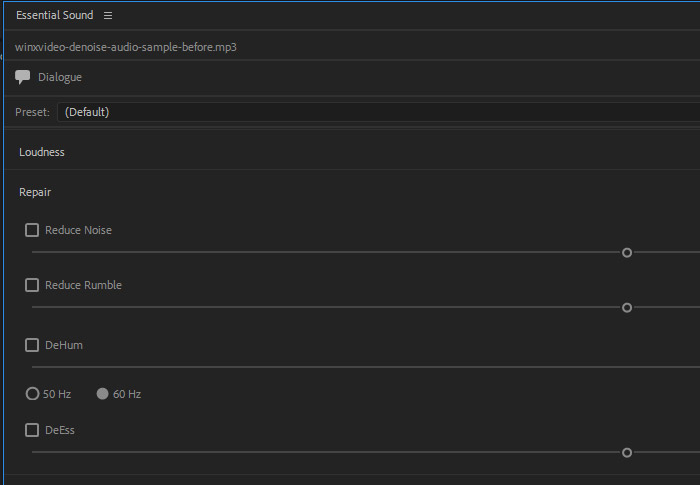
- Reduce Noise: The amount of noise removal applied to the audio clip. 0 means audio remains unchanged, and at 100, the maximum noise reduction effect is applied.
- Reduce Rumble: It reduces low frequencies noises, plosives, and microphone rumble caused by movement, wind, or rubbing sounds. Increasing the value of it will get more rumble reduction.
- DeHum: It reduces hum sounds caused by electrical interference.
- DeEss: It reduces the harsh ess-like sounds and other high frequencies.
- Reduce Reverb: It reduces reverb from your audio track, and it is very helpful when you can hear an echo in your recordings.
Note: Exercise patience when adjusting each slider to eliminate background noise while maintaining optimal sound quality.
Best Alternative to Premiere Pro Background Noise Reduction
Premiere Pro is well-recognized as a preferred choice among professionals for editing various media files. Consequently, users must possess a comprehensive understanding of the software to effectively eliminate noise from videos. To reduce background noise more efficiently, you can use the power of AI.
The AI-powered and user-friendly software - Winxvideo AI is such an ideal choice you can opt for. Version 3.8 of Winxvideo AI enhances the current Image AI and Video AI functionalities by incorporating new Audio AI feature, which facilitates the removal of background noise from both audio and video files. By leveraging the cutting-edge AI technology, this noise removal tool can significantly reduce typical distractions such as traffic, wind, microphone interference, and background noise, thereby ensuring exceptional sound quality.
How to Get Rid of Background Noise in Winxvideo AI?
Step 1. Download Winxvideo AI, install and launch it on your computer.
Step 2. On the main interface, click on the "Audio AI" button.

Step 3. Directly drag and drop one or more audio or video files that you want to remove the background noise. Or you can also click the "Add Media" button at the bottom to browse and select the audio or video files to import.
Step 4. Make sure the Noise Suppression is ticked on, choose the preferred AI model, and adjust the parameters accordingly.
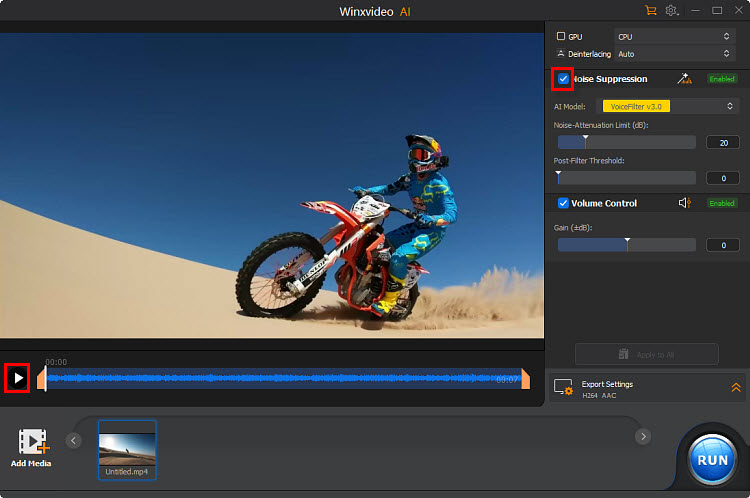
- AI Model: There are 2 AI models designed to help handle a variety of background noise.
- Noise Attenuation Limit (dB): It pertains to the highest degree of noise suppression measured in decibels (dB). This metric indicates the extent of noise elimination while preserving the integrity of the primary audio. A higher threshold effectively reduces more noise but may compromise audio quality, whereas a lower threshold allows for a more authentic sound experience. Striking a balance between these parameters is essential for achieving clarity in sound. It is advisable to configure the limit between 6-12 dB for minimal noise reduction and 18-24 dB for moderate noise suppression.
- Post-Filter Threshold: This parameter regulates the extent of additional noise elimination following the primary noise suppression procedure. It establishes a boundary for the removal of residual noise, thereby ensuring that the primary audio remains distinct while minimizing undesirable background sounds. A lower threshold (0.01-0.02) offers a gentler filtering effect, maintaining the natural sound quality in quieter settings, whereas a higher threshold (0.03-0.05) enforces more robust filtering, which is advantageous in environments with moderate noise, such as background hum or distant conversations.
- Volume Control: It enables users to adjust audio loudness by increasing or decreasing the signal.
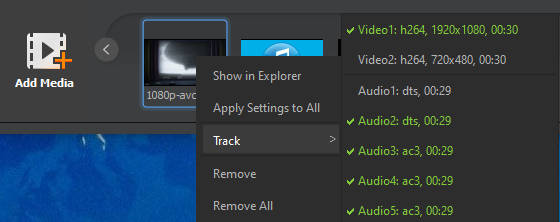
Step 5. If you have multi-track audio, you can right-click on the chosen file, select the specific track you want to modify, and then follow the same process as before.
Step 6. Click on the "Play" button to preview the audio after noise removal.
Step 7. When everything is OK, hit the "RUN" button to export your audio with the background noise removed.
 Free Download
 Free Download
Note: AI tools for Mac are currently unavailable, but they're coming soon. Stay tuned.


