How to Remove Background Noise in Audacity [Steps with Pictures]
 Mike Rule
Updated on
Have you ever recorded a podcast, voiceover, or music track, only to be disappointed by the persistent hum of a refrigerator or the distant rumble of traffic? You're not alone. From the subtle hum of electronics to the roar of traffic, unwanted sounds can detract from your message. Fortunately, there are tools available to help us eliminate background noise, and Audacity is a powerful one.
Audacity is a free, and open-source audio editor, but its learning curve can be steep. And to effectively reduce background noise from their recordings in Audacity is one common challenge that users face, especially for beginners. In this article, we share a step-by-step guide on how to use Audacity to remove unwanted background noise like hiss, static, white noise, wind, hums, etc.
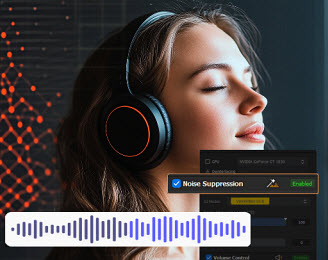
- Remove background noise from video/audio with AI in one click.
- Remove hum, hiss, static, white noise, buzz, fan, wind, etc.
- Handle challenging situations like traffic, noisy crowds, wind, etc.
- Enhance, stabilize, interpolate, upscale, restore, edit, record, etc.
How to Remove Background Noise in Audacity?
Audacity has 3 noise reduction tools: Noise Reduction, Noise Gate, and Notch Filter. They are designed to remove different types of background noise in an audio track. Choose the proper method to eliminate background noise in Audacity based on your source audio.
Audacity's noise reduction tool is most effective on consistent background noise, including hums, static, hiss of fans and tape, whistle, buzzes, whines, FM/webcast carrier noise. It may struggle with fluctuating noise sources like traffic or audience sounds.
Audacity's Noise Gate effect attenuates any sound that falls below a set threshold. This is particularly useful for vocal recordings with noticeable background noise or gaps between phrases, such as like breaths, lip smacks, room tone or ambient noise.
Audacity's Notch Filter effectively eliminates specific frequency noises by creating a deep cut in the frequency spectrum. It’s ideal for targeting and removing unwanted frequencies, such as hums, whistles, resonances, ground loop hum, or other annoying peaks in the harmonic spectrum.
Remove any noise from audio/video with AI. Effectively remove wind, street, air conditioning, rain, white noise, buzz, and more.
Before you start to use Audacity to reduce background noise, note:
- Audacity is a destructive editor. To protect your original audio, create a copy before using Audacity's noise reduction tools.
- Audacity is an audio editor and you can’t use it to remove background noise from videos.
1. Remove Background Noise in Audacity with Noise Reduction
Step 1. Download and Install Audacity
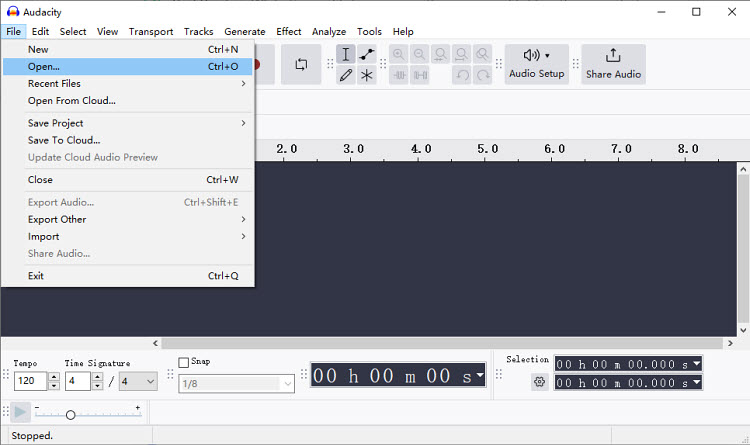
If you haven’t already, download Audacity from the official website. Install and launch Audacity. Then click the File menu, choose Open and choose and load your audio from your local computer.
Step 2. Select a Sample of the Noise
Once your audio is loaded, you need to choose a section of your recording that contains only the background noise you want to remove (no speech or important sounds). Highlight that section with your mouse by clicking and dragging over the waveform. Then go to the Effect menu at the top, choose Noise Removal and Repair and select Noise Reduction.

Step 3. Get a Noise Profile
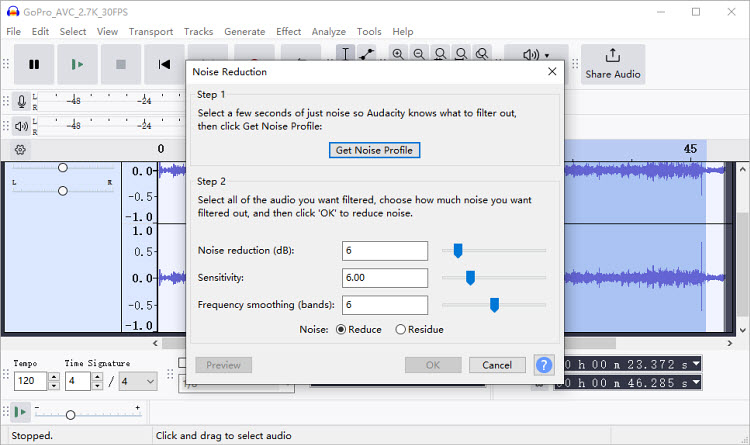
In the Noise Reduction window, click Get Noise Profile. The Noise Profile dialogue box will then close and Audacity will analyze the selected noise sample to create a noise profile.
Step 4. Apply Noise Reduction
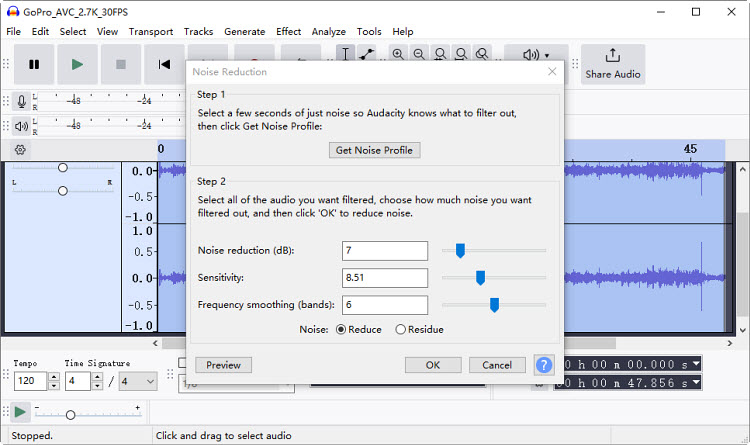
Choose the part of the audio track or the entire audio file that you want to apply the noise reduction to. With the track selected, go back to back to Effect > Noise Removal and Repair > Noise Reduction. In the Noise Reduction window, there are a few parameters to adjust. Below are the best Audacity noise reduction settings:
- Noise Reduction (dB): Controls how much noise is reduced (usually start around 12 dB and recommend 12-18dB).
- Sensitivity: Determine how sensitive Audacity is to detecting noise (start with 6 and recommend 6-8).
- Frequency Smoothing (bands): Smooth out the sound after noise reduction (start with 3 and recommend 3-6 bands).
Step 5. Fine-Tune Your Audio
Click Preview to hear the effect. If you’re satisfied with the result, click OK to apply the changes. If necessary, use additional effects like Equalization or Compression to further refine your audio. You can also use a high-pass filter to remove low-frequency hums or a low-pass filter for high-frequency hiss.
Step 6. Export Your Cleaned Audio
Once you’re happy with the noise reduction, click File > Export Audio to save your cleaned audio. Choose the desired format (WAV, MP3, etc.), name your file, and click Export.
Also learn: all methods to remove background noise from video/audio
2. Reduce Background Noise in Audacity with Noise Gate
Step 1. Load the Audio File
Open Audacity and click the File menu. Choose Open and choose and load your audio from your local computer.
Step 2. Select a Sample of the Noise
Once your audio is loaded, you need to choose a section of your recording that contains only the background noise you want to remove (no speech or important sounds). Highlight that section with your mouse by clicking and dragging over the waveform. Then go to the Effect menu at the top, choose Noise Removal and Repair and select Noise Gate.
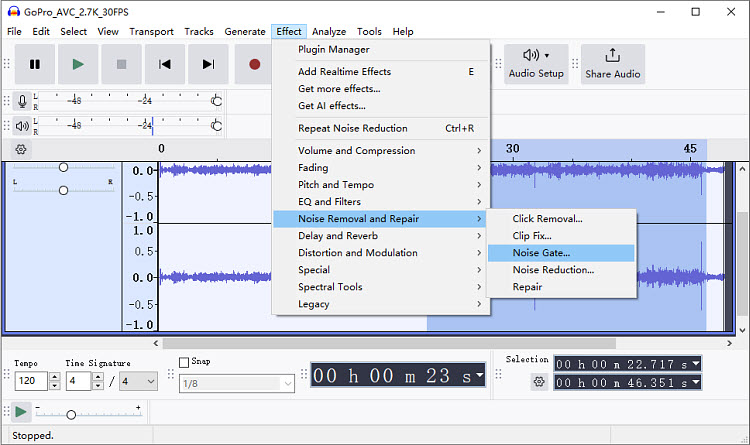
Step 3. Get the Noise Level
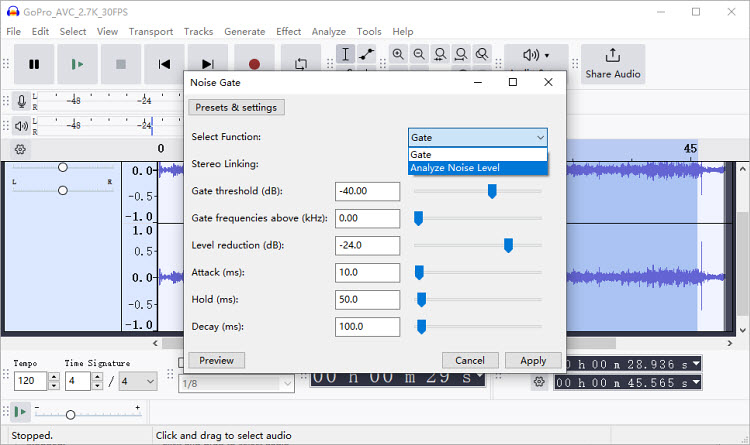
In the Presets & Settings, click Select Function and choose Analyze Noise Level. Then click Apply.
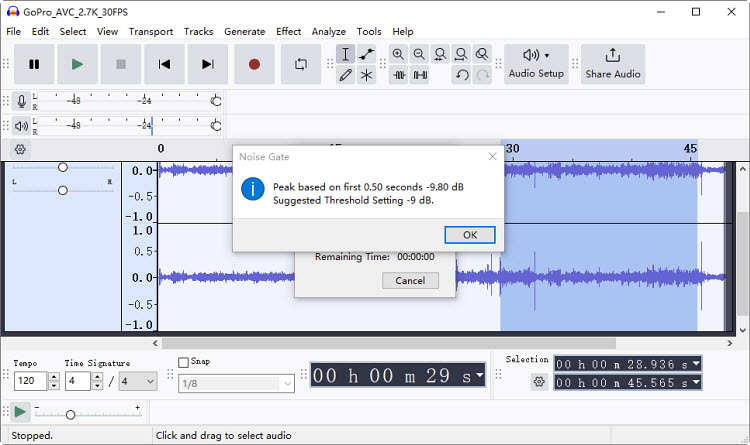
The Noise Gate dialogue box will then close and Audacity will now tell you where your noise level lies and recommend a threshold.
Step 4. Apply Noise Gate
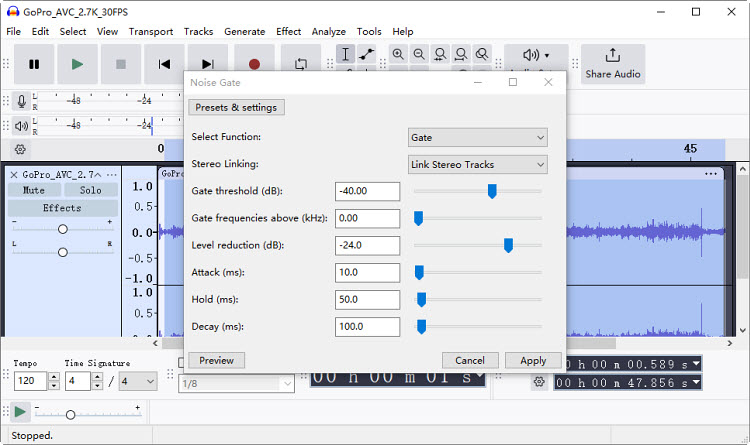
Choose the part of the audio track or the entire audio file that you want to apply the noise gate to. With the track selected, go back to back to Effect > Noise Removal and Repair > Noise Gate. In the Noise Gate window, there are a few parameters to adjust. Below are the best Audacity noise reduction settings for Noise Gate:
- Threshold: Determine the level at which the gate opens. Set slightly above the desired audio signal. Recommended -40 dB to -30 dB (higher for quiet sounds like hum, lower for aggressive noise like traffic).
- Gate Frequencies Above: Control frequencies affected by the gate. Recommended 1 kHz - 2 kHz for high-frequency noise (hiss, hum).
- Level Reduction: Control how much the gate reduces volume below the threshold. Recommended -40 dB to -60 dB for consistent noise (e.g., hum, hiss), -10 dB to -20 dB for moderate noise reduction.
- Attack Time: Speed at which the gate opens. Recommended: 10-30 ms for quick response without clicks.
- Hold Time: Duration the gate stays open after the signal drops below the threshold. Recommended 100-500 ms for smoother transitions.
- Decay Time: Speed at which the gate closes. Recommended 100-300 ms for natural closure and reduced artifacts.
Step 5. Export the Audio
Click Preview to hear the effect. If you’re satisfied with the result, click OK to apply the changes. Once you’re happy with the noise reduction, click File > Export Audio to save your cleaned audio. Choose the desired format (WAV, MP3, etc.), name your file, and click Export.
3. Reduce Background Noise in Audacity with Notch Filter
Step 1. Load the Audio File
Open Audacity and click the File menu. Choose Open and choose and load your audio from your local computer.
Step 2. Choose Notch Filter
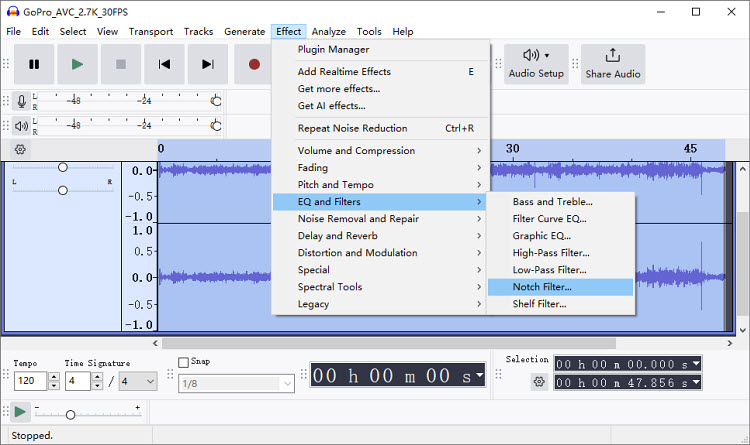
Once your audio is loaded, you need to choose the part of the audio track or the entire audio file that you want to remove noise. Highlight that section with your mouse by clicking and dragging over the waveform. Then go to the Effect menu at the top, choose EQ and Filters and then Notch Filter.
Step 3. Adjust the Settings
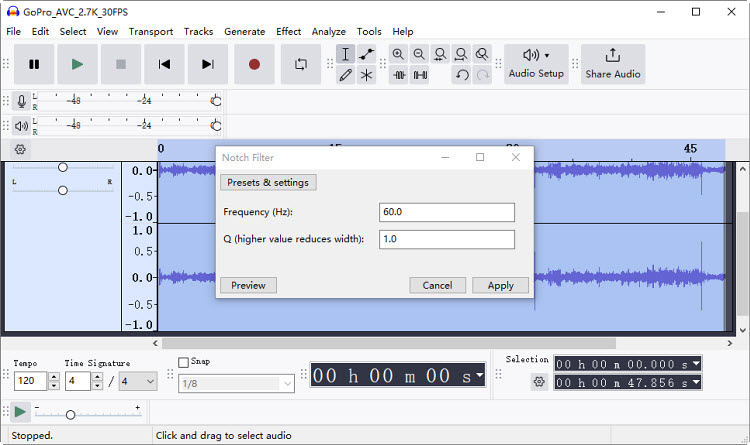
In the Notch Filter window, adjust the Frequency and Q values. Below are the best Audacity noise reduction settings for Notch Filter:
- Frequency (Hz): The frequency of the noise you want to remove in Audacity, such as a hum or buzz. Recommend 50 Hz to 60 Hz.
- Q (higher value reduces width): Control the width of the notch (how broad or narrow the frequency range is around the target frequency). Set Q Factor to around 10-15 for precise removal of a single frequency, or 5-10 for a broader, smoother effect.
If you have a broader spectrum of noise (e.g., multiple hums or buzzes), consider using multiple notch filters at different frequencies.
Step 4. Export the Audio
Click Preview to hear the effect. If you’re satisfied with the result, click OK to apply the changes. Once you’re happy with the noise reduction, click File > Export Audio to save your cleaned audio. Choose the desired format (WAV, MP3, etc.), name your file, and click Export.
How to Remove Background Noise with Audacity AI?
Winxvideo AI stands out as the best Audacity AI noise reduction tool. By harnessing the power of advanced AI, including DNN and RNN algorithms, it effortlessly identifies and eliminates a wide range of background noise, from subtle hums to disruptive environmental sounds.
- Automated noise reduction: No manual adjustments or technical expertise required.
- Superior noise reduction: Effectively removes a wide range of noise types, including white noise, electrical hum, wind interference, and more.
- Preserves audio quality: Maintains the integrity of your original audio while removing noise.
- User-friendly: Easy-to-use interface for seamless audio processing.
Whether you're dealing with drone footage or bustling city sounds, this Audacity AI alternative ensures clean and professional-quality audio in even the most challenging environments. In addition, Winxvideo AI offers a comprehensive suite of tools to enhance videos/images, denoise, upscale , compress, convert, edit, record, download, and more.
 Free Download
  Free Download
Note: AI tools for Mac are currently unavailable, but they're coming soon. Stay tuned.
Steps to Reduce Background Noise with Audacity Alternative
Step 1. Download the Audacity AI alternative on your computer. Open it and click Audio AI on the main interface.

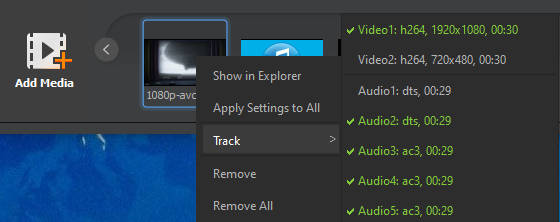
Step 2. Just drag and drop your media files into the software. Unlike Audacity, the background noise reduction works with both audio and video files in any format. For multi-track audio, you can target specific tracks for noise reduction.
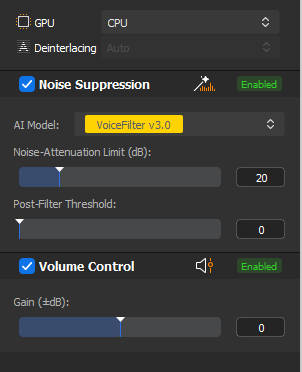
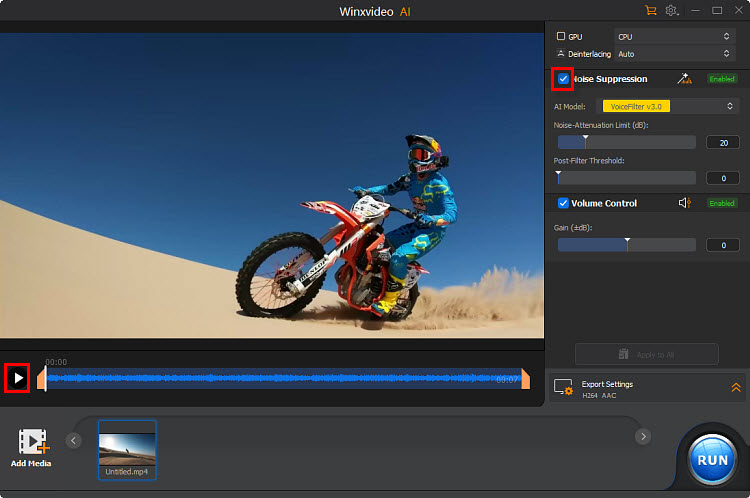
Step 3. On the right panel, select from two AI models to automatically adapt to different noise types. Then you need to adjust the following as needed:
- Noise Attenuation: Fine-tune the maximum noise reduction level (6-12 dB for subtle noise, 18-24 dB for more aggressive reduction).
- Post-Filter: Adjust the level of additional noise reduction (0.01-0.02 for preserving natural sound, 0.03-0.05 for stronger filtering).
- Volume Control: Balance the overall audio level to compensate for potential volume loss.
Step 4. To preview the noise-reduced audio, click "Play." To compare, uncheck the "Noise Suppression" box and play again. When you're happy with the results, click "Run" to process the entire file.
Conclusion
With Audacity's Noise Reduction, Noise Gate, and Notch Filter tools, you can significantly eliminate the unwanted background noise for clear audio quality. However, manual adjustments are necessary to achieve the desired level of noise reduction. If you're struggling to achieve the desired noise reduction with Audacity, AI-powered tools like Winxvideo AI can provide a more efficient and effective solution, automatically removing various types of background noise.
FAQ
1. How to remove hiss from audio in Audacity?
Removing hiss can be challenging, especially when it's a significant component of the audio signal. To remove background hiss in Audacity, you can try the methods above. In addition, you can also go to Generate > Selience, or Effect > EQ and Filters > Low-Pass Filter to use these two options to remove the hiss.
2. What tool in Audacity is used to remove unwanted noise?
The official Audacity recommends three tools to remove unwanted background noise, namely the methods shared above. In fact, there are many other tools for help, including Click Removal, Silence, High-pass/Low-pass filters, as well as third-party plug-ins. You may need to combine these techniques and tools to effectively remove background noise.
3. How to remove white noise in Audacity?
Use the Noise Reduction to remove white noise.
4. Can Audacity remove silence?
Audacity can effectively remove silence from audio tracks with the "Truncate Silence" effect. Go to Effect > Special > Truncate Silence. You will need to adjust the Threshold, Duration, Truncate To settings.
5. How to get rid of crackling noise on Audacity?
The Click Removal is a good option in Audacity to deal with crackling sound, clicks, pops, etc. Go to Effect > Noise Remove and Repair > Click Removal and try with different settings.


