How to Restore Old Photos to Their Former Glory with Photoshop
 Mike Rule
Post on
Old photographs are precious time capsules, capturing moments frozen in time. Unfortunately, age, wear, and tear can diminish their beauty. Photoshop offers a powerful arsenal of tools to restore these cherished memories. With a little patience and practice, you can breathe new life into old faded images. By following the right steps and tips on how to restore old photos in Photoshop, you can effectively eliminate scratches, stains, and color fading.
How to Restore Old Photos in Photoshop with Neural Filters
Photoshop's Neural Filters offer a powerful and efficient way to restore old photos – Photo Restoration feature. The feature can dramatically repair damaged images in Photoshop with just a few clicks, including image enhancement, face enhancement, and scratch reduction. Here’s how to restore old photos in Photoshop using the Neural Filters.
Step 1. Import Your Photo
Open your old photo in Photoshop.
Step 2. Duplicate the Background Layer
Create a copy of your original image by duplicating the background layer. This preserves the original in case you need to revert changes.
Step 3. Open the Photo Restoration Filter
Navigate to Filter > Neural Filters > Photo Restoration.
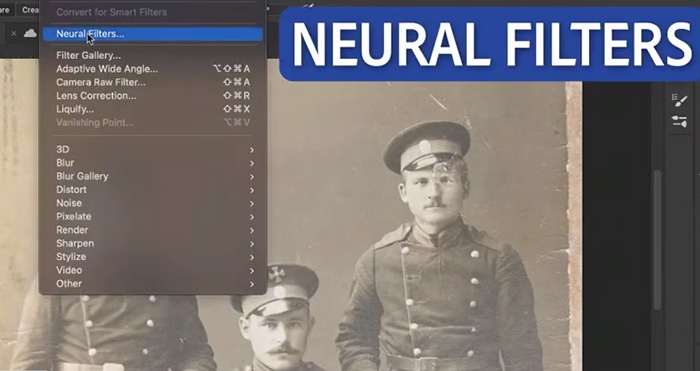
Adjust the sliders for Image Enhancement, Enhance Face, and Scratch Reduction to achieve desired results. Try different settings to find the optimal balance.
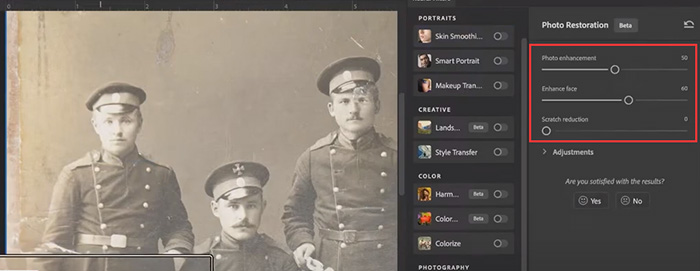
Step 4. Use Healing Brush and Healing Spot Tools (Optional)
For more precise control over scratch removal, use Photoshop's Healing Brush and Spot Healing Brush tools. These tools allow you to target specific areas, preserving details like jacket buttons that might be lost with the Photo Restoration filter.
To combine the best of both worlds, apply the Photo Restoration filter's lighting and sharpness enhancements without enabling Scratch Reduction. Then, meticulously remove scratches using the Healing Brush (for larger areas) or Spot Healing Brush (for smaller spots). Remember to sample a clean area by Alt-clicking (Option-click on Mac) before healing. You might need multiple passes for stubborn scratches.
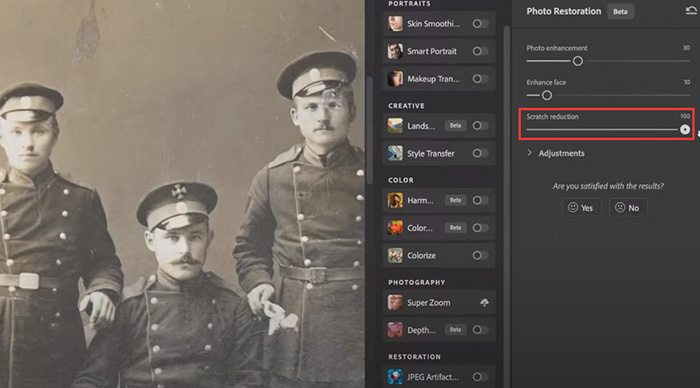
Step 5. Colorize Old Black and White Images (Optional)
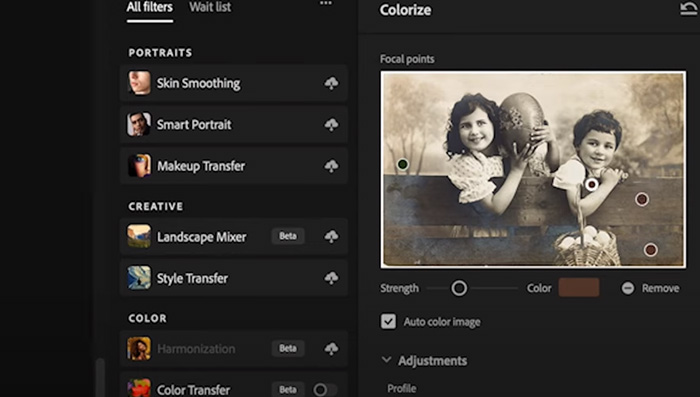
Photoshop's Neural Filters offer a quick, AI-powered solution for colorization. Just go to Filter › Neural Filters › Colorize to add color to old black and white images in Photoshop. Adjust the saturation slider within the filter for a more natural look.
Tips: Manual colorization is an option for greater control, but it's time-consuming. Standard photo adjustments like brightness, contrast, noise reduction, and smoothing can be applied. Focus on restoration rather than artistic enhancement. For instance, you might need to carefully add color to specific areas using tools like the Healing Brush. While the results won't match professional-level restoration, they can significantly improve the overall appearance of your old photo.

Step 6. Save Your Restored Old Photos
Once satisfied with the results, save your restored photo in a suitable format (JPEG, TIFF, PNG).
Read more: How To Upscale Old Low-resolution Photos in Photoshop
How to Restore Faded Color Photos in Photoshop with Color Tools
While Neural Filters excel at overall restoration, you might need to fine-tune colors manually. Photoshop provides AI photo colorizer tools to enhance faded color photos.
Step 1. Open Your Photo
Import the faded color photo into Photoshop.
Step 2. Duplicate the Background Layer
Create a copy of the background layer to protect the original. To duplicate the background layer, either drag it onto the "New Layer" button in the Layers panel, or right-click on the layer and select "Duplicate Layer" from the menu.

Step 3. Adjust Colors with Hue/Saturation
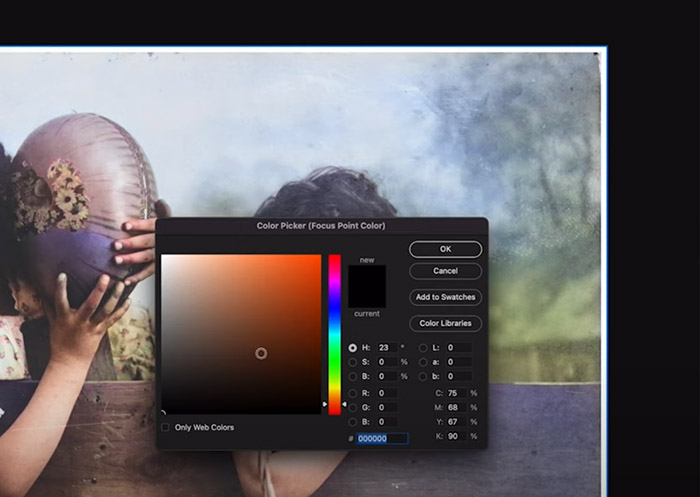
Create a Hue/Saturation adjustment layer. Fine-tune the colors by adjusting the Hue, Saturation, and Lightness sliders. Target specific color ranges using the Master, Reds, Yellows, Greens, Cyans, Blues, and Magentas options.
Step 4. Enhance Contrast and Sharpeness
Use the Levels adjustment layer to adjust the tonal range. Target shadows, midtones, and highlights to improve contrast and detail.
Apply the Clarity filter to enhance midtone contrast and detail. For a sharper image, use the Unsharp Mask filter cautiously to avoid excessive noise.
For more precise color adjustments, consider using the Selective Color and Curves adjustment layers. Make subtle adjustments to avoid over-processing.
A Smarter Way to Restore Old Photos: Try Winxvideo AI Instead
Photoshop has long been the go-to tool for photo editing and restoration. It offers powerful manual tools like Healing Brush, Clone Stamp, and advanced color correction options. However, restoring heavily damaged, blurry, or faded old photos in Photoshop isn’t without its challenges.
Drawbacks of Using Photoshop:
- Requires advanced photo editing skills and familiarity with multiple adjustment tools.
- Time-consuming, especially when dealing with multiple photos or severe damage.
- Manual corrections can lead to unnatural results without careful adjustments.
- Subscription-based pricing can be expensive for casual or one-time users.
If you're not a professional editor or simply want a faster, smarter, and easier way to restore your old photos, AI-based tools like Winxvideo AI offer a much more efficient solution.
Winxvideo AI is an AI-powered photo restoration software designed to automatically remove blur, noise, scratches, and stains from old photos. It can restore facial details, colorize black-and-white images, and even upscale image resolution by 2X, 3X, 4X — up to 10K. Besides photo enhancement, Winxvideo AI also works as a video enhancer, stabilizer, format converter, screen recorder, and video editor, making it a versatile all-in-one tool for media processing.
Step 1. Install and open Winxvideo AI. Select the Image AI feature.

Step 2. Click the Add Image button to import the old photo(s) you want to restore. Batch processing is supported.
Step 3. Choose your model settings. If you don’t need to upscale, select Enhance Image (1X). Preview the result in the player window.

Step 4. Enable optional features under Image Restoration, such as Face Restoration and Colorizing Monochrome Image, according to your needs.
Step 5. Click RUN to process and export the restored image.
 FAQs about How to Restore Old Photos in Photoshop
The Spot Healing Brush is ideal for small imperfections like dust or minor scratches. For larger areas or more complex damage, the Clone Stamp Tool offers precise control. By sampling clean areas and carefully applying these tools, you can effectively eliminate blemishes without compromising image quality.
To restore faded colors, use adjustment layers like Hue/Saturation to target specific color ranges. Levels can be used to adjust overall contrast and color balance. For more precise control, experiment with Curves to fine-tune the tonal curve of the image. By carefully adjusting these settings, you can revitalize the colors in your old photo.
Yes. Photoshop offers several methods for colorizing black and white photos. The Colorize feature in the Image Adjustments menu provides a quick and easy way to apply base colors. For more control, create a new layer and manually paint colors using brushes and blending modes. Advanced users can explore channel mixing and selective colorization techniques for nuanced results.
To enhance detail without sacrificing image quality, use the Unsharp Mask filter judiciously. Apply a small amount of sharpening with a low radius and threshold to subtly improve clarity. Consider using a high-pass filter for more control over sharpening specific details.
Restoring damaged areas requires careful attention. For smaller tears, the Clone Stamp Tool can be used to fill in missing information by sampling similar areas. Larger sections may require more complex techniques like content-aware fill or manual reconstruction. It's often helpful to combine multiple methods to achieve the best results.


