How to Fix Audio & Video Out of Sync in Premiere Pro or Other Editors
I've been capturing some gameplay footage, with files that last an hour or even more. When I watch the files in any player they play fine. But after I import to Adobe Premiere, the audio and video get out of sync. It’s really strange that the audio delay problem only occurs after importing. – From Adobe Support Community
Audio and video out of sync issue is common with video editing program, be it Adobe Premiere Pro, Davinci Resolve, Avid, Shotcut, Corel VideoStudio, VideoPad, or Ligthworks. Especially, when you import your recording or footage and try to edit it, the sound may be delayed in the timeline. Strangely, the audio matches the video in VLC, QuickTime, or any other media player. Why do the audio and video drift out of sync? How to fix the mismatched audio and video error?

Part 1. Why Video and Audio Are Incorrectly Synced While Editing?
The real culprit for the audio desync or audio lag is the variable frame rate (VFR). What is VFR? Explanatorily, the frame rate changes over time during a media file as a meant of improving compression efficiency. For example, it might be 60fps here but 25fps there. So modern cameras, smartphones, webcams, or screen capture applications use VFR to record video, meant to reduce the file size. But this comes at the cost of adding extra processing needs in editing.
Common video editor are designed to cope with video at constant frame rate. Therefore, you may end up with 4K VFR error, typically the audio and video go out of sync when editing the footage in VFR format, especially if you add extra effects to the video.
Note: In addition to the audio lag error while editing, the audio is incorrectly synced when you try to play or stream the video. You can also find the solution to fix the audio lag issue in windows 10, sync audio with video on YouTube here.
Part 2. How to Fix the Audio and Video Out of Sync Issue
Adobe knows that the audio lag in video can ruin your experience. In V12.0.1, Premiere Pro adds Preserve Audio Sync for variable frame rate footage. It decodes the video in a way of adding or dropping frames so as to automatically keep audio in sync without any manual adjustment. However, this feature may lead to choppier-looking video, especially if it is in 4k resolution. The ultimate solution to fix the audio delay error is to transcode VFR video to a constant frame rate before editing.
To do the task, you can try Free Video Converter, a professional video transcoder that is able to change video from VFR to CFR without lowering your video quality. It gives you full control over any video source, be it 4k footage taken by GoPro or DJI, HD movies, game play recordings, or any other video from YouTube or Facebook. You can follow the steps to remove the variable frame rate limitation and fix audio lag issue before editing or playing.
4 Simple steps to Convert VFR to CFR with Winxvideo AI
Step 1: Free download and install the 4K video converter on your computer and launch it. Click on the Video Converter button on the main UI, and then load the VFR video clip by clicking + Video button. You can add more than one clip at a time.
Step 2: Choose the output format as per your needs. It’s up to you to keep the original format or choose another edit-friendly format such as Prores.
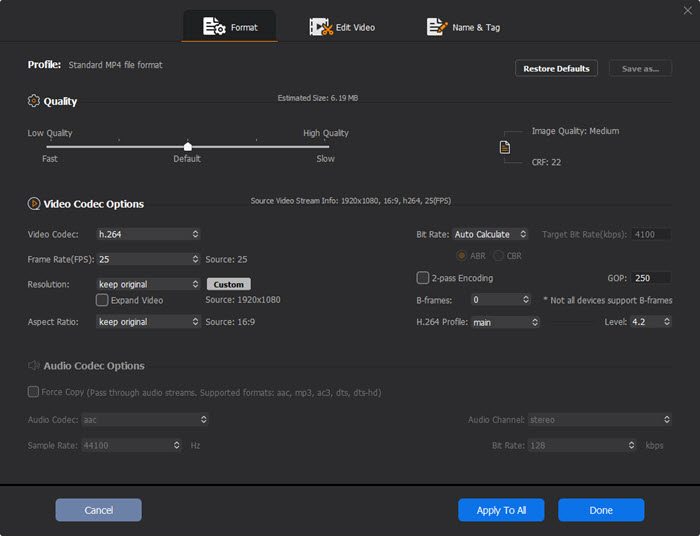
Step 3: Click the gear-shaped icon on the main interface. Specify the Frame Rate value from the drop-down menu. Winxvideo AI offers the CFR options from 15fps, 23.97fps, 25fps, 29.97fps, 30fps, 50fps, 59.94fps to 60fps. You can choose the exact constant frame rate according to your needs.
Step 4: Click RUN button to begin converting variable frame rate to constant frame rate. After the conversion, you can import the CFR video into any video editing software and will never encounter the audio/video out of sync error.

Part 3. FAQ
1. How to Determine if a Video Has VFR?
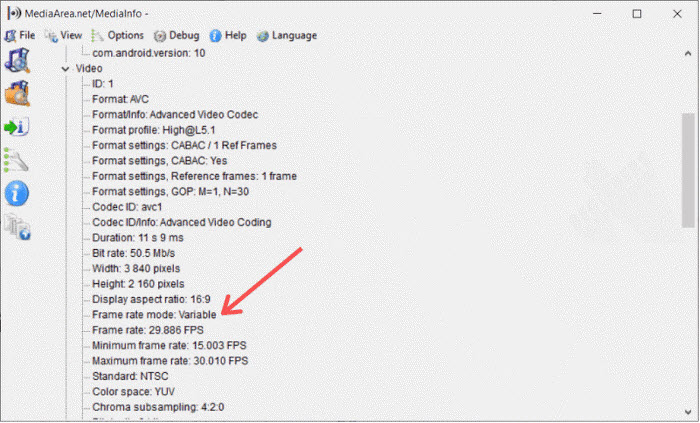
There are two ways to check if your video is recorded in VFR format. For one thing, you can rely one mediainfo, a free and open-source program that not only reveals the video clip frame rate but also a vast amount of information about the video and audio properties.
Just luanch Mediainfo > click on File > Open > File > select your video clip > click View and choose Tree. If the frame rate mode shows as variable, then the video is formatted in variable frame rate. Then you need to convert VFR to CFR beforehand to avoid the audio/video out of sync error while editing.

2. How to Fix Audio and Video Out of Sync on TV?
Causes of the sound delay issue on TV can be hardware itself or cable hiccups. Check the solutions below and see if the audio goes back to normal while playing video.
- Tweak your TV hardware. Find a video source that doesn’t have any audio latency error such as a DVD disc or a YouTube video. Play it on your TV’s built-in speaker and check if there is any inconsistency. If so, find a “Reset”, “Reset sound” or the like under the sound settings menu of your Samsung TV or other TV, reset the sound and get your audio sync back on track. Please avoid watching movies with TV’s game mode and make sure you are running the latest firmware.
- Reset the external speaker. If you are using a sound bar or home theater system, it’s likely to run into the sound not matching video issue. Unplug the TV and your sound equipment, disconnect the sound system, then reconnect and plug it all back in after a few minutes. Set the delay between zero and 300 milliseconds in audio delay settings. Change the TV’s digital audio out settings to PCM and turn the A/V sync, if available.
- Correct your cable. Unplug your cable box for 15 seconds, plug it back in, and wait 20 minutes to power it up again. Then grab your set-top box remote. Access the settings, set the feature Secondary Audio Programming or SAP Off. If your TV has an SAP setting, turn it off or set to stereo mode.
3. Why Are Audio and Video Out of Sync While Streaming Online?
One thing to kill streaming binge is the issue when the audio is not matching video. Frankly, the audio delay may boil down to the poor streaming service quality. Amazon Prime, Netflix, and YouTube are examples of the streaming services that could cause the audio lagging behind the video. Consequently, the movie watching experience can be distracting. If you've ever encountered the audio and video out of sync on YouTube, Netflix, Amazon Prime, etc, check the solutions here.
- Check out another title or two on Netflix or other streaming service to confirm that it’s a problem on your end and not a poorly synced video on the streaming service’s end. If it’s the latter, report the suspicious content to customer service.
- Sometimes fast-forwarding or rewinding the video causes the audio desync error. Watch the content from the beginning, do the same thing, and check if the audio is re-synced.
- If you are using a streaming box or stick, reset the device and try again.
- Uninstall the streaming app, and download it to see if the error is fixed.
- Test the speed of your internet. If you find it is having issues, contact the internet service provider and report the problem. Or switch from a Wi-Fi connection to a hardwired connection and check if the issue is fixed.
- Change another browser, clear the cache, and check if the audio delay issue is alleviated.
4. What to Do with Audio Not Matching Video On windows 10/11?
The audio may not go sync with the video and cannot follow along with the video playback on Windows 10. Except the streaming service, hardware acceleration and device driver are the two main culprits. Check the solutions below to fix the issue.
- Disable hardware acceleration. For example, if you are using Google Chrome, go to Settings > Advanced > System > use hardware acceleration when available > re-launch Chrome, play a video and check if the error is fixed.
- Update your device drivers. Outdated or corrupted device drivers can be an issue. Updating your device driver to the latest version can fix the audio and video sync error on Windows 10. Open Settings > click on Update & Security > click the Check for updates button. To install a Driver from mcirosoft, you can click on Start > Device manager > category with the device > select Update Drivers > click search automatically for update driver software option. Then play the video on Windows 10/11 to see if the sound delay disappears.


