


How to Record Screen with Audio: 5 Best Tools for PC, Mac & Online (Free & Paid)
 Mike Rule
Updated on
Need to record your screen with both internal system audio and external microphone input? Whether you're crafting a comprehensive software tutorial, documenting crucial details during a virtual meeting, capturing your epic gaming sessions for posterity or streaming, or producing engaging content for platforms like YouTube, selecting the right screen recorder with robust audio support is absolutely essential for clear and effective communication.
In this guide, we’ll delve into 5 of the top-rated screen recording tools currently available. These solutions are carefully chosen for their ability to capture high-quality video and synchronized audio seamlessly, and they encompass both powerful desktop applications designed for PC and Mac, as well as convenient online platforms that offer quick recording capabilities without the need for software installation.
Top 5 Screen Recorders to Record Screen with Audio
How We Pick These Screen Recorders with Audio
To help you find the best screen recorder with audio for your needs, we evaluated each tool based on these essential criteria:
- Audio Sources – We focused on tools that record both system sound and microphone.
- Video Quality – Only HD or 4K-capable recorders were included for visual clarity.
- Recording Flexibility – Support for full screen, window, or custom region recording.
- Output Formats – Must support MP4, MOV, AVI, or other common export formats.
- Ease of Use – A user-friendly interface is essential for quick, hassle-free recording.
- Cost & Limitations – We looked at price, time limits, and whether watermarks are added.
- Platform Compatibility – Tools available on Windows, macOS, or via browser were prioritized.
Based on the conditions above, we have selected 5 screen recording software with audio capabilities and have provided detailed tutorials on how to record your screen with audio using them.
1. Winxvideo AI
- Best for: YouTubers, e-learning creators, marketers, video editors
- Platforms: Windows & macOS
If you’re looking for a professional-grade screen recording tool with built-in AI enhancement, Winxvideo AI should be at the top of your list. It’s a powerful multimedia toolkit that combines screen and webcam recording, audio capture, and advanced AI-driven video enhancement. You can record both system audio and microphone simultaneously, tweak parameters like resolution, bitrate, and format, then enhance your final output, such as upscaling screen recording to 4K/8K, boosting 30FPS to 60FPS etc. Whether you're recording a tutorial, demo, or game walkthrough, it delivers pro-level output with minimal effort.
Key features for recording screen with audio:
- Record screen with both system audio and mic.
- Customize resolution (up to 4K), frame rate, and output format.
- AI-powered video enhancement: upscale video, reduce noise/blur, frame interpolation etc.
- Region or full-screen recording
 Free Download
 Free Download
Note: AI tools for Mac are currently unavailable, but they're coming soon. Stay tuned.
- High-quality screen and audio recording.
- AI-enhanced video output.
- GPU hardware accelerated.
- No complex settings before recording.
- May require significant system resources, especially for high-res or long recordings.
- Free recording limited to 5 minutes; longer recordings are watermarked.
How to Record Screen with Audio Using Winxvideo AI
Step 1. Launch Winxvideo AI after installation and select Recorder on the main interface.
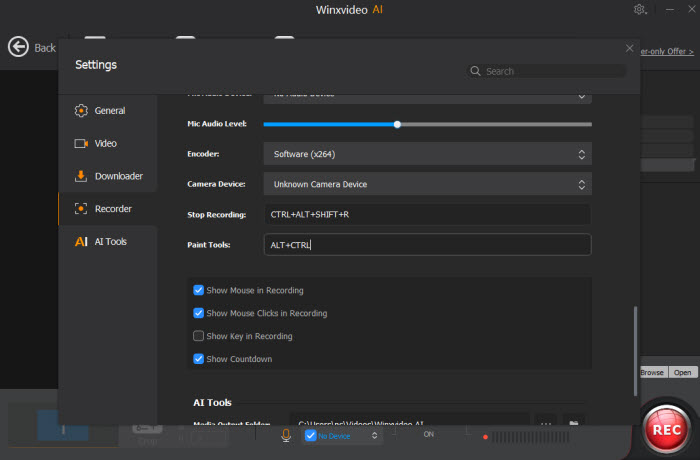
Note: tap the Setting icon on the top right corner of the UI and choose Recorder to adjust settings if needed. You're allowed to change recording quality, format, audio level/device, and know the shortcut for drawing (Ctrl+Alt+Shift+T).
Step 2. Select Screen mode at the top menu. Of course, you can also choose Screen & Webcam if you want to record both screen and webcam for a narration, tutorial and so on.
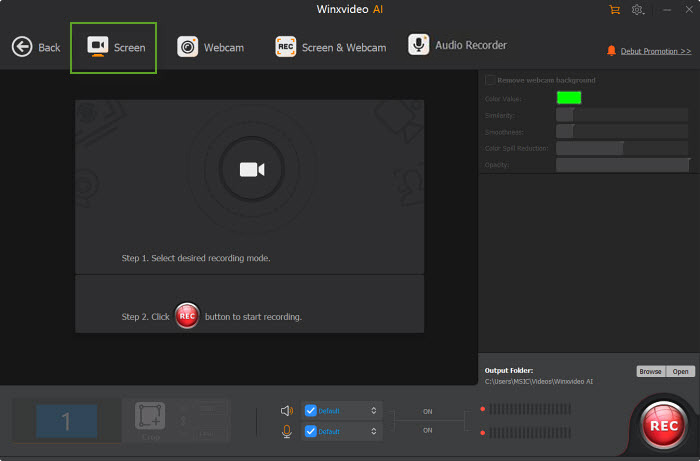
Step 3. Choose to record the entire screen or part of the screen at the lower-left corner.
Step 4. Enable audio device(s), including your microphone volume, system sound volume.
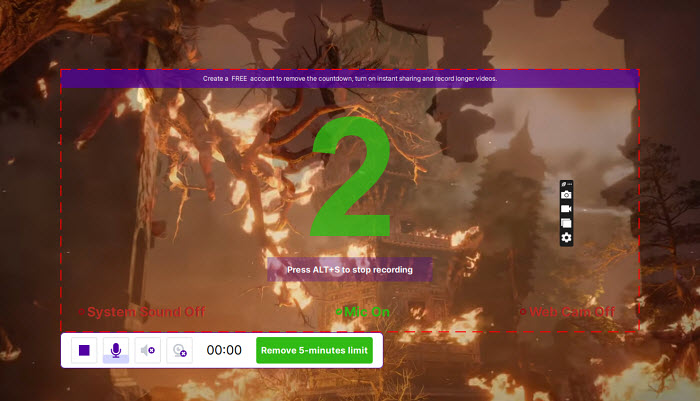
Step 5. Click on the REC button to start recording screen with audio voice. When everything is OK, click on the Stop button to end. Now the resulting file will be auto saved to your local drive on your computer.

Note: If you're not satisfied with the recording quality, or feel your recorded video isn't smooth enough, Winxvideo AI can upscale your recordings to stunning 4K or 8K resolution, effectively removing noise and artifacts for clearer footage. It can also increase the frame rate, for example from 30FPS to 60FPS, helping you capture fluid and smooth action in fast-paced scenes like gameplay videos.
2. ScreenRec
- Best for: Business professionals, educators, remote teams, quick screen sharing
- Platforms: Windows, Linux (macOS version coming soon)
ScreenRec is a lightweight screen recorder designed for fast, no-fuss video capture and instant sharing. It lets you record your screen with audio (both microphone and system sound) and generate a private sharing link right after recording—ideal for remote communication, quick tutorials, and feedback sharing. Unlike many tools that require complex setup, ScreenRec emphasizes speed, privacy, and ease of use. You don't even need to upload your video manually—it’s automatically uploaded to your free cloud account with 2GB of storage. And best of all, it’s completely free with no watermarks or time limits.
Key features for recording screen with audio:
- Record screen with system audio and microphone simultaneously.
- Instantly generate a private shareable link after recording.
- No watermarks, time limits, or ads—even in the free version.
- Lightweight with minimal CPU usage; runs in the background.
- Optional cloud backup with 2GB free storage.
- Free to use without watermarks or recording limits.
- Instant sharing with cloud links.
- Minimal setup—ideal for non-tech users.
- Secure and encrypted recordings.
- Lacks advanced video editing or enhancement features.
- No macOS version (yet).
- Requires sign-up for cloud upload and sharing.
How to Record Screen with Audio Using ScreenRec
Step 1. Download and install ScreenRec from the official website, then launch the app.
Step 2. Click on the ScreenRec icon in your system tray, then click the camera icon to begin.
Step 3. Drag to select the area of the screen you want to record (or choose full-screen).
Step 4. Enable audio sources by clicking the microphone and speaker icons. Make sure both are unmuted if you want to record voice and system audio.
Step 5. Hit the red "Record" button to start. When you’re finished, press the stop button or use the hotkey (Alt + S).
Step 6. After recording, your video is automatically saved and uploaded. A private shareable link is generated instantly for you to copy or send.
3. Xbox Game Bar
- Best for: Gamers, Windows 10/11 users, quick screen captures
- Platforms: Windows 10 & 11
Xbox Game Bar is a built-in screen recording utility for screen reocrding on Windows 10 and 11, mainly designed for gamers but also great for general screen and audio capture. It offers seamless performance with hotkey support, instant recording, and direct control over audio sources. While it doesn’t support full desktop or File Explorer recording, it's perfect for capturing app windows with both mic and system sound. Since it’s pre-installed, there’s no need to download any extra software—just press Win + G and start recording.
Key features for recording screen with audio:
- Built-in screen recorder on Windows—no installation needed.
- Capture screen with both system audio and microphone.
- Customizable hotkeys and audio mixer.
- FPS counter, GPU & CPU usage monitoring for gamers.
- Auto-saves recordings in MP4 format.
- Free and pre-installed on Windows.
- Simple and fast screen recording with audio.
- No watermark or time limitation.
- Can’t record full desktop or non-app windows (e.g., File Explorer).
- No editing tools or webcam recording.
- Windows-only.
How to Record Screen with Audio Using Xbox Game Bar
Step 1. Press Windows + G to launch Xbox Game Bar.
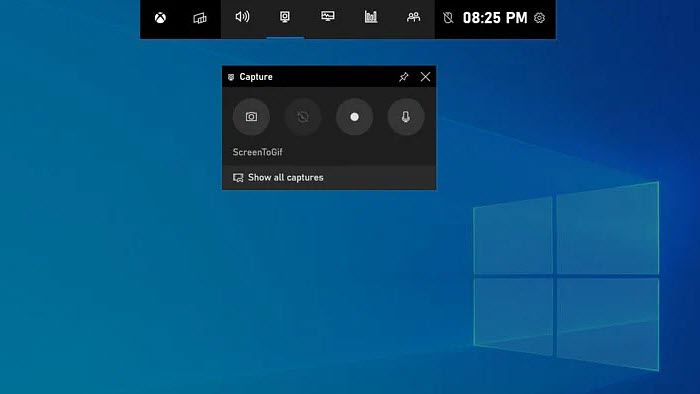
Step 2. In the capture widget, click the microphone icon to turn on mic recording.
Step 3. Make sure your target app is in focus, then click the record button or press Windows + Alt + R.
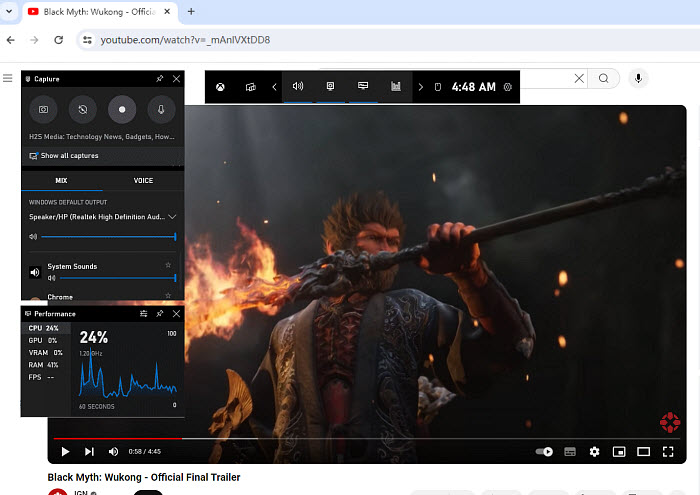
Step 4. To stop recording, press Windows + Alt + R again. The video will be saved in the "Videos > Captures" folder.
4. OBS Studio
- Best for: Advanced users, streamers, YouTubers, professional tutorials
- Platforms: Windows, macOS, Linux
OBS Studio is an open-source, professional-level software that supports powerful screen recording and live streaming. It offers unmatched control over your scenes, sources, and audio inputs—perfect for users who need to record screen with audio and advanced layouts (e.g., webcam overlay, multi-track recording). It’s fully free and community-supported with no limits, ads, or watermarks. However, the interface can be overwhelming for beginners.
Key features for recording screen with audio:
- Multi-source recording: screen, webcam, audio inputs.
- Supports both system audio and microphone input with volume mixing.
- Highly customizable scenes and output settings.
- Supports MP4, MKV, FLV, and more formats.
- No watermark, time limit, or usage restriction.
- Free, open-source, and fully customizable.
- Powerful recording and streaming capabilities.
- Multi-track audio and video support.
- Steep learning curve for beginners.
- No built-in video editing.
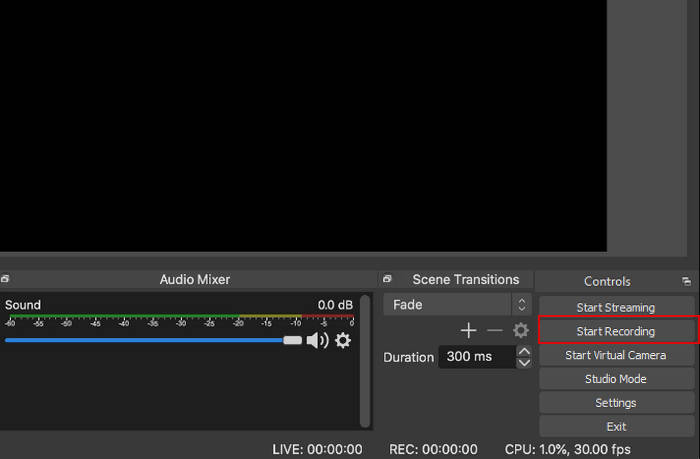
How to Record Screen with Audio Using OBS Studio
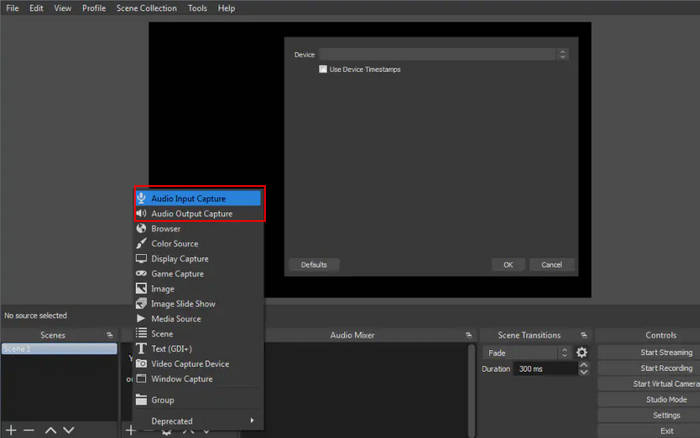
Step 1. Download and install OBS Studio, then launch the program.
Step 2. Click the + button under the “Sources” box and add “Display Capture” for screen, then click “Audio Input Capture” and “Audio Output Capture” for microphone and system sound.
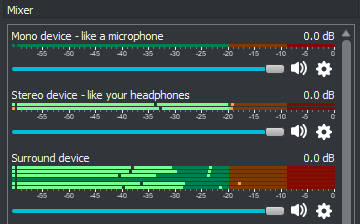
Step 3. Adjust audio levels in the mixer panel.
Step 4. Click “Settings” > “Output” to choose recording format (e.g., MP4) and quality.
Step 5. Click “Start Recording” to begin, and “Stop Recording” when done. Your file will be saved to the selected path.
5. Online Screen Recorder (Powered by ScreenPal)
- Best for: Chromebook users, quick online recordings, educators
- Platforms: Web-based (Windows, macOS, Chromebook)
Online Screen Recorder from ScreenPal offers a browser-based screen recorder that doesn’t require installing software—great for users who want to record screen with audio quickly from any device. You can capture your screen, webcam, or both, and include narration or system audio. The free version supports recordings up to 15 minutes with watermark; paid plans unlock more features including video editing, cloud backup, and captioning.
Key features for recording screen with audio:
- Web-based screen recording with optional launcher.
- Supports mic narration and system audio (on supported browsers).
- Record screen only, webcam only, or both.
- Save locally or upload to ScreenPal cloud.
- Basic free plan available; paid version removes watermark and adds editing.
- Record from any browser without installation.
- Beginner-friendly with clear UI.
- Supports webcam overlay and narration.
- Free version includes watermark and limits recordings to 15 minutes.
- System audio recording depends on browser support (best on Chrome).
How to Record Screen with Audio Using ScreenPal Online Recorder
Step 1. Visit Free Online Screen Recorder powered by ScreenPal and click “Start Recorder.”
Step 2. Choose what to share with scree-recorder.com: “Chrome Tab,” “Window,” or “Entire Screen.”
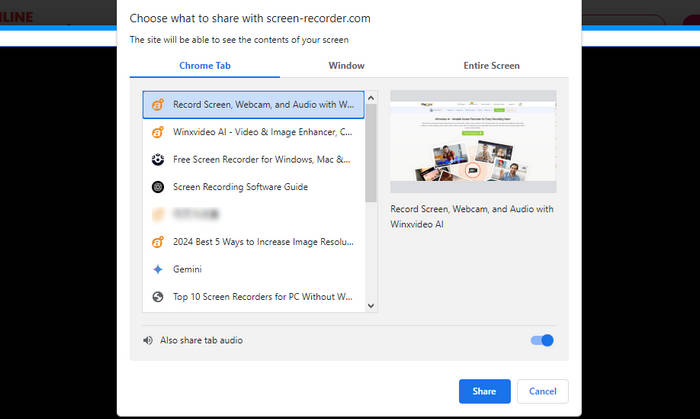
Step 3. Enable the "Also share tab audio" option. Then click "Share" for screen recording.
Step 4. Hit the red “Rec” button to start recording screen with audio.

Step 5. Once done, click “Done Recording” and choose whether to save locally or upload to ScreenPal’s cloud.
Conclusion: Which One Should You Choose?
Now that you know how to record screen with audio using five top tools, choose one based on your platform, purpose, and ease of use. Whether you're a beginner or advanced user, there’s a perfect tool for you.
| Tool | Audio Support | Platform | Free Version | Best For |
|---|---|---|---|---|
| Winxvideo AI | System + Mic | Windows | Free Trial | Pro users, upscaling |
| ScreenRec | System + Mic | Windows, Linux | ✔️ | Sharing, quick demos |
| Xbox Game Bar | System + Mic | Windows 10/11 | ✔️ | Basic, pre-installed |
| OBS Studio | System + Mic + More | Windows, macOS, Linux | ✔️ | Streamers, creators |
| Online Screen Recorder | System + Mic | Web (All OS) | ✔️ (15 mins) | Students, quick tasks |
After comparing features, pricing, and ease of use, it’s clear that no single tool fits all. Whether you're a content creator, teacher, gamer, or business professional, the best screen recorder with audio depends on your workflow. Below are quick takeaways to help you decide which tool to go for when you're figuring out how to record screen with audio for your specific purpose:
 FAQ about Screen Recording with Audio
Yes, most modern screen recorders such as Winxvideo AI, OBS Studio, and ScreenRec allow you to capture both system sound and microphone input simultaneously. Be sure to enable both audio sources in the settings before recording.
OBS Studio is one of the best free screen recorders with no watermark and no time limit. It's open-source and highly customizable, ideal for both beginners and professionals.
You can enhance your recorded video using tools like Winxvideo AI. It uses AI to upscale resolution, increase frame rates, and reduce noise or blur in post-production.
On iPhone, open Control Center and long-press the Screen Recording icon. Then, enable the microphone and tap "Start Recording." This captures both screen and mic audio. Internal audio may be limited by app restrictions.
This may happen due to permissions, disabled audio devices, or using a recorder that doesn’t support internal audio. Make sure your screen recorder has access to your mic/system audio and the correct audio source is selected.


