How to Reduce Video File Size in Davinci Resolve
We received a Davinci Resolve 17 video file size too big error. Here’s the case: the video file size in MP4 (YouTube)format has gone up 10 times before updating to Davinci Resolve 17.4. The original MP4 video is 400MB, now the file size is 5GB in Davinci Resolve. What happened to the workflow? Nothing has changed in delivery.
Too large export video file size always occurs in Davinci Resolve 17/16. It’s also a common issue with video editor programs, such as Adobe Premiere Pro, iMovie, and Final Cut Pro. There might be something wrong with the used presets. Pick custom and set the quality and size as you prefer. Here’s a detailed guide on how to compress video file size with Davinci Resolve export settings.
Compress Video from GB to MB with Winxvideo AI (No Quality Loss/Watermark)
- Compress video size up to 90% off (from 1GB to 10MB) thanks to leading compression algorithms.
- High qualit reserved thanks to its well built-in HQ engine and de-interlacing engine.
- Several options to reduce video size, such as dragging file size slider, cutting, lowering down quality, resolution, bit rate, etc.
- Support hardware acceleration, low CPU usage, no lagging, no crashes. AI-powered.
Table of Content
- Part 1. How to Compress Video in DaVinci Resolve
- Step 1. Import your video file
- Step 2. Cut the video to reduce video size in DaVinci Resolve
- Step 3. Customize the export settings to reduce video size
- Step 4. Start rendering the compressed video in Davinci Resolve
- Part 2. Video Tutorial - How to Reduce Video Size in DaVinci Resolve
Part 1. How to Compress Video File Size with Davinci Resolve
Step 1. Import Your Video File
Open Davinci Resolve on your computer. The latest version is DaVinci Resolve 18.0.1 with general performance and stability improvements. Select New Project from the Project Manager and create a new project. Name your new project in the File Name field, then open Project Settings in the lower right of the window to get more settings options.

Step 2. Cut the Video to Reduce Video Size in DaVinci Resolve
After importing the video, click the Cut tab at the bottom control pane. Your video should appear in the Preview window. Drag the sliders to cut the video as you wish to shorten the video length and compress the video without losing quality in DaVinci Resolve.
DaVinci Resolve comes with the Trim Edit Mode, allowing you to cut the video to shrink the video size easily by dragging the video slider bar. The Blade Edit Mode can also be used to split the clip for a smaller video size in DaVinci Resolve.
Step 3. Customize the Export Settings to Reduce Video Size
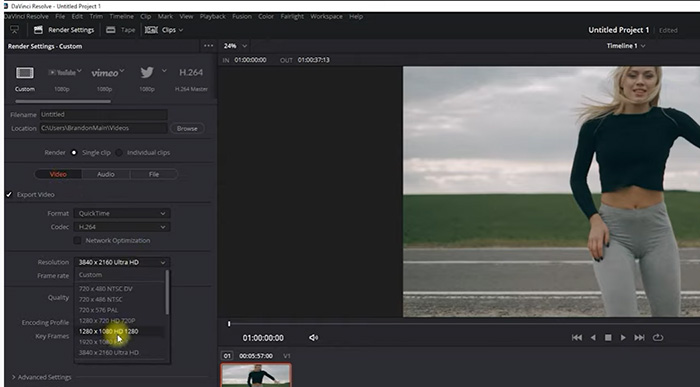
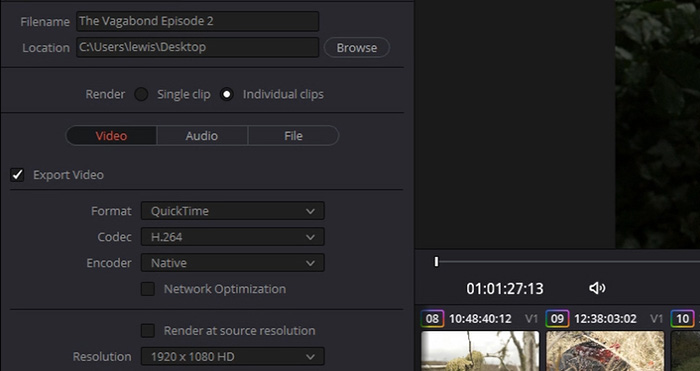
Select the Single Clip and check the Export Video box. Note that if the Export Video box is unchecked, it only exports audio. Click the Browse button near the location section and pick a folder where you want to save the compressed video file.
Click the Format dropdown menu to display the video format list. Select MP4 format and choose H.264 under the codec menu. We recommend MP4 H.264 for its high compression efficiency and great compatibility. Whether you reduce video size in Davinci Resolve for uploading to YouTube, Instagram, Facebook, sharing, or for other purposes, you won’t go wrong with MP4 H.264.

Click the Resolution drop-down menu and lower the video resolution to shrink the video size in Davinci Resolve. You can compress video to 1080p, or 720p for smaller video size. Also, set the Frame Rate to match your project settings. Select Custom near the Resolution section and enter your customized orientation in pixels. In this way, you are free to export different video resolution, be it square or vertical. It’s helpful when you want to compress video size in Davinci Resolve for Instagram which requires a square video size.
FYI: How to change frame rate in DaVinci Resolve >>
Select Export quality on Automatic. Lower down the video quality you can accept to make the video size smaller. Select Restrict to and lower down the video bitrate. Lower bitrate means smaller video size but also worse quality. It’s a trade-off between video size and quality. Other settings can keep by default.
Tips: Export Presets in DaVinci Resolve
Davinci Resolve offers several export presets designed for YouTube, Vimeo, Twitter, Premiere Pro, and other software. These presets are useful for those who want to compress video size in Davinci Resolve for YouTube, Premiere Pro, and other platforms and programs. Check the box Upload directly to YouTube and your compressed video file will upload to YouTube from DaVinci Resolve straightforwardly.
- YouTube in 720p, 1080p, or 4K resolution.
- Vimeo in 720p, 1080p, or 4K resolution.
- Twitter preset in 720p and 1080p.
- Final Cut Pro, Premiere Pro, Avid, and Pro Tools.
Other presets like IMF and ProRes (for Mac) export video in high-quality and large file size. If you want a smaller video file size, avoid such presets in Davinci Resolve.
Step 4. Start Rendering your Compressed Video in Davinci Resolve
After all is down, lick add to Render Queue. The project will display on the list in the workspace on the right of the window. Click on Start Render to begin exporting the compressed video file in Davinci Resolve.
Part 3. Video Tutorial: How to Reduce Video Size in Davinci Resolve
How do I lower the video quality for a smaller file size in Davinci Resolve? You can find the detailed guide in the video below. The uploader selected different quality options (Least, Low, Medium, and High) and showed the file size/image quality results.
- From 00:20, select video resolution (optional)
- From 00:27, change the automatic quality
- From 00:59, lower video quality for smaller size
Also read: How to Export Video in Smaller Size in Premiere Pro


