How to Remove Background Noise in DaVinci Resolve
 Mike Rule
Updated on
Background noise can significantly disrupt the quality of audio in videos. It distracts viewers and diminishes the professionalism of content. While professionals often rely on high-end equipment and soundproof environments to minimize noise, amateur creators working with basic gear frequently face issues like traffic sounds, hums, or wind noise.
Fortunately, DaVinci Resolve, a powerful post-production tool, offers advanced noise reduction features for both video and audio. However, mastering these features can be challenging. This guide explores what background noise is, how to effectively remove it using DaVinci Resolve, its limitations, and introduces a much easier alternative solution: Winxvideo AI.
What is Background Noise?
Background noise refers to any unwanted or extraneous sounds that interfere with the clarity and quality of recorded audio. These noises, which can originate from a variety of sources, often compete with or overpower the primary audio, making it difficult for the audience to focus on the intended message.
Common types of background noise include:
- Environmental Noise: This category encompasses sounds from the surrounding environment, such as the rustling of wind, the patter of rain, honking cars in traffic, or faint chatter from people nearby. These noises are often unavoidable during outdoor recordings and can significantly degrade audio quality if not addressed. Also learn: how to remove wind noise from video >>
- Human Noise: Sounds generated by human activity, such as the clicking of a keyboard, the shuffle of footsteps, or the accidental bumping of a microphone, fall into this category. These noises are common in home or office recording setups and can be especially disruptive in intimate or professional content like podcasts, interviews, or tutorials.
- Electrical Noise: Background hums or whirring sounds from electronic devices, such as air conditioning units, refrigerators, or poorly shielded microphones, are typical examples. These noises are subtle but persistent, often creating a low-frequency buzz that can be challenging to remove in post-production.
For content creators, particularly those without access to high-end equipment or soundproof environments, background noise presents a significant challenge. Poor audio quality can distract viewers, undermine the professionalism of the content, and result in a frustrating experience for the audience. As a result, addressing background noise effectively is critical for maintaining audience engagement and ensuring the success of creative projects.
How to Remove Background Noise Effectively?
Removing background noise using DaVinci Resolve can be both rewarding and frustrating. While its advanced tools and professional features enable precise editing, the steep learning curve often overwhelms beginners. Users frequently encounter inconsistent results, such as audio distortion, and the noise reduction and export processes can feel unnecessarily slow.
For creators looking for a simpler, more reliable solution, Winxvideo AI is an excellent AI noise remover that combines ease of use with advanced functionality:
- Removes background noise from video and audio in just one click.
- Automatically detects and separates noise from essential sounds with precision based on AI.
- Accurately cleans up noise from each track in multi-track recordings, ensuring that vocals, instruments, and sound effects retain their original clarity and purity.
- Enables users to remove noise from multiple files at once, ensuring efficiency for large workloads.
- Maintains the integrity of audio and video while delivering professional-grade noise reduction.
Now let’s check the detailed steps to remove background noise using Winxvideo AI.
Step 1. Free download the AI background noise remover, and follow the wizards to install and open it.
 Free Download
 Free Download
Note: AI tools for Mac are currently unavailable, but they're coming soon. Stay tuned.
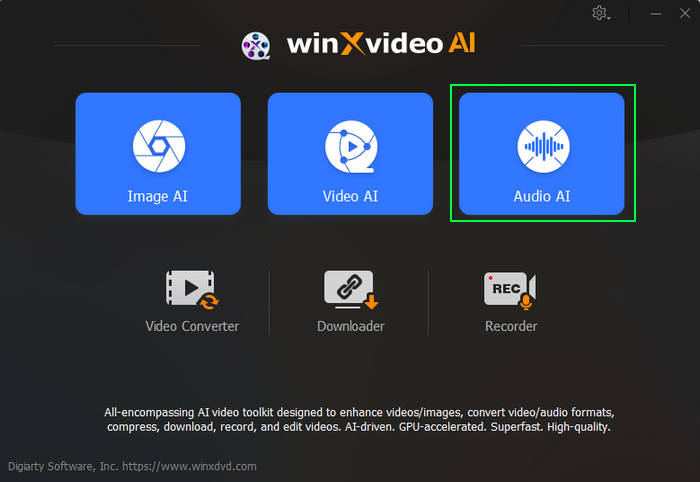
Step 2. Click the "Audio AI" button on the main interface.
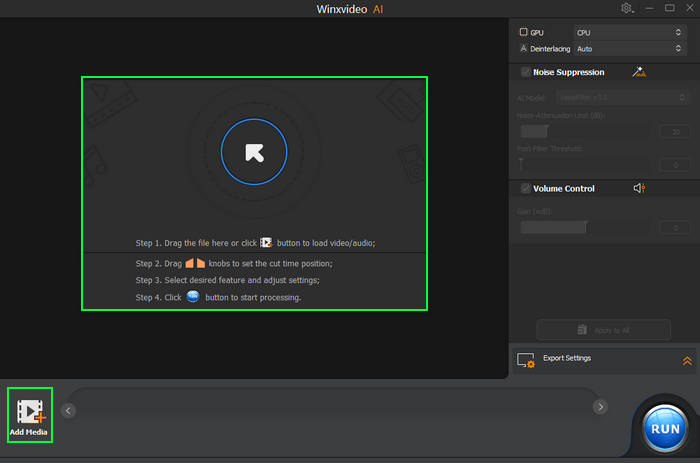
Step 3. Directly drag and drop one or more audio or video files that you want to remove the background noise. Or you can also click the "Add Media" button to browse and select the audio or video files to import.
Step 4. Set AI noise suppression model and parameters. Make sure the Noise Suppression is ticked on, choose the preferred AI model, and adjust the parameters accordingly.
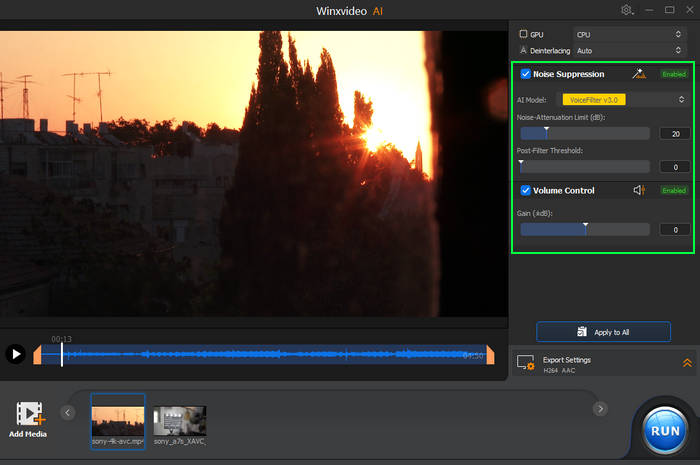
- AI Models: There are 2 AI models enhance speech clarity by filtering background noise in real time, handling challenges like construction sounds and fan hum. Ideal for podcasts, interviews, or vlogs, they offer tailored noise suppression for various scenarios.
- Noise Attenuation Limit (dB): Defines the maximum noise reduction without compromising audio quality. Recommended settings: 6-12 dB for light noise, 18-24 dB for moderate noise.
- Post-Filter Threshold: Fine-tunes residual noise removal, balancing clarity and natural sound. Lower thresholds (0.01-0.02) suit quiet environments, while higher ones (0.03-0.05) handle moderate noise.
- Volume Control: Adjusts loudness to maintain clarity, compensating for volume loss after noise reduction.
Step 4. Click on the "Play" button to preview your audio that removed wind noise in real-time. For a comparison, you can also uncheck the box of "Noise Suppression" and tap on the "Play" to listen to the original audio.
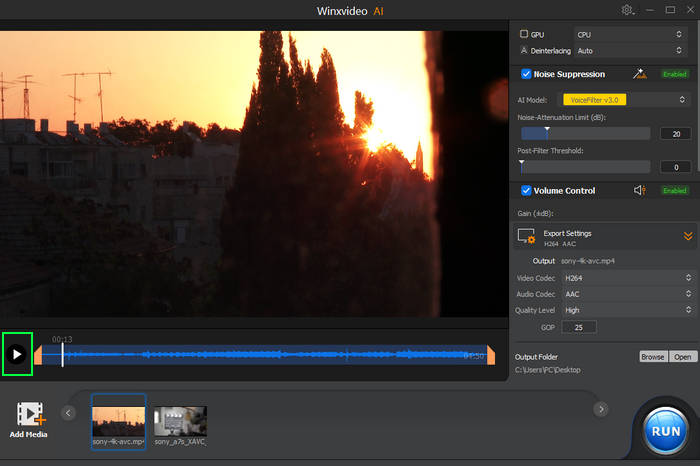
Step 6. Click “Browse” to choose output format for your file. Then tap "RUN" button at the bottom to start removing background noise.
Hot search: All ways to remove background noise from video
How to Remove Background Noise in DaVinci Resolve
For Background noise removal in audio, Davinci Resolve has several options, like Noise Gate, Equalization (EQ), Auto Speech/Manual Mode, Effects Library and third-party noise removal plugins. Though complex, Davinci Resolve does give you a more professional audio noise removal and clearer sound quality.
Follow the step-by-step guide below on how to remove background noise with DaVinci Resolve 18.
Using Noise Reduction in Fairlight
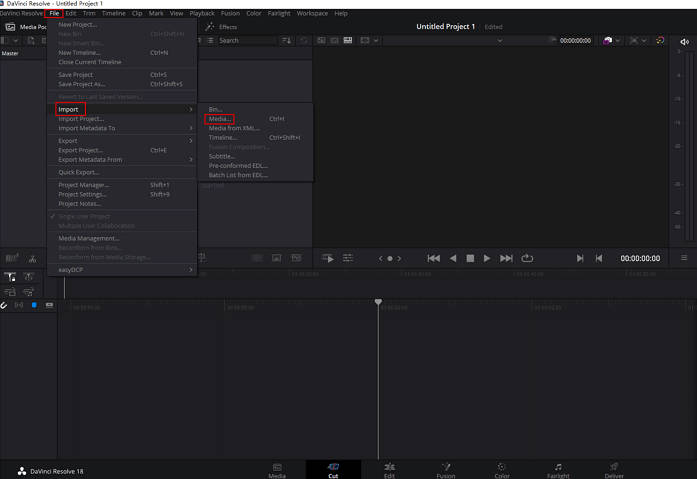
Step 1. Add audio to DaVinci Resolve Studio.
After installing the application on your computer, launch it and upload the file you want to remove background noise from. Right-click on the audio clip and choose Create New Timeline Using Selected Clips. You’ll see the audio appear on your video Timeline below.
Step 2. Open the Fairlight audio controls
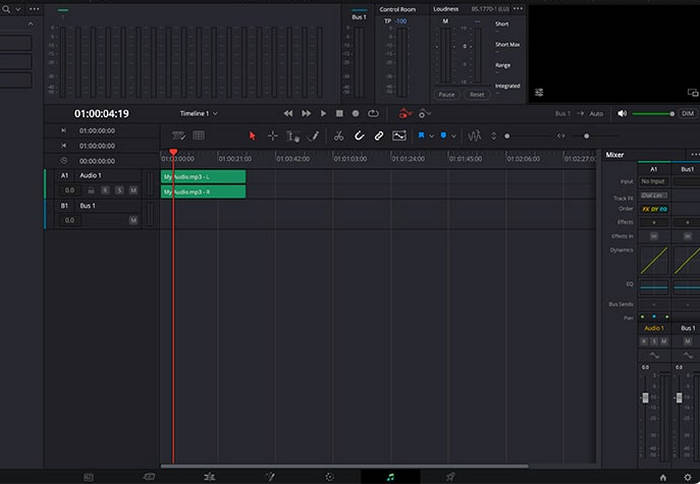
To access Fairlight audio controls in Resolve Studio, click the music note icon in the toolbar to open the Fairlight panel, the hub for audio editing. Explore features like the Toolbox and Audio FX on the left, audio meters and timeline in the center, and the Mixer Panel on the right for adjustments like input and EQ.
Step 3. Apply the noise reduction effect
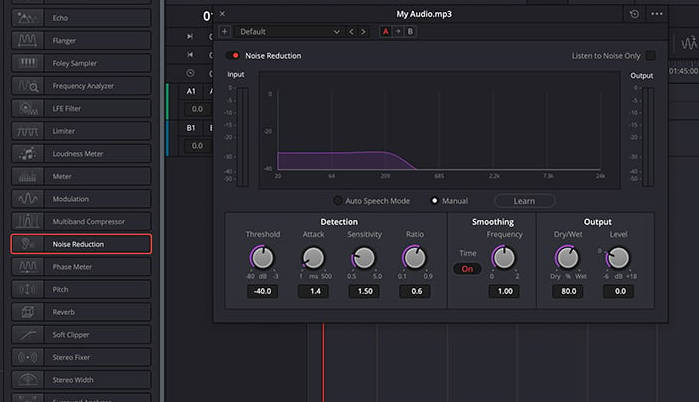
To reduce audio noise in Resolve, open the Audio FX dropdown in the upper left of the Fairlight panel. Locate Noise Reduction in the Fairlight FX sidebar, then drag it onto your audio track in the timeline. The Noise Reduction panel will open, allowing you to fine-tune the effect.
Using Noise Gate
Step 1. Navigate to the "Fairlight" page located at the bottom of the interface. And open the Effects Library.
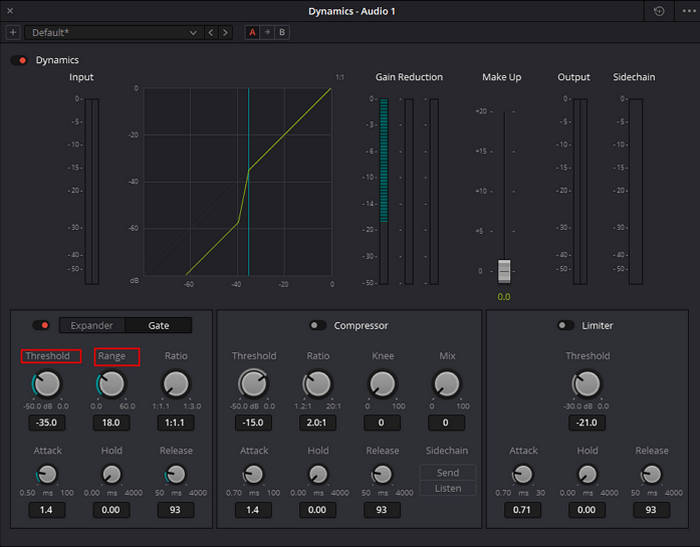
Step 2. Add a Noise Gate to the audio track and set the Threshold to suppress background noise below a specific volume level.
Step 3. Fine-tune the Attack and Release times to ensure natural sound transitions.
Using Auto Speech/Manual Mode
Use the Dialogue Processor or third-party plugins with auto-speech recognition to emphasize spoken words. For manual adjustments, use the EQ Panel to isolate and boost frequencies typically associated with human speech (around 85-255 Hz for male voices and 165-255 Hz for female voices). For low-frequency hums, reduce levels around 50-120 Hz. For high-frequency hiss, cut frequencies above 8 kHz.
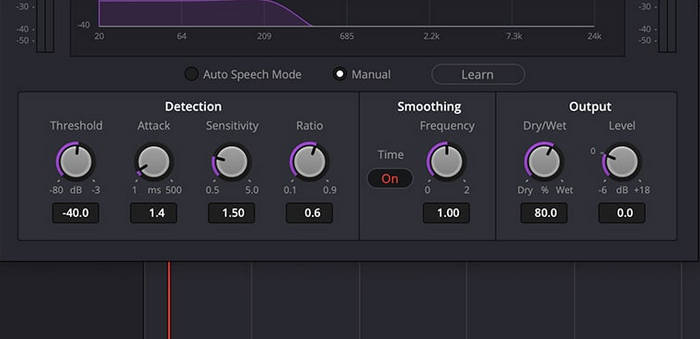
Here are the key controls for noise reduction:
- Threshold: Sets the baseline level to trigger noise reduction, determining what is considered noise.
- Attack: Adjusts how quickly reduction is applied when noise is detected.
- Sensitivity: Controls how aggressively noise is removed; higher values remove more noise but risk affecting desired audio.
- Ratio: Determines the strength of reduction once the Threshold is reached; lower ratios apply more subtle effects.
- Smoothing: Spreads reduction over time for a natural, consistent sound.
- Output: Balances the overall volume to prevent loss after noise is removed.
Other Options in Effect Library
The Noise Reduction panel offers several controls to explore. Since there's no one-size-fits-all approach to noise reduction, the process often involves trial and error. Experiment with different settings and combinations until you achieve the desired results.
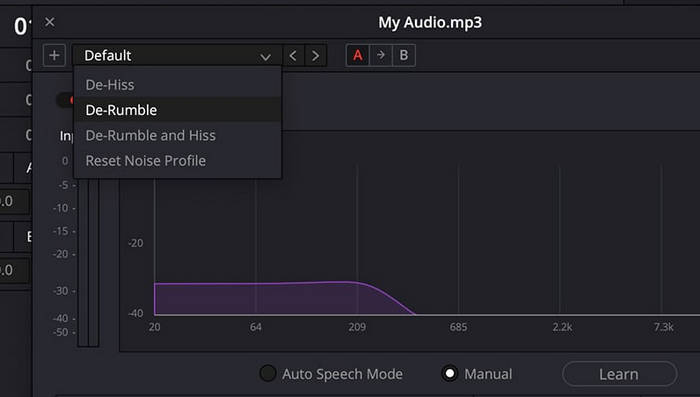
- De-Hummer: Eliminates electrical hums caused by power lines, faulty cables, or electronic interference. It targets low frequencies (e.g., 50 Hz or 60 Hz) and their harmonics, removing hums while preserving the main audio.
- De-Esser: Reduces sharp sibilant sounds like “s,” “sh,” or “ch,” which can be piercing in speech or vocals. It softens these frequencies without compromising overall vocal quality for smoother audio.
- De-Rumble: Filters out low-frequency vibrations or rumbles from mic handling, footsteps, or engines. It removes these noises while maintaining the clarity and richness of the original audio.
Using External Noise Reduction Plugins in Davinci Resolve
While DaVinci Resolve offers robust built-in tools for noise reduction, sometimes achieving the best results requires additional precision or specialized features. For more complex projects or to address persistent audio issues, external tools can complement Resolve's capabilities and deliver professional-grade outcomes. Consider the following options:
- ToneLib Noise Reducer: For precise and targeted noise removal.
- CrumplePop Audio Restoration: Ideal for recovering and enhancing degraded audio.
- iZotope RX Advanced: A powerful solution for advanced audio repair and denoising.
- Cedar Audio: Known for high-end audio restoration and exceptional clarity.
Conclusion
Now you know how to reduce audio noise in DaVinci Resolve Studio. This one-click tool enhances audio quality, but for better results, customize settings in the Noise Reduction panel. Plan edits, target problem areas, and adjust parameters to achieve clear, professional audio.
For a more straightforward alternative, Winxvideo AI offers precise noise removal powered by AI technology. It delivers high-quality results with minimal effort, bypassing the complexities of DaVinci Resolve. Its intuitive interface and advanced features make it the perfect choice for creators seeking efficiency and exceptional audio quality.
 Free Download
 Free Download
Note: AI tools for Mac are currently unavailable, but they're coming soon. Stay tuned.


