How to Remove Background Noise from Video on iPhone [4 Methods]
 Mike Rule
Updated on
Summary: Want iPhone videos with cleaner background audio? This guide shows how to remove background noise using apps like iMovie, Winxvideo AI, CapCut, and Canva—plus tips for noise-free recording.
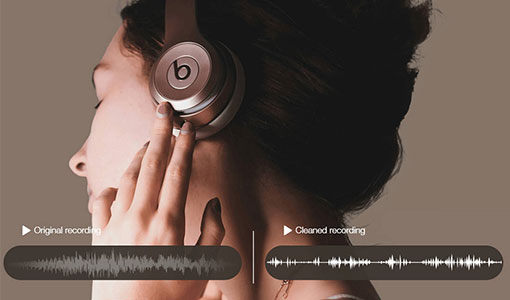
Recording videos on your iPhone is quick and convenient, but unwanted background noise can often diminish their quality. Whether it’s wind, chatter, or traffic sounds, these distractions can make your videos less enjoyable to watch and listen to. Luckily, you don't need professional equipment to fix this issue. There are several tools and apps that allow you to reduce or remove background noise from video on iPhone, helping you create clearer and more polished videos with minimal effort. In this article, we'll explore 4 methods to clean up your video's audio as well as tips to prevent background noise during recording.
Method 1: Remove Background Noise from Video on iPhone Using iMovie
If you're looking to remove background noise from your video on an iPhone, iMovie provides an efficient method. It allows you to detach the audio from the video, giving you the option to delete or replace it.
Step 1: Launch iMovie on your iPhone.
Open the iMovie app on your device.
Step 2: Create a New Project.
Tap on Create Project, then select Movie from the options. Then, choose the video you want to edit from your gallery.
Step 3: Detach the audio from the video.
Tap on the video clip in the timeline to select it. Tap the Actions button at the bottom and choose Detach to separate the audio from the video. This will create a separate audio clip below your video clip in the timeline.
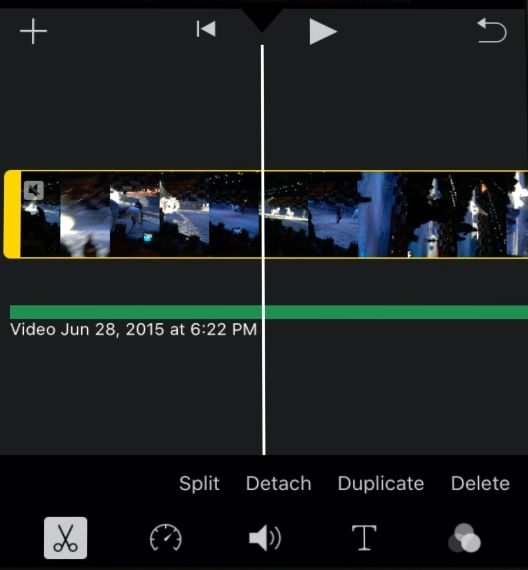
Step 4: Delete the audio clip.
Tap the separated audio clip to select it and then tap and hold the audio clip and choose Delete to remove the background noise.
Step 5: Save your edited video.
After removing the unwanted audio, tap the Share button in the top-right corner and select Save Video to export the edited video back to your gallery.
This approach is quick and straightforward, offering a simple solution for reducing background noise by eliminating the audio entirely.
Also learn: all ways to remove background from videos
Method 2: Remove Background Noise from iPhone Video Using Winxvideo AI
If you don't mind removing background noise from iPhone videos on your computer, you can try Winxvideo AI. This desktop tool offers a powerful solution to remove background noise from videos. This AI-powered toolkit provides a wide range of features, including noise removal, video and image enhancement, stabilization, frame rate boosting, video conversion, compression, and editing.
Specifically for noise reduction, it offers two AI models—VoiceFilter v3.0 and VoiceFilter v3.1—giving users precise control over noise attenuation and filtering thresholds. With real-time preview, you can fine-tune the audio to perfection.
Here's how to use Winxvideo AI to remove background noise from your iPhone videos.
Step 1: Download and launch Winxvideo AI.
Install the tool on your desktop and open it.
 Free Download
  Free Download
Winxvideo AI is for PC, while Macxvideo AI (from our MacXDVD brand) is for macOS.
On the main interface, click the Audio AI icon to enter the Audio AI workspace.
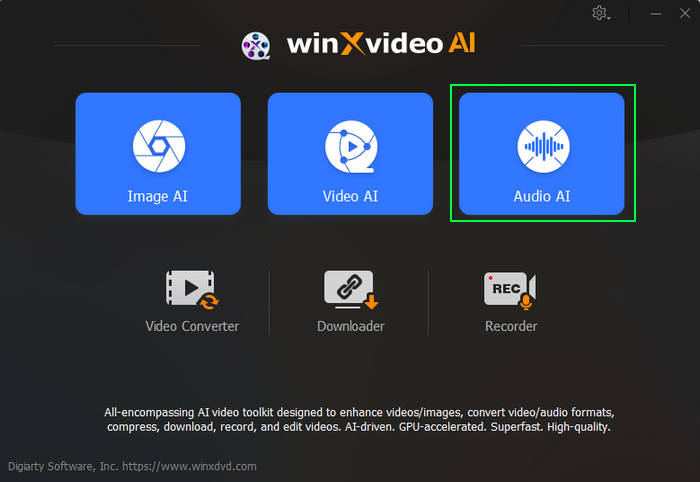
Step 2: Import your video.
Click the Add Media button to load the iPhone video with background noise.
Step 3: Enable Noise Suppression and preview.
Check the Noise Suppression option and select your preferred AI model (VoiceFilter v3.0 or v3.1). And then preview to see if the background noise has been removed as you desire. If not, you can try another AI model or adjusting the following settings:
- Noise Attenuation Limit (dB): Set the level of noise suppression. For light noise, use 6–12 dB, and for moderate noise, use 18–24 dB.
- Post-Filter Threshold: Fine-tune additional noise removal after the main suppression. A threshold of 0.01–0.02 works for quieter environments, while 0.03–0.05 is better for background hums or chatter.
- Volume Control: Increase or adjust the volume to compensate for any drop caused by noise reduction.
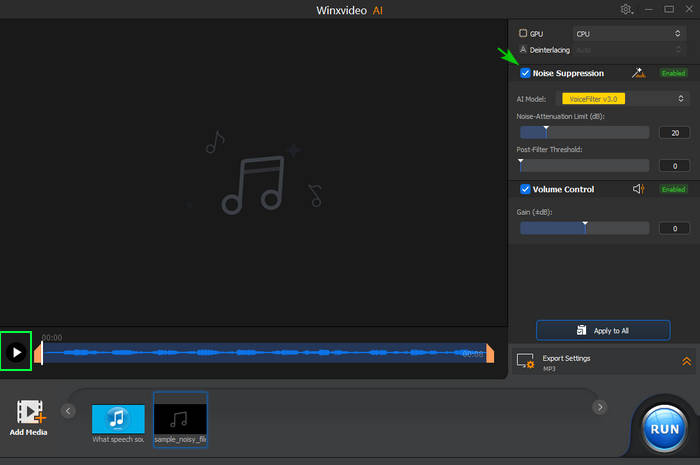
Step 4: Export your video.
When you're satisfied with the results, specify the output folder and click RUN to save your file with enhanced audio.
Latest Feature: Winxvideo AI now supports vocal removal and instrumental separation directly from videos or audio files. Click here to remove vocals from YouTube now >>
Method 3: Remove Background Noise from Video on iPhone Using CapCut
CapCut is a powerful, free video editing app available for both Android and iOS that includes a built-in noise reduction feature. It allows you to easily reduce background noise in your videos, giving your audio a cleaner, more professional sound. Here's how you can use CapCut to remove background noise from video on iPhone.
Step 1: Download and install CapCut.
Head to the Apple App Store and download the CapCut app to your iOS device.
Step 2: Open CapCut and set up permissions.
Open the app, log into your account, and grant any necessary permissions for the app to function properly on your device.
Step 3: Import your video.
Tap the New Project button, select the video you want to edit from your gallery, and tap Add to import it into the app.
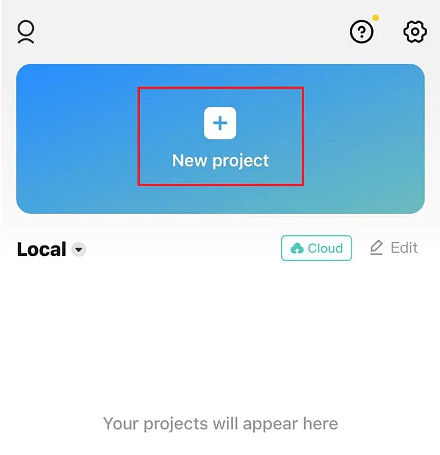
Step 4: Access the Noise Reduction feature.
Once inside the Editor, tap on the video clip in the timeline to select it. Scroll the menu bar at the bottom of the screen and tap on the Reduce Noise option.
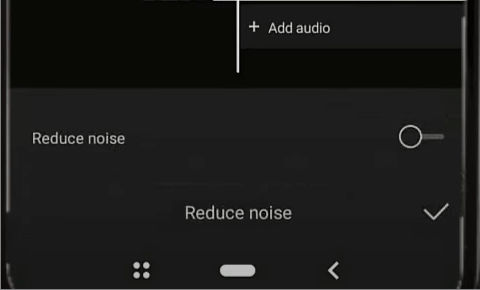
Step 5: Apply the Noise Reduction.
Enable the Noise Reduction feature, and listen to the changes in the audio. The app will automatically reduce background noise, making your voice or primary audio clearer.
Step 6: Export your edited video.
After applying the noise reduction, tap the Export button in the top-right corner of the screen to save your video with the reduced background noise.
Method 4: Remove Background Noise from Video on iPhone Using Canva
Another effective way to remove background noise from your video is by using Canva's Enhance Voice feature. This online tool leverages AI technology to automatically reduce background noise, allowing your voice to come through clearly for a more professional and engaging video. Currently, this feature works only for videos that have embedded audio, but Canva is working on expanding this functionality to include audio tracks in future updates.
Step 1: Launch Canva in your browser and open the editor.
Upload your video by clicking the Upload button and selecting your video file from your device. Once uploaded, add the video to your design.
Step 2: Select the video in the editor.
Once your video is added, tap on it to select it. A toolbar will appear at the bottom of the screen. From the toolbar, choose the Audio option.

Step 3: Toggle on Enhance Voice.
In the audio settings, toggle the Enhance Voice feature on. This will automatically reduce background noise and make your voice clearer in the video.
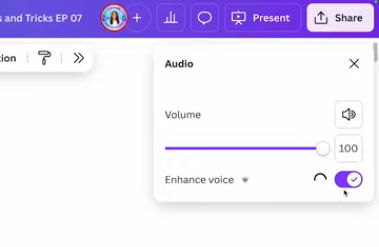
Step 4: Save or share your video.
Once you're happy with the enhanced audio, you can download or share the video directly from Canva.
How to Reduce Background Noise When Recording Video on iPhone
Preventing background noise during recording is often more effective than removing it afterward. By minimizing unwanted sounds during filming, you can save time and effort in post-production and achieve cleaner audio from the start. Below are practical tips to reduce background noise while recording videos on your iPhone:
Choose a Quiet Location
Always opt for a quiet and controlled environment when recording. Avoid places with heavy traffic, machinery, or large crowds. Indoors, shut windows and doors to block outside noise, and turn off devices like fans or air conditioners that could create a hum in the background.
Use an External Microphone
Built-in iPhone microphones are adequate for general use but tend to pick up a lot of ambient noise. Consider investing in an external microphone, such as a shotgun mic or a lavalier mic, to focus on capturing your voice or primary sound source with greater clarity.
Enable Wind Noise Reduction
For outdoor shoots, wind noise can be a major issue. Use a windscreen for your microphone or enable your microphone's Wind Noise Reduction feature (available on some external mics) to reduce interference.
Record in Short Takes
If unavoidable background noise occurs intermittently, plan to record in shorter takes. This approach makes it easier to manage audio issues in specific sections rather than throughout an extended recording.
Use an App with Noise Reduction Features
Some third-party video recording apps for iPhone offer real-time noise reduction features. These apps can process and minimize background noise during the recording itself, saving you from extensive editing later.
Position the Microphone Strategically
If you're using an external mic, position it as close as possible to the sound source while avoiding direct contact with the person or object being recorded. This setup minimizes the capture of ambient sounds and focuses on the primary audio.
Perform a Test Recording
Before beginning your shoot, do a quick test recording to identify any noise issues and make adjustments as needed. This step helps you optimize your setup and avoid surprises during filming.
By taking these measures, you can significantly reduce background noise while recording videos on your iPhone, ensuring higher-quality audio for your projects.
 FAQs
FAQs
Yes, you can use built-in tools like iMovie, or third-party apps such as CapCut, LumaFusion, or Adobe Premiere Rush to reduce or remove background noise.
iMovie has a "Noise Reduction" feature that lets you manually reduce background noise. It doesn’t remove it completely but can significantly reduce unwanted sounds.
It can, if overdone. Noise reduction sometimes dulls the voice or removes subtle sounds, so it's best to preview the changes and adjust the intensity as needed.


