


How to Fix Grainy Videos in 6 Ways [2026 Update]
 Mike Rule
Updated on
"I was recording in extremely low light settings with not a whole lot of light source , and the playback on the camera itself looked fine the whole time however upon loading these videos up on my pc they have an overly grainy blue fuzz, is this fixable? or savable to the point that its an acceptable amount of grain? " - from New-Advance-4805 on Reddit
Have you ever captured a special moment on video, only to be disappointed by the grainy, speckled mess that appears on playback? You're not alone. Maybe you filmed a concert in low-light, resulting in a video filled with flickering pixels. Perhaps you unearthed a precious home video from years ago, only to find it riddled with grainy textures. Or maybe you downloaded a cool video online, but the compression left it looking rough around the edges.
These grainy videos can leave viewers feeling disappointed. But don't despair! Understanding what causes them is the first step toward fixing grainy video. Let’s take a closer look.

Why Does My Video Look Grainy?
In most cases, the rough, speckled look you see in your video is known as grain or digital noise. It occurs when an image processor or camera sensor fails to capture a clean video signal—especially during low-light or high-contrast shots. What you will find yourself with is randon specks or color dots rather than smooth gradients and clear motion details, making the video look soft, pixelated, or flickery.
The most common cause of grainy video is low light combined with high ISO or gain settings. When shooting in dim environments—like indoors at night or during dusk—your camera amplifies its sensor signal to brighten the footage. Unfortunately, this amplification also increases electronic noise, which shows up as visible grain. Cameras with smaller sensors (such as smartphones or compact camcorders) are even more prone to this issue because they capture less light per pixel.

Another major factor is video compression and low bitrate. When a video is compressed too heavily to reduce file size or improve streaming speed, much of the visual detail is lost. This makes for blocky textures, color banding, and exaggerated noise—most noticeable in dark areas or smooth gradients. Over-editing during post-production can also make things worse: lifting shadows or adding too much sharpness often increases noise instead of removing it.
Finally, older or analog footage—such as recordings from VHS, MiniDV, or early digital cameras—naturally contains more visual noise. When such footage is digitized or upscaled to HD or 4K, that analog grain becomes even more noticeable. Prolonged camera operation or heat buildup can also introduce thermal noise from the sensor itself.
Understanding these causes helps you address them effectively—by improving lighting, ISO and exposure control, and avoiding excessive compression. And if you’re trying to fix noisy video or restore your old footage, follow the guides below.
Part 2. How to Fix Grainy Videos? Try the 4 Ways
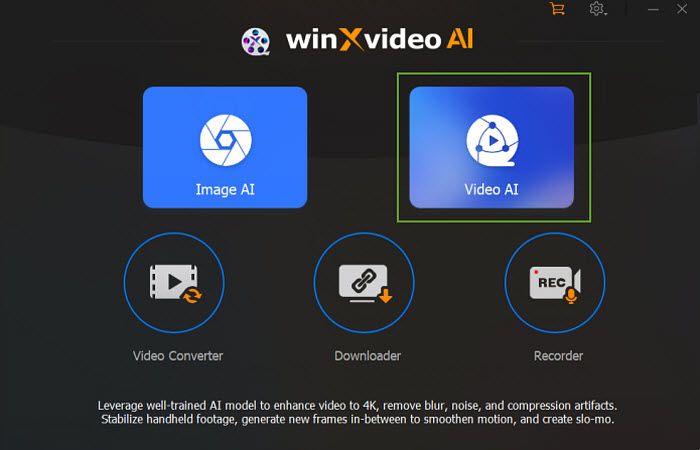
Way 1. Fix Grainy Video with AI
Winxvideo AI provides a one-click solution to remove grain from videos. Here is an AI-powered super resolution feature that can improve the overall quality of a grainy video and clear up the grain. It also helps to fix noisy, pixelated, blurry, low-quality, and other videos with compression artifacts. You can use it to effectively fix low-light videos, old videos, highly-compressed videos, handheld footage, and other videos that are grainy.
 Free Download
 Free Download
Winxvideo AI is for PC, while Macxvideo AI (from our MacXDVD brand) is for macOS.
Step 1. Load your grainy videos. Download and install Winxvideo AI on your computer. Launch the software and click on "Video AI." Drag and drop your grainy videos directly into the Winxvideo AI interface. You can add multiple videos at once for efficient grain reduction in several clips simultaneously.
Step 2. Choose an upscaling type. Look for the left panel where various options are displayed. Locate the "Super Resolution" box and enable it. In the "Type" section, make a choice based on your video content:
- Reality: Ideal for old family videos, low-quality movies, or imperfect recordings that are grainy.
- Anime: Perfect for fixing grainy animated videos.
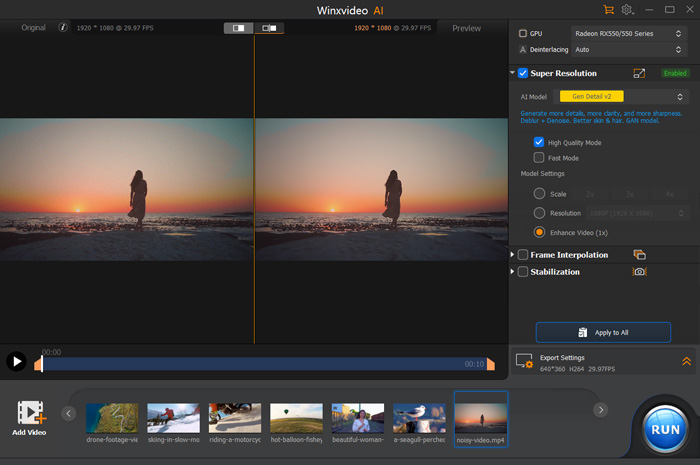
Step 3. Select an upscaling level. Under "Model Settings," you have the option to upscale your video resolution. This process will removes video grain/noise, remove pixilation, unblur videos, and clear up other imperfections during processing. Choose from upscaling your video by 2x, 3x, or even 4x its original resolution. If you simply want to fix a grainy video and don't need increased resolution, you can simply choose to "enhance the video quality" without upscaling the size.

Step 4. Export the fixed video. Experiment with different settings to find the best results for your specific video. Preview the changes before exporting the final version.
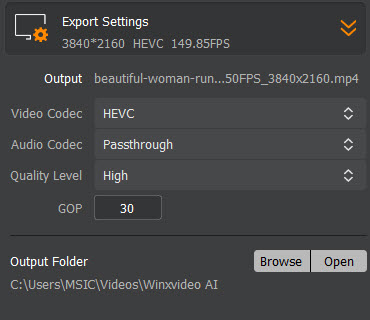
Then click on "Export Settings" to define your preferences for the output file. Here you can adjust the video codec, quality level, and choose the destination folder where you want to save the fixed grainy footage. Once everything is set, click "Run" to begin the process.
My Personal Experience with Winxvideo AI
I tested a low-light video clip using Winxvideo AI, and honestly, I was surprised by how smart it felt. It offers four AI models, and I used the Gen Detail V3 model. Even though there isn’t a dedicated "denoise" option, once I upscaled the video by 1x or 2x, the noise was intelligently recognized and naturally removed without losing texture. The video became sharper and cleaner, especially in darker areas. I also tried the frame interpolation and stabilization features, which worked seamlessly. For someone like me who isn't a pro, the whole process was incredibly easy — just import, choose a model, and let AI handle the rest. The denoising result looked natural and balanced, definitely beyond what I expected from an all-in-one AI tool.
Way 2. Remove Grain from Video with Traditional Editor Premiere Pro
While not specifically designed for removing video grain, Premiere Pro provides users with a suite of tools and effects to address graininess and enhance video clarity, such as Sharpen, Unsharp Mask, Lumetri Color, Noise Reduction, etc. To fix grainy videos in Premiere Pro, the best effect that can help: Median. It also integrates with other plug-ins and software, such as Neat Video and After Effects for more advanced grain reduction. Follow the guide and learn how to fix grainy video in Premiere Pro.
Step 1. Launch Premiere Pro and create a new project or open an existing one. Drag and drop your grainy video clip into the project bin or use the "File" >"Import" function.
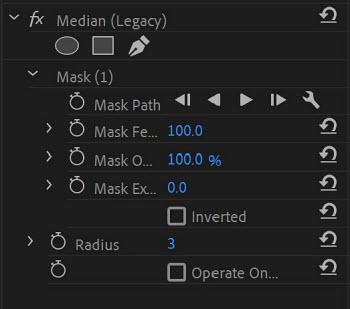
Step 2. Drag the imported grainy video to the timeline. Go to Effects > Video Effects > Noise & Grain > Median. Then drag the Median effect to the timeline. Then you can see the Median settings under the Effects Control panel.

Step 3. To fix grainy footage with Premiere Pro, you need to adjust the following Median settings:
- Choose Your Mask Shape: In the "Effect Controls" panel, select the mask shape that best fits the grainy parts that you want to clear up.
- Define the Mask Area: Using the "Pen" tool, draw the mask around the grainy area where you want to fix. Click to add points and drag to adjust the size and curvature. You can add more points to the mask using the "Pen" tool to create a more precise outline, especially for complex shapes.
- Soften the Mask Edge: Set the "Feather" value to around 100 pixels. This creates a gradual transition between the masked area (grain reduction applied) and the unmasked area (original video).

- Repeat for Multiple Areas: If necessary, create additional masks to target other grainy areas in your video.
- Adjust the Radius settings: Increase the "Radius" value in the "Effect Controls" panel to achieve a stronger grain reduction effect. However, a higher radius can also blur details in the masked area. Preview the changes as you adjust to find the best balance between grain reduction and detail preservation.
Step 4. Use the playback controls in the timeline to preview the effect of your adjustments. Fine-tune the settings by making small adjustments and observing the changes in the video preview.
Step 5. Once you're satisfied with the adjustments, go to "File" > "Export" > "Media" to export the fixed grainy video. Choose the desired export settings, including format, resolution, bitrate, and destination folder. Click on "Export" to render and save the fixed video.
Tips:
- Experiment with different settings to find the optimal balance for your specific video.
- The "Median" effect blurs the grain rather than truly removing grain from the video.
- Consider using masking if you only want to fix certain grainy areas of the video.
Also Check: How to Fix Out of Focus Video in Premiere Pro
My Personal Experience with Premiere Pro
Using Adobe Premiere Pro felt like stepping into a professional editing studio. The interface and settings were a bit overwhelming at first, especially for someone without much editing experience like me. It took quite a bit of time to learn which effects or filters to use for noise reduction. However, once I got the hang of it, the results were impressive. The grain in my video was significantly reduced while maintaining excellent detail. Although it's not the most beginner-friendly option, I could tell why professionals swear by it — the level of control and precision is unmatched.
Way 3. Reduce Grain in Video with Plug-in
Neat Video is a third-party plug-in for editors that is specially designed to reduce video grain, noise, flicker and other imperfections from videos. It excels at removing noise and grain from videos, leaving behind a cleaner, sharper image. It offers sample grain profiles for various camera types and shooting conditions. The whole process is powered by GPU acceleration so you can fix a grainy video effectively. It also works with other editors, such as Premiere Pro, After Effects, Resolve, Final Cut Pro, Vegas Pro, etc.
Neat Video can be expensive (e.g., from $79.90 to $144.90 for Premiere Pro), with various pricing options depending on your chosen edition. There is no free trial available.
Also see: how to make videos clear
Step 1. Launch Premiere Pro and create a new project or open an existing one. Drag and drop your grainy video clip into the project bin or use the "File" >"Import" function. Drag the imported grainy video to the timeline.
Step 2. While not strictly necessary, some users prefer to add a noise reduction effect to an adjustment layer instead of directly to the video clip. This allows for greater flexibility in fixing the grainy video later. To do this, click the "New Item" button in the project panel and choose "Adjustment Layer." Drag the adjustment layer onto the timeline above your video clip.
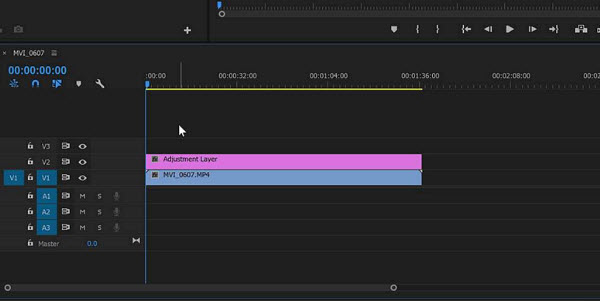
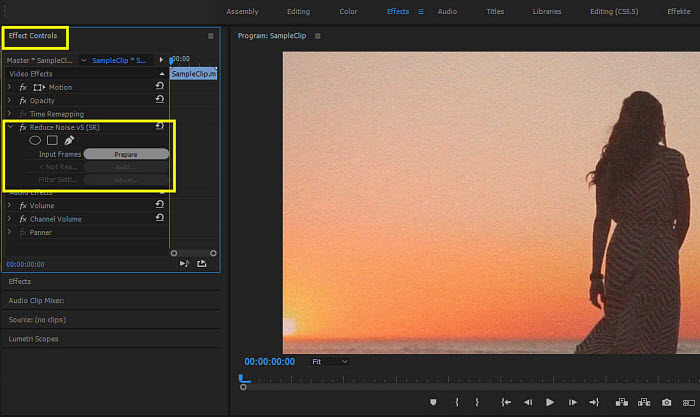
Step 3. Go to Effects > Video Effects > Neat Video > Reduce Noise v5 (SR). Then drag and drop the "Reduce Noise v5 (SR)" effect onto your grainy video clip (or adjustment layer if used).

Step 4. Click on your video clip (or adjustment layer) in the timeline to select it. In the "Effect Controls" panel, find the "Reduce Noise" effect settings. Click the "Prepare" button next to the "Profile" dropdown menu.
Step 5. Premiere Pro will open a new window for Neat Video. Choose a frame from your video clip that represents the most prominent grain using the preview window. Click the "Build Profile" button. Neat Video will analyze the frame and create a noise profile specific to your video's grain/noise characteristics.
Back in the "Effect Controls" panel within Premiere Pro, you can adjust various grain reduction settings in Neat Video:
- Noise Reduction: Controls the strength of the noise reduction effect. Higher values reduce more noise but can also remove details.
- Detail: Helps to preserve details while reducing noise. Adjust to find a balance.
- Sharpening: Can counteract some blurring caused by noise reduction (use cautiously).
- You can also explore other settings like "Spatial NR" and "Temporal NR" for more granular control over the noise reduction process.
Step 6. Use the playback controls in the timeline to preview the effect of your adjustments. Fine-tune the settings in both Premiere Pro and Neat Video to until you make the video less grainy. Then go to "File" > "Export" > "Media" to export the fixed grainy video.
My Personal Experience with Neat Video
After installing the Neat Video plug-in in Premiere Pro, I realized how powerful this tool really is. It specializes in noise and grain removal, and once I loaded my clip and analyzed a noisy area, it automatically built a noise profile that worked wonders. The video instantly looked much cleaner and smoother. It does require some fine-tuning, but the plug-in gives very detailed control — like adjusting temporal and spatial filters. It’s not as beginner-friendly as Winxvideo AI, but the final quality is superb. For anyone who already edits in Premiere, this plug-in is absolutely worth it.
Way 4. Clean up Grainy Video with Video Enhancer
Topaz Video AI is an AI-powered video enhancer that tackles the challenge of improving video quality, specifically focusing on: upscaling low-resolution videos, reducing video noise/grain, and sharpening blurry footage. If offers variuos AI models that are trained to clear up video grain, such as the Nyx Model and Artemis Model. It's based on advanced algorithm to produce natural-looking results.
However, the the high cost and long processing times might be drawbacks for casual users.
Step 1. Head over to Topaz Labs' website and download Topaz Video AI. Install and open it.
Step 2. Click on the "Add Media" button and choose your grainy video clip from your computer.
Step 3. To fix grainy videos, enable the Enhancement box on the right panel. Then you need to choose an AI model. Topaz Video AI offers various models for different video enhancement needs and the models that can help remove video grain are:
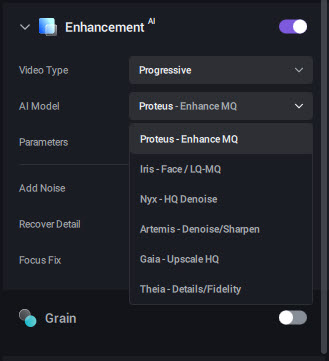
- Nyx - An AI model designed to denoise high-quality videos. Nyx is designed for high-resolution videos captured in low-light conditions with high ISO settings.
- Artemis: This model is specifically designed for grain reduction and video enhancement. It excels at removing video grain while preserving details.
- Proteus: Another strong choice for noise reduction, Proteus works well for videos with heavy noise or compression artifacts.
- Gaia: While not solely focused on noise reduction, Gaia can improve overall video quality and potentially reduce some grain in the process.
Step 4. Topaz Video AI provides a preview window to see the effect of your chosen model and settings. Play the video preview and adjust the settings until you achieve the desired balance between grain reduction and detail preservation.
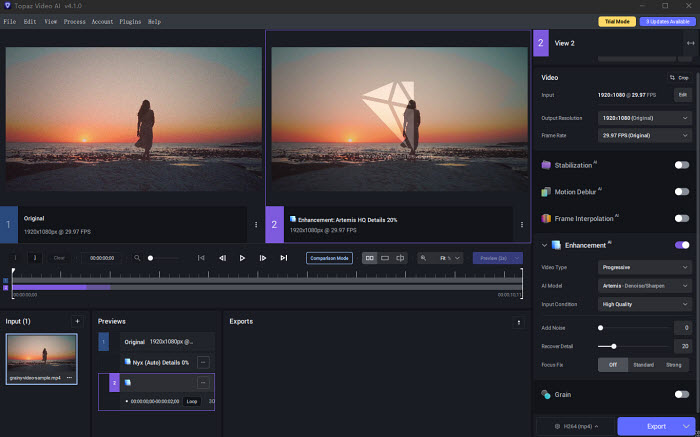
Step 5. Then click on the "Export" button. Choose your desired output format, filename, and destination folder. You can also adjust output settings like bitrate and resolution.
My Personal Experience with Topaz Video AI
Topaz Video AI impressed me with its denoising power, but it also came with a steep price tag. I tested it on the same low-light clip, and while the noise was almost completely gone, I noticed that some fine details — like textures on clothing — looked a bit too smooth, almost "plastic". The processing speed was decent, and the interface was simple enough to navigate. Still, for casual users like me, the price feels a bit high. It’s definitely a professional-grade solution, though I personally prefer the more balanced and natural output from Winxvideo AI.
Way 5. Reduce the Playback Window Size to Make Video Less Grainy
If you want a quick way to make your video less grainy without changing anything of your file, you can try decreasing the size of your playback window during viewing. When viewed in a smaller frame, the grain and noise become less noticeable, resulting in a cleaner and sharper visual impression. However, please note that this technique only improves perceived clarity. It doesn’t actually remove noise from the video itself. It works as a temporary fix when streaming or previewing grainy video.
My Personal Experience with Windows Size Change
This method is more of a visual trick than a real fix. When I reduced the playback window size while watching a grainy video, the noise became much less noticeable. It looked cleaner and more comfortable to the eyes. But of course, this doesn’t actually remove any noise from the video itself — it just hides it. It’s a good quick fix when previewing or streaming, but if I want to export or share the video, I’d still need proper noise reduction software.
Way 6. Make a Grainy Video Clear with Video Repair Software
Except the above-mentioned video noise reduction tools, you can also get rid of grainy video with Stellar Repair for Video, a renowned software specialized in repairing corrupted or damaged video files. It supports an unlimited number of videos shot from Canon, Nikon, Sony, iPhone, GoPro, DJI, etc. Whether your footage appears grainy, blurry, broken, choppy, jerky, broken, frozen, or flickering, Stellar makes it easy to restore smooth playback. Here is the guide about how to remove grain from video with Stellar.
- Launch Stellar Repair for Video after the installation. Click Add Videos in the main interface to add your grainy footage.
- After the video is successfully loading, you can click the Repair button. It will pop up a window showing Repair process completed, click OK. Please note that Stellar Repair for Video cannot reduce the grainy video if it is severely corrupted.
- Click Save button. You can watch the Preview of the repaired video before saving it.

My Personal Experience with Stellar Repair for Video
I tried Stellar Repair for Video out of curiosity, hoping it could fix some of my grainy clips. Unfortunately, it didn’t really remove noise at all. It seems designed more for repairing corrupted or broken files rather than enhancing visual quality. Some of my test videos even showed an error message saying they were "This video is severely corrupted and cannot be repaird", For grain or noise issues, this tool didn’t help much. I’d say it’s useful for technical file repair, but not for improving video clarity.
Part 2. Comparison Table of the 6 Ways
To help you choose the most suitable solution for your grainy video issues, we've compiled this comprehensive comparison table. Below you'll find key differences in functionality, ease of use, and ideal use cases across all four methods. This side-by-side analysis highlights each tool's strengths, helping you match your specific needs to the right solution whether you're a casual user or professional editor.
| Tool | Core Functionality | Best For |
|---|---|---|
| Winxvideo AI | • One-click AI super resolution, stabilization, frame interpolation |
Beginners and casual users seeking AI-powered automatic repair of grainy or low-light videos and detail recovery. |
| Premiere Pro |
• Manual denoising using Median effect, masks, and feathering • Precise control for local adjustments • Integrated with professional editing and color grading tools |
Professional editors with technical skills who need precise, local grain removal and require full creative control over noise reduction |
| Neat Video |
• Dedicated noise profiling & reduction • Adjustable spatial and temporal filters • GPU-accelerated rendering • Works as a plug-in for Premiere Pro, Final Cut, and other NLEs |
Advanced users who prefer detailed parameter tuning of heavy grain or high-ISO footage |
| Topaz Video AI |
• Multiple AI models (Artemis, Nyx, etc.) for denoising and upscaling • Good noise removal & detail preservation • Modern, easy-to-use interface with batch processing |
Users with larger budgets prioritizing medium noise reduction |
| Reduce Playback Window Size |
• Visually reduces visible noise • Does not process the video file itself • Quick, no-processing workaround for better viewing experience |
Non-technical users wanting instant clarity boost without editing or re-encoding. |
| Stellar Repair for Video |
• Repairs corrupted or unplayable files • Focuses on fixing structure and playback issues, not visual noise • No actual denoising or quality enhancement |
Users dealing with playback or format errors |
Conclusion:
The battle against grainy video has multiple fronts, each with its own champion. Whether you prioritize ease of use (Winxvideo AI), professional-grade control (Premiere Pro), specialized noise reduction (Neat Video), or AI-powered enhancement (Topaz Video AI), there's a solution waiting to bring your footage back to life. Consider the severity of your video problems, your editing experience, and your budget when making your choice. Don't be afraid to experiment with different tools – you might be surprised by the hidden gems waiting to be discovered in the free editing software you already own!
 FAQs
FAQs
Graininess (or "noise") typically results from:
- Low-light filming (cameras boost ISO sensitivity, creating sensor noise).
- High ISO settings or small camera sensors.
- Video compression (e.g., uploading to social media).
- Incorrect camera settings (shutter speed/aperture mismatch).
Three effective solutions:
- AI Denoising Tools: Winxvideo AI, Topaz Video AI for automatic grain removal.
- Editing Plugins: Neat Video for Premiere Pro/DaVinci Resolve.
- Basic Filters: In After Effects, use Effect > Noise & Grain > Remove Grain.
Yes! Free options include:
- Online Tools: Media.io or VEED for browser-based processing.
- Free Trials: UniFab Denoise AI (30-day trial). Click here to learn in-depth Unifab review>>
- Temporary Fix: Shrink playback window to minimize grain visibility.
For heavy grain situations:
- AI Tools: Topaz Video AI (Artemis/Nyx models) or Neat Video.
- Professional Editors: Premiere Pro with manual masking + Median effect.
Even 4K videos can show grain due to:
- Low-light shooting with high ISO settings.
- Over-compression during export/upload.
- Player incompatibility misrendering the file.


