Best OBS Recording Settings for High-Quality Recordings
 Mike Rule
Updated on
Open Broadcaster Software (OBS) is a powerful, free, open-source tool for video recording and live streaming. It offers a high degree of customization and flexibility, allowing users to create professional-quality content. However, with so many settings to tweak, it can be overwhelming to find the optimal configuration for your specific needs. This guide will walk you through the best OBS settings for recording, ensuring you capture high-quality video every time. Of course, if you’re struggling with the OBS recording settings, we also recommend you powerful OBS alternatives to help recording high-quality videos indeed.

- Part 1. Best OBS Settings of Recording
- Part 2. Understand OBS Key Settings That Affect Video Quality
- Part 3. Recommended OBS Recording Settings for Different Use Cases
- Part 4. How to Set the Best OBS Settings for Recording
- Part 5. Best OBS Alternative to Make Recording Simple Yet High-quality
- Part 6. FAQs about Best OBS Setting for Recording
Part 1. Best OBS Settings for Recording
To help you quick set the OBS settings for recording high-quality videos, let’s have a quick look of best OBS settings for recording. Follow the table below to grasp the ideal recording format for OBS.
| OBS Parameter | Best Settings for Recording |
|---|---|
| Video Encoder | X264 or NVENC |
| Bitrate | 2500-4000 Kbps for 1080p. High bitrate for better quality, balanced with file size and bandwidth |
| Rate Control | CBR |
| Resolution | Match your monitor's resolution. For example, 1920x1080 for 1080p |
| Frame Rate | 60FPS |
| Keyframe Interval | 2 seconds |
| Audio Bitrate | 128-256 kbps |
| Audio Sample Rate | 48 kHz |
| Preset | MaxQuality |
| Output Format | MP4 |
| Base (Canvas) Resolution | 1920×1080 |
| Output (Scaled) Resolution | 1920×1080 |
| Downscale Filter | Bicubic |
| Color Format | NV12 |
| Color Range | Full |
| Color Space | Rec. 709 |
Winxvideo AI is a versatile tool similar to OBS Studio for recording and sharing screen activities, online calls, and video tutorials. It offers granular control over the recording process, allowing you to capture only the desired elements, from your screen to your webcam output or audio. Additionally, it provides intuitive editing tools, allowing you to draw on video and edit after recording.
Part 2. Understand OBS Key Settings That Affect Video Quality
While you can refer to our recommended OBS settings for recording videos, the optimal settings may vary depending on specific scenarios, computer environments, and other factors. Understanding the parameters that influence OBS video quality will help you find the best configuration for your needs. The parameters outlined below significantly impact OBS recording quality. By experimenting with these settings, you can create content that stands out and resonates with your audience.
1. Video Encoder
In OBS, the video encoder is a crucial component that determines how your video data is compressed and processed. The choice of encoder significantly impacts video quality, file size, and CPU usage.
- x264: Offers excellent quality but can be CPU-intensive.
- NVIDIA NVENC: Hardware-accelerated, providing good quality with lower CPU usage.
- AMD VCE: Hardware-accelerated, providing good quality and performance for AMD GPUs.
2. Video Bitrate
The bitrate determines the amount of data used per second to encode the video. A higher bitrate generally results in better quality, as more information is retained. However, higher bitrates also lead to larger file sizes. A good starting point for 1080p video is 2500 - 4000 kbps, but you can adjust this based on your desired quality and storage constraints.
Learn More: Check the Best Bitrate Settings for OBS Recording >>
3. Resolution
The resolution specifies the number of pixels in the video. Higher resolutions, like 1080p or 4K, offer more detail but require more processing power and storage space. It's generally recommended to match your monitor's resolution for the best viewing experience.
4. Frame Rate
The frame rate determines the number of frames displayed per second. Higher frame rates, like 60 fps, provide smoother motion, especially in fast-paced content like gaming or sports. However, higher frame rates also increase the amount of data required, so you may need to adjust other settings accordingly.
5. Keyframe Interval
Keyframes are complete frames that can be decoded independently. The keyframe interval, also known as the Group of Pictures (GOP) size, determines how frequently keyframes appear in the video. A shorter keyframe interval can improve quality but increase file size, as the encoder needs to recalculate more frames. A good starting point is 2-4 seconds.
6. Base (Canvas) Resolution
The canvas size is the dimensions of the output video. It should match your target resolution to prevent stretching or distortion.
7. Output (Scaled) Resolution
The scale determines how your sources (e.g., game captures, webcam feeds) are resized to fit within the canvas. If you need to scale your sources significantly, it can affect image quality.
8. Filters
Filters can be used to enhance or modify the video's appearance. For example, you might use a denoise filter to reduce noise, a sharpen filter to improve image clarity, or a color correction filter to adjust the color balance.
9. Video Format and Color
Common OBS recording formats include MP4, AVI, MOV, and FLV. MP4 is versatile, while FLV is suitable for specific platforms. Choose a format that's easy to share and play. Select either "Partial" (16-235) or "Full" (0-255) color range. Full-color offers more vibrant visuals, while partial is often used for compatibility.
10. Audio Settings
Audio settings in OBS control the quality and format of your recorded or streamed audio. Adjust parameters like sample rate (e.g., 44.1 kHz), channels (e.g., stereo or mono), and bitrate (e.g., 128 kbps) for clear, professional sound. Moreover, enabling audio noise suppression can reduce background noise and enhance audio quality, especially in noisy environments.
Part 3. Recommended OBS Recording Settings for Different Use Cases
As above, different use cases can lead to different OBS settings. Tailor your OBS settings to match the specific scene and purpose of your content. This ensures optimal viewing for your audience while minimizing resource and bandwidth consumption. Let's explore recommended OBS settinsg for recording of common use cases.
Best OBS Settings for Screen Recording Tutorials
- Video Encoder: x264 for compatibility and consistency. NVENC if available.
- Bitrate: 2500-3000 kbps for a balance of video quality and file size.
- Resolution: 1920x1080 for clarity, but 1280x720 can suffice for basic tutorials.
- Frame Rate: 30 fps for most tutorial videos.
- Audio: 128 Kbps for clear voice narration.
Best OBS Settings for Gameplay
- Video Encoder: NVENC if you have a supported Nvidia GPU; otherwise, x264.
- Bitrate: 5000-8000 Kbps for 1080p; consider 12000-24000 Kbps for 4K.
- Resolution: 1920x1080 for Full HD; 2560x1440 or 3840x2160 for higher-end content.
- Frame Rate: 60 fps for capturing fast motions, like Black Myth: Wukong fight scene.
- Audio: 160 Kbps to capture both game sounds and commentary clearly.
Best OBS Settings for YouTube Streaming
- Video Encoder: x264 or NVENC, depending on your GPU and preference.
- Bitrate: 4000-6000 Kbps
- Resolution: 1920x1080 for a standard stream.
- Frame Rate: Depending on the contents, 30 fps for talk shows or low-motion content; 60 fps for gaming or high-motion broadcasts.
- Audio: 128-160 Kbps
Best OBS Settings for Video Calls & Conferences
- Video Encoder: x264 for broad compatibility across devices.
- Bitrate: 1500-2500 Kbps for a clear image without network strain.
- Resolution: 1280x720 for smooth video calls
- Frame Rate: 30 fps
- Audio: 128 Kbps for clear voice.
Best OBS Settings for Low-end PC
- Video Encoder: Use x264 for a balance of quality and performance.
- Bitrate: Start with a lower bitrate (1000-3000 kbps) and adjust based on performance.
- Resolution: Consider lower resolutions like 720p or 480p to reduce processing.
- Frame Rate: Lower the frame rate to 30fps or even 24fps to decrease data processing.
- Audio: 128 Kbps
- CPU Usage Preset: Prioritize performance by setting "Very Fast."
- Color Range: Set to Limited.
- Recording Format: Choose MP4 for efficiency on low-end systems.
Part 4: How to Set the Best OBS Settings for Recording
Now that we've covered the optimal OBS settings for different scenarios, it's time to put them into practice! Let's dive into a tutorial on how to configure your OBS settings. We'll walk through the Output, Video, Audio, and advanced settings step by step.
Output Settings
- Go to "File" in the top-left corner of OBS and select "Settings."
- Navigate to the "Output" tab in the Settings window.
- Choose "Advanced" from the Output Mode dropdown and select your preferred recording format (e.g., MP4).
- Specify the location where you want to save your OBS recordings.
- Select "x264" as the Video Encoder and set a Bitrate of at least 8000 kbps for 1080p.
- Set a Keyframe Interval between 2 and 4 for most scenarios.
- Set the CPU Usage Preset to "Faster."
- Switch to “Audio” column to make changes to the audio bitrate based on your requirements. Higher value leads to better quality and larger size.
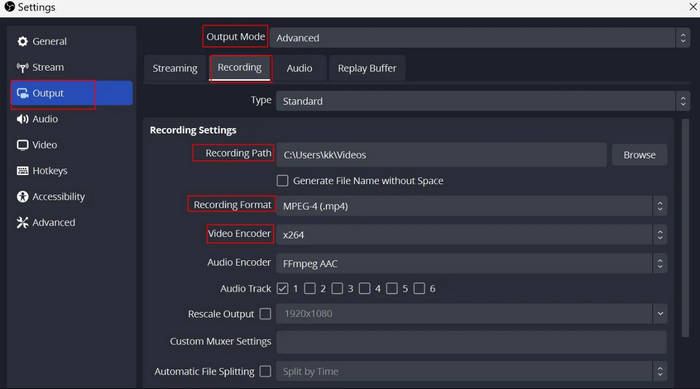
Video Settings
- Navigate to “Video” column at the left in the Settings window.
- Set your Base (Canvas) Resolution to your monitor's native resolution or the desired recording resolution.
- Choose the Output (Scaled) Resolution based on your target platform and audience. Consider 1080p for high-quality recordings if your hardware allows.
- Select the desired Common FPS Values for your recording. 60 FPS provides smoother motion, while 30 FPS is suitable for standard videos.
- Select a downscale filter like Bicubic or Lanczos for better quality, but be aware of increased processing demands.

Audio Settings
- Press the "Audio" tab in the Settings window.
- Choose your desired sample rate (e.g., 44.1 kHz or 48 kHz) for audio quality.
- Choose "Stereo" for most recordings. "Mono" is suitable for smaller file sizes.
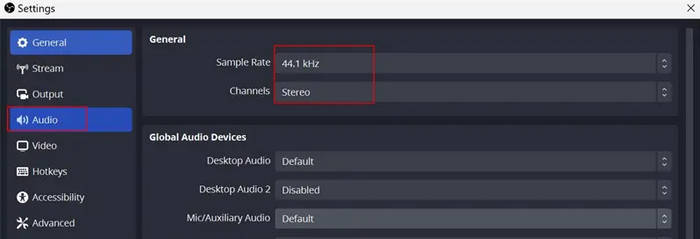
Advanced Settings
- Go to “Advanced” option in Settings window.
- Set Colour Format to NV12 for optimal performance and compatibility.
- Use “Full” color range to get the most vibrant and accurate colors in your recordings.
- Choose “Rec. 709” color space for most modern displays. If you’re using older screens, Rec.601 is a good choice.
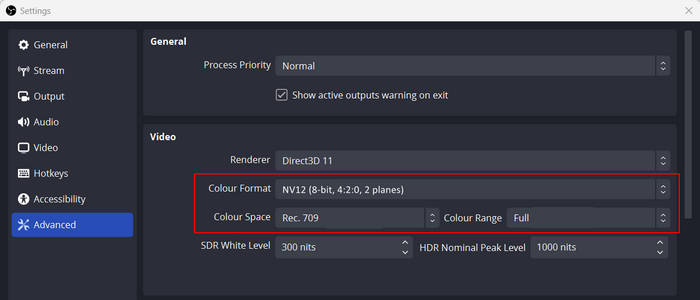
After configuring the desired recording settings of OBS Studio, click "Apply" to save your settings and "OK" to close the Settings window. With your optimized OBS settings, you're ready to capture high-quality videos.
Part 5. Best OBS Alternative to Make Recording Simple Yet High-quality
If the complexity of OBS settings is wearing you down, consider switching to an OBS alternative. Winxvideo AI is a great option, offering a simpler setup without sacrificing video quality. This OBS alternative offers three versatile recording modes: screen recording, picture-in-picture, and webcam. You can capture videos in stunning 1080p or 4K resolution, with frame rates up to 60 FPS. It has no limit on recording time and size, but offering handy editing features like trimming, merging, cropping etc. Besides, you're able to export recordings in various formats like MP4, MKV, or MOV for seamless sharing.
 Free Download
 Free Download
Winxvideo AI is for PC, while Macxvideo AI (from our MacXDVD brand) is for macOS.
Step-by-Step Guide to Record Video with Winxvideo AI
Step 1. Download and install Winxvideo AI.
Download and install Winxvideo AI. Launch Winxvideo AI and open your desired screen to be recorded, such as Black Myth: Wukong game.
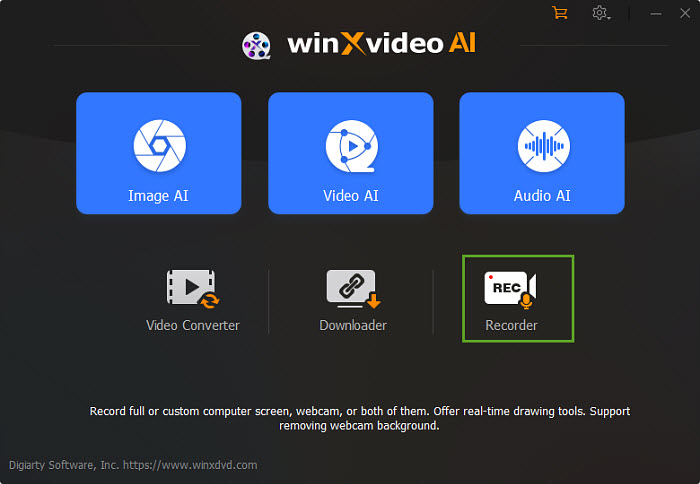
Step 2. Set the Recording settings.
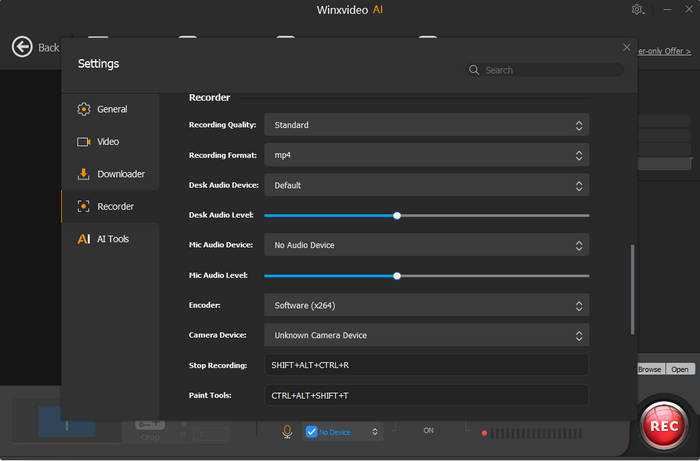
Select the "Recorder" option in Winxvideo AI. Click the "Screen" button to capture your gameplay. Then click on the gear-shaped “Settings” button, where you can set video encoder, format, audio and more.
Step 3. Start Recording
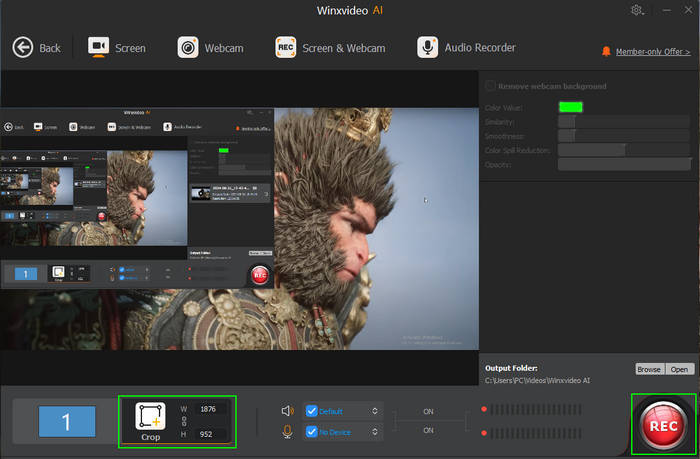
Set the Crop width and height, audio and microphone. And click the "Browse" button to select an output folder. Then tap the “REC” button to start recording, and stop recording when finished.
 Part 6. FAQs about Best OBS Setting for Recording
For 1080p video at 60 frames per second (fps), a bitrate between 6000 and 10000 kilobits per second (Kbps) is generally recommended to ensure high-quality video. This range offers a balance between image clarity and file size, allowing for smooth playback without excessive buffering or distortion.
- Video Encoder: NVENC (if available) or x264
- Bitrate: 8000-12000 kbps for 4K60fps, 4000-6000 kbps for 4K30fps
- Resolution: 3840x2160
- Frame Rate: 30 or 60 fps (depending on your hardware and desired quality)
- Keyframe Interval: 2-4 seconds
- CPU Usage Preset: Faster or Very Fast
MKV is often the preferred format for OBS recordings due to its versatility and reliability. It supports various codecs, handles complex setups, and is less susceptible to corruption. Plus, you can easily convert MKV files to other formats like MP4.
While MKV is a strong choice, consider these alternatives:
- MP4: Widely compatible but less robust for long recordings and prone to corruption.
- FLV: Offers good compression and fast recording speeds but has limited compatibility.
OBS recordings can become laggy due to factors like an overloaded CPU, insufficient GPU, network issues, incorrect OBS settings, or hardware limitations. Before fixing the laggy issue, you need to figure out what causes it indeed.
Related article: 17 Fixes for OBS Encoding Overloaded while Streaming or Recording
The quality of your OBS recordings is significantly influenced by your computer's hardware and the capture settings within the application. If your graphics card is old and you're trying to record in 1080p at 60fps, don't be surprised if the video looks blurry.


